Explosion Box - Fleur Fun

11:00 am Chirali Shah 5 Comments

Hello people!
Chirali this side with the evergreen explosion box made with the Fleur Fun paper stack from Papericious. This pack has an amazing colours and flowers and as usual, a fussy cut sheet is the best part.
So here it is:
Here is the look when it is open. I have made a small box inside the main box to keep some small gifts or chocolates etc.
Some detailed pictures:
I have added a lots of small fussy cut flowers and leaves and butterfly along with the beautiful chippies topped with Soft Rock Chalk Paint and then Frosting Powder.
The closeup of the box inside.

Supplies used:

That is it for the day.
Thanks for stopping by!

Hugs,
Chirali :)

5 comments:

Tutorial : A Gift Card Holder with Jack and Jill

11:00 am Parul 0 Comments


Hello girls!
There are numerous occasions when we struggle to find a right gift for someone, right? How about gifting a gift card from that person's favourite store! I love gift cards because they give me the freedom to spend as I wish 😉 And this option becomes even more meaningful when you are looking a gift for babies. When babies are born, they are showered with so many gifts from everyone, and the new parents end up having multiples of everything 😃😃

So for today's post I have designed a gift card holder which will give a personal touch to your gift card. And here it is:
Isn't it cute?
The Jack and Jill Pattern Papers are so apt for this theme. They are gender neutral as well which makes it a win win situation :)

Tutorial
Step 1
You need to take a 4.25" x 8" blue card stock and score it at 2" and 5"

Step 2
You will need 2 pieces of 4"x1.75" pattern papers of your choice
and 
You need 3 pieces of 4"x 2.75" pattern papers of your choice

Step 3
Fold on score line and round the corners of the 2" flap. as shown in the picture.

Step 4
Now start pasting the pattern papers. How ever you can stick them however you want but I prefer to have a light pattern to write wishes in this holder as shown in the following picture.
Once all your sides are ready, we can proceed to make our belly band.
Step 5
Cut a 1"X 7" stripe from a contrast colour card stock. And incase you are using a 6" paper pack you can join two stripes and make a longer one as I did. Please ignore my dirty crafting mat 😬

Score this strip at 3" and 6" and join both end with help of adhesive.
Our belly band is ready now and we move towards embellishing it.

Take two circle dies 0.25" diameter difference and cut a circle from blue card stock (same as base) with bigger die.
The Jack and Jill paper pack comes with a very beautiful elements sheet. So I took my smaller die and cut that cute start from that sheet. stick smaller circle to bigger circle and adhere to belly band.
And thats it! Our cute little gift card holder is ready!

And this is how a gift card inside this holder looks like. You can use any double sided tape to stick it.
Do let me know if you like this. I had so much fun while making it!

Supplies Used:

Thank you for stopping by!
Love,
Parul

0 comments:

Flip Flap Album - Tutorial with SWATI

11:00 am swati nahata 0 Comments


GOOD MORNING! 

Swati here from Swati's Crafting World, Guwahati saying Hello to everyone. Today I am 
back with a new step by step pictorial showing how to create a album by yourself. This album features FLEUR FUN Paper Pack. 

FLIP FLAP ALBUM : 

A book of memories : a heartfelt gift, perfect for any occasion. It's a beautiful concept of card
 that has a lot of space to fit your beautiful memories. This card can house more than 
10 pictures and/or tags.

Isn't this wonderful? On to the Tutorial :

Cover Size of the album : 6 by 6 inches & the album pages are 5.3/4 by 6 inches.
1. 6 by 6 inches - 2 pcs.
2. 6 by 12 inches - 1 pc.
( Score at 2 5/8, 3, 9 & 93/8 inches from 12 inch side.) 
3. 5.75 by 12 inches - 3pcs.
( Score at 3, 9 inches from 12 inch side.)

Once the scoring of the album is done, we need to paste the 5 3/4 x 12 inches cardstock one after another to create flaps.

Detailed Picture :


After we're done with creating the flaps, the next step is to create the album cover. We need to paste the 6 by 6 inches cardstock on the 6 by 12 inches. After scoring is done, paste 6 by 6 pc on top of both the ends which measures 6 by 2 5/8 inches. The base of the album is ready.
 The next step is to add magnets to the cover album. Now cut the pattern papers 
accordingly & paste them.

Detailed Picture :


For decorating the cover I've made a small pocket & tags.
Pocket of size - 4 by 3 1/2 inches.
Tags -  3 1/2 by 3 inches,
                3 by 2 1/2 inches, &
            2 1/2 by 2 inches.
If you want you can add more tags, I've added three. I've also fussy cut some peonies & leaves
 from FLEUR FUN Paper Pack & added them to the cover to give a lustrous look.

Detailed Picture :


CARD LAYOUT :


SUPPLIES USED :


I hope you liked it! Hope you guys will surely try this. 
That's it from me today.
Thanks for stopping by.
Love 

0 comments:

Cloud Hanging - Jack & Jill

11:00 am Chirali Shah 0 Comments


Hello people!

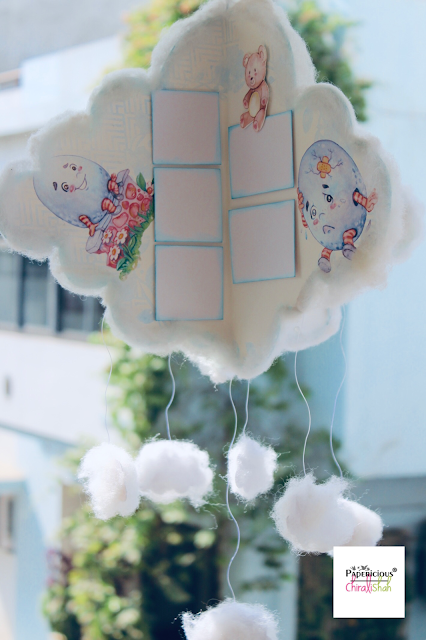
Chirali this side with a cute room decor project for kids' room using Jack & Jill Paper Pack. It's a cloud shaped hanging which would have photos too.

Here it is:
I cut four same shaped clouds from four sheets of Jack & Jill paper pack and stuck them, after folding in half, to each other from their back. 

First I cut a cloud on one sheet after drawing on the back. (12x12 pack it is which will make this hanging of almost 11x11 inches. Then I put it as it is on another sheet. For rest of the two sheets, I flipped the first cut cloud so that I can stick them as shown in the picture.

Afterwards, I put some photo mats and added fussy cut elements from the same pack. At last I added cotton on the edges and some small cotton clouds as hanging, and DONE.

Here are all the sides of the hanging along with some different angles:


Some closeups to make them look a proper cloud:


A mirror effect, which I clicked just like that but I loved it afterwards:


You do not need any other thing to decorate your project when you have such a beautiful paper pack.

I hope you liked it.
Thanks for stopping by.

Hugs,
Chirali :)

Supplies used:

0 comments:

Dream Little One - Layout using Jack and Jill

11:00 am Erum Tasneem 3 Comments


Hi there everyone! Erum here today and I have a cute layout to share with you!
This layout features the new Jack and Jill paper pack.

When I first saw these papers, I knew I had to make a layout using this photo of my nephew I took while he was sleeping and smiling!
So I started first with the blue starry paper, tore it to add interest. I adhered it with foam tape on a lighter blue dotty paper. 
Next, I printed the photo and fussy cut all the elements from another paper. I popped up the photo and arranged all the elements. Oh, these elements are SO stinkin' cute! 

I then watercoloured a panel in yellow and die cut the word "dream" and printed out "little one".

I tucked in the spare yellow watercoloured paper in some places. In the end, I used White Chalk Paint to color my Square Collage chipboard pieces. The White Chalk paint is a life saver. This is the first time ever that I achieved such a polished, clean coating on my chipboards!

I also added very diluted chipped sapphire to give it a more "me" feel.
I hope you liked it! I had fun making it and I wanted to do so much more but I have fallen sick.
See you soon everyone!


3 comments: