Hope you are enjoying viewing lovely planners by Papercious Design team,
here is my version...
I've got this Vintage theme - Retro Chic Planner and I am loving it!! It has some beautiful papers and planner elements.
I would like to share with you ... how do I use pockets in my planner?
I pick out my favorite supplies and stuffing them into my front pocket.
A full pocket is one that will help me throughout month.
I keep the current month section in the front, you will notice, I've February month tab. I made it with diecuts which are available in Planner kit. I've also kept small note cards, sometimes need them to write immediately. Next there are Mini washi tape bookmarks and sticker sheets.
I wanted one more pocket in my planner so I made my own with Papericious Infinity paper pack.
I made small pocket, distressed the edges and punched the holes to add it in my planner.
Papericious Retro chic planner has one pocket making paper sheet. I made two pockets out of it and adhered them on my large pocket to keep small things like tags.
In my large pocket I kept planner stamps, enamel dots, and more stickers.
Here’s a look at how the whole thing works together.
Next.... how I added tabs to planner from Planner set
This set also contains tabs.... as I said it is wonderful planner set!
I cut them, and attached according to the month sections...
Here are inside pages
Aren't these papers Gorgeous!!
Oaky.. we can make tabs for other sections like Goals, projects, Ideas... and many more!
Hope you liked my post and got inspired!
Do try Papericious Planners available in many Indian Online stores!
This is Hussena here and today I am sharing with you all the different accessories and stickers that you get with the Papericious Retro Chic planner and how to use them.
First let's have a look at what you get along with the Retro chic planner :
As you can see above, you get 3 sticker sheets and one journal tabs/tags sheet with your planner.
Here's a closer look at all the 3 sticker sheets when taken out of their packaging :
The sheet on the left hand side is the icons and tabs sheet. It contains various stickers for your day to day use and I will be showing you how I have used them in my below pictures. The sheet in the middle is a clear sticker sheet with some fun sentiments and images and when you stick them on paper they seem almost like stamped images.
The third and the last sheet on the right hand side is the hole-guard sheet and it helps to reinforce your planner pages. See the picture below to get an idea on how it's used :
The brown circle you see below the binder rings are the hole-guards.
Now moving on to how to use the Icon and tabs stickers in your planner. Here's how I have used them in mine :
This is the monthly spread page and the dollar icon on the first represents the due payments that I have to make on the first of the month. The telephone icon against my mom's doctor appointment is self explanatory..Also notice that I have highlighted certain dates by using colored round stickers. These were actually punched from a colored cardstock. I have also done some stamping to highlight certain important dates.
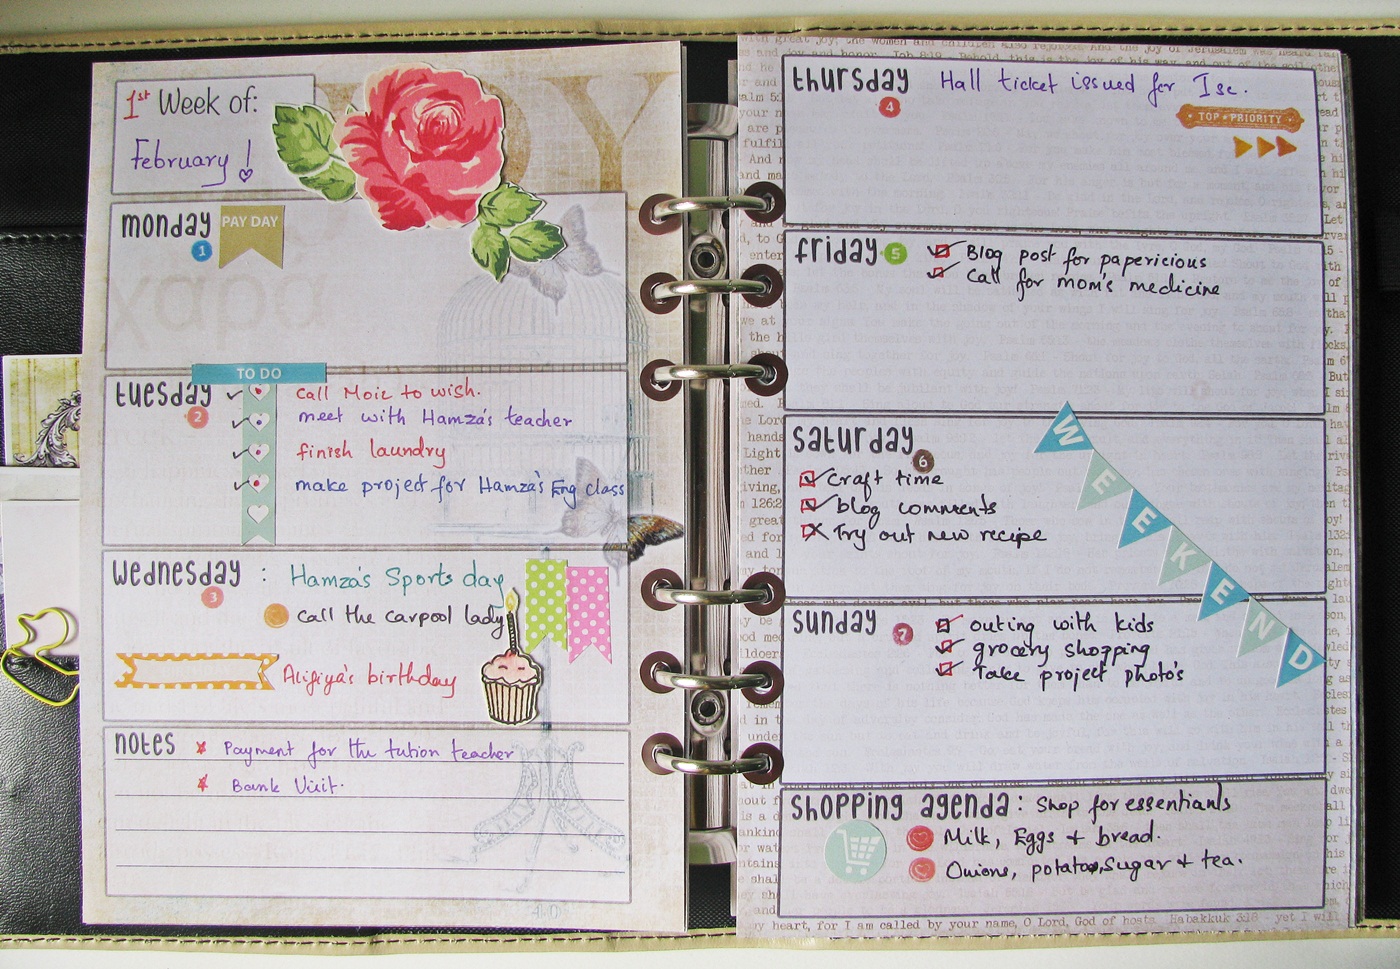
This is my first week spread for the month of February. Here I have used a couple of stickers, washi tapes and stamping to make my page more colorful.
As you can see, I have used the 'Pay Day' icon sticker for the first of the month when I supposedly get my salary :)...You can use this on any date on which your payday falls though. The blue 'To do' sticker along with the horizontal 'heart checklist' sticker is to note down the tasks for the given day or even the tasks you have to do in the particular week.
There are small 'Happy birthday' banner stickers included in the icon sheets to help you highlight the birthdays you want to remember of your family or friends.
The Weekend highlighter sticker.
The shopping cart icon sticker.
This is the second week of Feburary page and I have highlighted the Valentines' day with a quote taken from our If Only collection.
I have used the transparent stickers on the dotted washi to highlight the important task I had to do before V-day.
The Instagram icon.
The dinner icon and the 'To buy' tab.
And lastly, the blog challenge page and I have embellished it with a few die cuts from our Infinity collection and Golden Garden collection.
Hope you find this info useful for using the stickers in the Retro Chic Planner. If you have any questions regarding any of the icons stickers, do let me know in the comments and I will get back to you ASAP.
Thank you so much for joining me today and have a nice day everyone :)
Manu here, and my post today is all about the January 2016 release from Papericious which is none other than the much awaited PLANNERS!!! What more, the planner has 2 styles!!! One is a very colorful Color splash and the other is a heaven for Vintage lovers, called Retro Chic !
Planners is the new found interest everywhere and what better way to plan and keep track of all the important things than the planner! It really helps to keep all things at one place and I know this for sure since I had been using a planner (a printable from the internet, which I'll also show in the video) since november 2015 and it really helped me in keeping a track of my To-do's and I also used to jot down a few memories, anything that happened which would be worth visiting over again. With multi tasking, I was kind of forgetting things to do and using the planner was kind of a boon to me!! I owe a lot to this.
I'am going to show you the planner in action, there are 2 video's. I had taken the first video which is a complete picture of how the color splash planner looks like and what all accessories comes with it. This was taken before I started working on the planner when I received it around mid Jan.
The other video captures how I have used my planner to keep track of the stuff I want to remember and my day to day professional and my routine! (I had started designing the same as soon as I shot the first video, it's exciting to set up the planner and I had seen numerous posts off the internet on how to plan !! So, I had in mind the way I wanted to set it all up! ). I have also made some additions to the planner as per my plan of setting up the planner, you can see those in the video and the pictures below too!
Checkout the first view of the planner here :
Here's the video of the planner in action !!!
( Sorry about my voice, I'm down with a little cold and cough !! )
I also have pictures of each page in the planner to see how and what goes where!!
There are a lot of pics, so sit back and enjoy!!!
This is the color splash planner, I love the pastel pink shade it has and I did purchase some writing accessories to go along. Some coloured pens and a few neon tape rolls, that I thought would blend perfectly with the planners!
I have kept all the planner accessories on the left behind the pocket for easy access. I also make 2 bookmarks with the journal cards that comes with the planner.
Here's a pic with the complete planner accessories !! I love this planner for its very colorful and vibrant!!
Now, here are some additions that I made for my planner! Since the planner did not had additional pages so I added a few pages, this one is the Vellum sheet that I added as per the planner measurement, and embossed some nice quotes!! These quotes are from the technique tuesday stamps!
I also added this sheet on the right from another papericious paper stack (color conceptions) and the journal card is from a simple stories pack!
Now this is the back of the extra A5 papericious sheet that I added and I had decided to use this blank page for the introduction. Since there was no page which indicated that 'this planner belongs to' I added these 2 sheets to utilize the area!
I stamped a few quotes along with my handwritten quotes and some washi tape to make it look brighter and in sync with the color splash theme of the planner! the stamps are from one of the Heidi Swapp stamp sets!
The Bee awesome is a printable that I had from long ago and this went very well with my planner!
I wanted to keep a few goals and resolutions I had for this new year 2016(we all make those resolutions, right), but I wanted to keep remembering it everytime I worked on the planner and there's no better way to jot them down and keep seeing them!!! The planner does have a year goals page (which is consistent for all months, but then I used the first one for the year goals and the rest, I'll be using for the monthly goals.
I also added a small panel here from another journal collection to jot down things I love doing!!
That's the year 2016 goals page that comes along with the planner! Still not complete, coz there are always more ways to plan and learn.
This is the monthly insert and I have used a couple of stamps, some washi tape to make it look more brighter and eye catching!! the best thing about these planners are that they come undated, so you can start wherever and whenever you wish to!
This is the weekly page!! I started off using the planner for FEB and have clear defined work to do this week. The slots for next week are partially filled, but I do have a pic for the same too!
Since there was ample of space to write down for each day. I divided my space in 2 halfs, to keep my personal and professional work apart and not mix them! (I know I mixed it all up here, but that's what I'm gonna remember in the future to keep them seperate) I also plan to use the right hand side of each day for keeping track of the shopping list that I have! so this basically serves the purpose of 'No shopping/Notes column' with the color splash planner (I know there's one in the Retro Chic planner)
Here's a closer look at the weekly page!
The whole Idea of using the planner is to be organized and keep track of the things to do, but that does not mean that you need to do it the mundane way!! Do it the BRIGHT and the COLOURFUL way!!!
This is my next week and you can see that I have it partially filled, but it's soon gonna get it's share!!
The Blogpost page is the one where I keep track of the blog posts that I need to do for my own blog and for the design teams that I'm a member of!! So I have the dates on which my posts is scheduled along with a little hint of what the post will be all about!
This is the complete COLOR SPLASH planner kit and I must say that this one is very colorful with bright and cheery colors!
I do hope you all will be inspired to use planners henceforth for planning out stuff and keeping track of the things!! I know it can be a tiring thought to think about the stuff to do and then jot it down also, but give it a try, this seems a little difficult at first, but just about 10 mins of daily planning can help you do a lot of things at proper times and save you from untimed hassles!!!
Be sure to get back to this space, we will have more inspiration from our DT members soon with their take on the planners and it's all about planners this month. With lots of inspiration and reading I'm sure you will love it all!!
Papericious is a vision started as a result of lack of craft supplies in India. This MADE IN INDIA production was started to provide craft supplies at affordable prices and best quality to all the international craft market. Starting from Scrapbook Papers, we have made beautiful Chipboards, Laces, Fabric Flowers, Art Mediums, Die Cuts, Stickers, Planner Kits etc. This journey is just 3 years old but has many many miles to go. Stay tuned with us, we have a lot surprises to pamper your crafting needs