An Altered Tin Tutorial with Infinity! ^__^

10:35 am Unknown 6 Comments

Hello and Good Morning! ^__^

On this last day of 2015, I (Halak) am going to take you through a fun tutorial.

I altered a Tin Box!

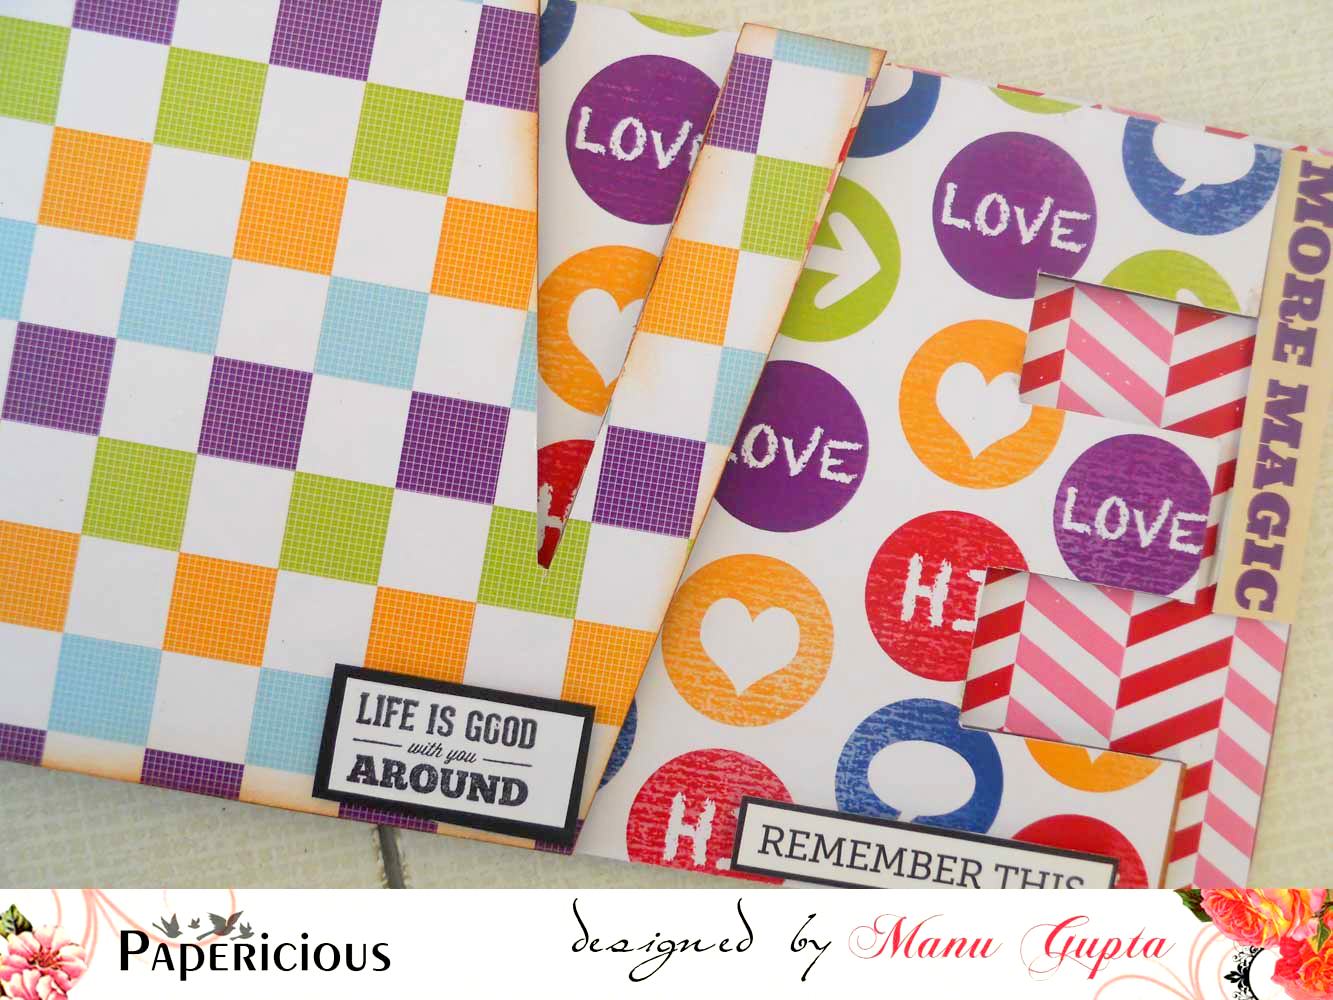
Stuff I used for this apart from the tin box : Papericious Infinity Collection Papers, Die-Cuts and Flairs, plus some washi tape, sequins, a flair from an earlier Papericious release, a stencil with some ink + Papericious Blending Tool, a tiny green flower and some Die-Cuts from Papericious Often Collection.
(I kinda converted this altered tin into a photoframe of sorts for me so... yeah, that's my childhood photograph. Lol!)

Adhesives : Industrial strength tacky tape and PVA glue (Fevicol).
(Yes, you can also use Mod Podge, I just used these cos I am comfortable with them more than Mod Podge).

Let's get to the steps :

1. I took an old tin box that I had at home. (You can use any old metal box that you fancy.)

The reason I used a tin box is because they are easily available and it's metal.
Metals and magnets are a match made in crafty heaven! :D

So, here's the tin box, all shiny and clean.

2. See how the edges are rounded?

The next part is cutting up the paper to size for laying it inside. I also rounded the edges using a corner rounder (size : L) but if you don't have one, fret not, just cut it by hand. If it doesn't turn out okay, you can always cover it up with some embellishments!

Here is also a picture of the die-cuts that I worked with. (I figured one butterfly was looking too lonely all by itself, so later I fussy-cut another one from the GORGEOUS Infinity papers to give the first one some company! ^__^ )

3. After this I tore some pieces of paper from the Infinity stack to layer on my original piece.

Aren't these pretty! I absolutely LOVE that pink bloom!

4. Then I took a stencil and did a bit of stenciling on my original base using the Papericious Blending Tool. You can check it out in this cool close up.

5. Then I adhered the three hand-torn pieces (from another sheet out of Papericious Infinity Paper Pack) to my base (using Fevicol) and started working with the die-cuts and flairs, moving them about and deciding how I liked them best.

Note : I was pretty generous with the Fevicol, because I didn't want anything to come off, so the paper has warped a little, but fret not, once you glue it to the base, everything will be awesome and aligned.

I decided to adhere stuff to my base first and then adhere the base to the tin because, it was my first altered tin and I knew I would be highly uncomfortable gluing things down after the base is adhered to the tin.

So, once I was happy with how I wanted things, I adhered them to the base (using Fevicol) and then, adhered the base to my tin (using Fevicol + Industrial strength tacky tape).

Ah yes, the benefits of tin. I added a small magnet to my picture and boom. You have an altered tin / photoframe!! How cool is that!

So, that's about it dear friends, I hope you enjoyed reading this, see you next year and, I hope that 2016 brings you all a lot of happiness and joy!

Last but not the least, here's another close up!

Till next time dear friends! *Hugs*


Posted via Blogaway

6 comments:

MDF LOVE album using the OFTEN pack

11:00 am Manu Gupta 1 Comments

Hello Everyone!

I'm Manu and this is my last post for 2015!!! 2015 has been an incredible year for me and I have learnt and absorbed a lot of things!! More so because I have fallen in love with what I do more and I hope this fascination and love towards my work continues in the new year too!!! 
Papericious has came out with 2 smashing collections in December and both are something to swoon on!! I loved working with the Infinity paper pack and you can view my desktop calendar here.
The other pack launched was OFTEN and my fellow DT members (a few of them) have already made amazing creations using it. 
I have made an MDF LOVE album using the OFTEN pack. I love this pack for it's bold look and very vibrant and rich colors! Lets checkout my take !

Sit back, Coz I have lots of pics to showcase the collection!


I do admit, it was hard for me to cut through this pack!
*sigh*


Couple inside shots!


I kept the insides to bare minimal coz I wanted to showcase the patterns and that the papers are totaly yumm!


Above were a few closeups!!! 


I totally loved the rich and vibrant colors on this one and couldn't help resist myself from cliking soo many pics!

I however do hope that you all liked my creation and yes, this pack is a must have in your collection!

Here's wishing you  A Very Happy New Year and that all your wishes come true!!!

See you around in 2016!!!
Happy Crafting!
Manu

1 comments:

Altered Diaries using 'Often' Collection with a Tutorial

11:00 am Hussena 12 Comments

Hello everybody,
This is Hussena here and I have some really quick and easy gifting ideas for the New Year. I'm sure most moms would agree that they would like to give a lil' something to their childrens' teachers or their hubby's clients. These altered diaries would make a perfect gift. The papers in the 'Often' collection are really very bright, peppy and trendy and they mix and match really well. The die-cuts that have been introduced with the paper packs make the perfect accents to dress up these diaries. Here's a look at two of these altered diaries that I have made:
(Scroll down below to check out the step by step tutorial on how I went about creating it).

 Diary one

A look at the inside of the diary:

The last page of the diary. The tags are die-cuts from the Often Collection.

A look at the back of the diary.

Diary two

Here's how I have embellished the inside of the diary.

This is how the last page of the diary looks like.
 
This is an inside page with a photo mat to include those special memories.

I have punched out circles and cut them in half to create these tabs on the side. These circles were punched out from all the left over scraps from the Often collection.
 
The back of the diary. 


 Now here's a simple  tutorial on how I went about creating this Altered diary :
Step 1 : Choose the pattern paper of your choice and measure and cut 2 pieces for the front and back of your diaries ...Just take an extra inch to your measurement as it will help to neatly fold over your paper.
      
 Step 2 : Cover the entire front cover of your diary with Mod Podge and also the back of your paper and glue it together.

Step 3 : Once you have glued the paper to the front of your diary, open it up  and cut a small slit on the corners of your paper as it helps to fold the paper easily and gives a finished look (As shown in the below picture).

 This is how it looks once you fold over your paper :

Step 4 : Now cover the back of your diary with Mod Podge and cover it similarly as shown in Step 2 and 3.

This is how your diary will look once it is covered :

Now to cover the spine of the diary cut an paper measuring 2 inch in width and the length will be the length of your diary cover. ..Mine was 8 inches so my dotted paper strip measures approximately 2 inches by 8 inches. Glue it over the front and back sides of your cover and now your diary is ready to be embellished.

A look at both the diaries together!

And this is how both the diary cover's look once I finished embellishing them. In both my diaries, I have used papers from the Often collection and have used die cuts from both Often and Infinity collections to embellish it further.

Hope you like my work and find the tutorial helpful.
Please do leave me your feedback as I love hearing from you :)
Have a nice day everyone!

12 comments:

Mixed media plaque using Infinity collection

9:45 am kavitha 3 Comments

Hello everyone,
 This is kavitha here today and i have a small tutorial to share for making this wall plaque with mixed media background.I have used "Infinity" collection for this project.As you may have seen already ,this collection is super gorgeous and  have some beautiful coordinating die cuts and flair buttons.


So lets get started
First i applied a coat of gesso on the wood.Then started sticking some pattern  papers in random way using mod podge(instead of sticking it as single layer this gives more texture for the base).The paper has some amazing textures to it which  suits mixed media very well.


Then i applied a coat of water downed gesso  to tone down the colors.Once it dried applied modelling paste through stencil,and while its still wet sprinkled some micro beads.

Sprayed some distress spray spun sugar and allowed it to dry.So now the base is ready in few easy steps.I decorated the plaque using beautiful die cuts and flair buttons from the collection along with some mulberry flowers and die-cut leaves.

Here are some close ups,isn't the die cuts are so gorgeous?,working with them is a breeze.


I hope you liked my project and enjoyed the tutorial,dont forget to leave your feed back:)
I wish you all a amazing and crafty NEW YEAR 2016,see you all next year:)


Happy crafting,


3 comments:

Giveaway from Papericious!!

7:48 pm Papericious 4 Comments

Hey All,
A very Merry Christmas and a very Happy New Year!
This is Aastha Jain from Papericious. And I am happy to announce our First ever GIVEAWAY.


6 BEAUTIFUL HANDMADE CARDS FROM OUR 6 TALENTED DT MEMBERS.

So, you are just 6 steps away to win these beauties. All you have to do is:


  • Starting from tomorrow(26/12/15) to New Year, we will give you 6 small contests on daily basis.
  • You will be given one task daily to win one of these cards.
  • You have to finish the task in that one day
  • By the night, we will announce the winners.
So stay tuned and check our page till new year..Dont miss out.

P.S: You will be parceled small surprises along with cards. You never know!!

Cheers..


4 comments:

Mixed Media " Selfie Frame" using "Often" Papercicious Pattern Paper

12:55 pm Artforte 8 Comments

  Dear Friends
In this era of smart phones, we all would surely have taken a lot of solo or group selfies. We would have also gloated over our photographic abilities, shared our mesmerizing selfie with our friends and family members over FB, Instagram or What's App and perhaps repeated it over and over again. But most of these lovely pictures would have remained imprisoned in chat backups or in our SD cards. Sometimes not even in our memory.
Today I present you a dedicated SELFIE FRAME to immortalize your best selfie in this hand crafted and unique way.
This lovely creation was on my mind since long and on this X-mas day, I thought I should encourage the crafter in you to present this creation to yourself in the new year.
Made in a mixed-media layout format, using guesso, modeling paste,spray and lot of decorations, the Selfie Frame gets even more unique by using exquisite Papericious "Often" Die-cut embellishments -- something unique from Papericious and which really inspired my crafty bones to undertake this creation.
Let me give you step wise procedure of this creation.

Step 1.Take any pattern paper of your choice and apply a layer of gesso

Step 2.
Take some torn paper and then again apply a layer of gesso

Step 3
After applying a layer of gesso , heat it and then take stensil and use modelling paste
and sprinkle some dry glitter 
and again after heating i had sprayed lindy's spray and color blooms 
and after spraying i had embellish them
with papericious dies and buttons from "often" collection
and flowers from my stash


So let your best selfie of 2015 be on this Selfie Frame and remain in your living room or study wall throughout 2016 as a remembrance of the year gone by.
Or make this as a unique new year gift for the one whom you want to thank for being with you in 2015.
Merry Christmas and a Happy and Crafty New Year 2016

8 comments: