Showing posts with label Tag Book. Show all posts

Tag Flip Book Ft. Dream Big | Tutorial


Hi Crafty Friends!
This is Sneha and Puja from Kalakriti to share my tutorial post with you all. 
Our project today is a Tag Flip Book featuring the 'Dream Big ' Paper Pack. I have also used the co-ordinating Cut and Create Embellishments and ChipboardsThis paper pack has a lot of beautiful  elements and is perfect for baby related projects.

Have a look. 


Here is the Tutorial:

Take a Cardstock Sheet and cut according to the measurements given in the pictures:


Now paste the pattern papers on the Cardstock pieces.


After pasting the pattern papers, add fussy cut elements to decorate the Card and the Tag Flip Card is ready.

Supplies Used:


Hope you all have enjoyed the project!
Love
Sneha and Puja
Kalakriti

Vintage Tag Flip Book ft. Papericious With Love

 
Hello Friends
Greetings for the day!
I am Parita Galani back today with tutorial post using 
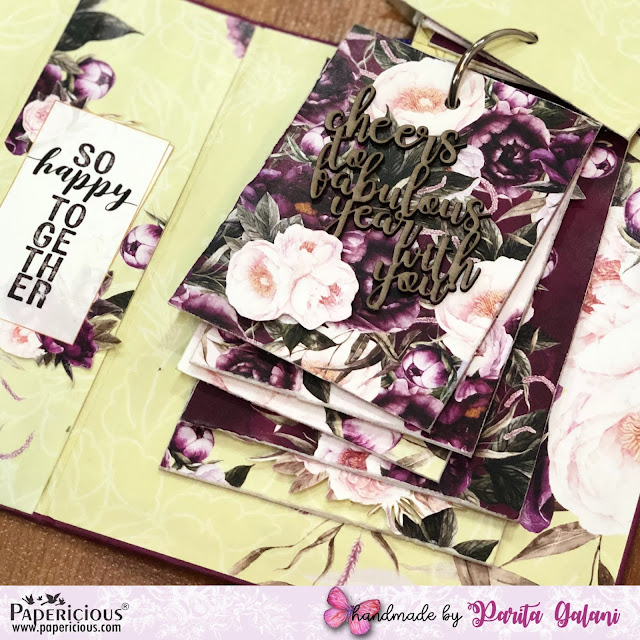
With Love - Papericious Designer Edition Paper Pack. This paper pack with its gorgeous hues of deep purple and pastel mint green with floral elements is all you need to make gorgeous anniversary or any other such special occasion gifts for your loved ones. 
So let's have a look at my project -


I have made a Tag Flip Book but with a twist, giving it a hardbound cover with a side pocket. So let's have a look at the step by step tutorial of this simple yet beautiful project made using very few supplies.

Step 1: I have taken a three pieces of cardboard in two different size of 6" by 5.5" for front and back and 6" by 2" for middle partition along with Purple Cardstock sized 8" by 15" to make the base. 

Cut the cardboard and Cardstock of above given measurement and arrange as shown below by applying glue on back side of the cardboard.
Step 2: Now give a slight cut on all four edges and glue the outer part of Cardstock as shown in picture on all the four sides than fold and stick it on inside, using a bone folder give it a smooth finish.
Step 3: Now I have four piece of the paper in size 5.75" by 5.25" and 2 piece of paper sized 5.75" by 2" all from With Love - Papericious Designer Edition Paper Pack and glued them on inside and outside of  the cover as shown below.
Step 4: I have made 10 different tags using various With Love - Designer Edition Paper Pack.
For each tag, I have used same design of paper for front and back, placed it in front and back of purple coloured Cardstock edge to edge, once it was all done I have distressed the edges of whole tag to give it a little bit of vintage effect.
Step 5: I have taken various embellishments from Papericious With Love - Cut and Create Embellishment Sheets (CCE) and placed it on the front side of each tag. I have kept back side of the each tag plain to write any message or to use it for more photos.

Step 6: I have taken a 4" by 6.5" paper and scored it at 0.5" on three sides, folded the three sides on inside and glued it with base. This pocket can be used to put in letter, photos, card, or chocolate anything of your choice.
Step 7: I embellished the front cover with cut outs from the With Love Paper Pack and CCE. Punched a hole in the centre at the back side of base cover and and all the tags using single punch machine. Using a single ring binder, I put together the tag book and finally tied some colorful ribbon on the ring binder.


Supplies Used:


I hope you all liked my creation and will try it for yourself. In case of any query, please mention it in comment section below.
Stay healthy,Stay safe and Keep crafting!
Best Regards,
Parita K Galani

A Tag Flipbook ft. Blooms & Berries and Die Cut Embellishments


Hello everyone!
This is DT member, Shweta, here with a new project inspiration for you all. I have created a Tag Flip Book featuring the new Die Cut Embellishments and the Blooms & Berries Collection. The Die Cut Embellishments are beautiful gold foiled embellishments on both black and white backgrounds that add a nice touch to your projects.

This Tag Flipbook has 5 tags measuring 6"x 4" which all have a pocket in them to add pictures and write messages. This was an easy and quick make and I have a pictorial to share with you all.

Let's begin with the process. 

First, create tags by cutting 5 pieces of White Cardstock measuring 6"x 4". Keep them aside.

To create pockets, take 5 pieces of White Cardstock measuring 6.5"x 5" and score at 0.5" on the 6.5" side and 0.5" and 4.5" on the 5" side and fold. 

Adhere these pockets to the tags using double tape. 
Paste pattern papers of your choice on the tags, I used the Blooms & Berries Paper Pack. Punch holes on the tags. Also, I rounded the corners for that extra effect.

Then, I used Blooms & Berries - Cut and Create Embellishments, Die Cuts, Flowers, It's a Girl Sequins, and other accessories and formed clusters on the tags. The sentiments from the Capture The Moment - Die Cut Embellishments completed the look. I then passed all the tags through a scrapbooking ring and decorated it with some lace. And we're done.


How did you like this flip book? Do let me know. 

Supplies Used:

Picture of Its a Girl Sequins - Papericious Sequins Mix

Love,
Shweta

Accordion Tag Box by Tanvi

Hello lovely people! 
This is Tanvi from Paper FantaseesToday, I have an Accordion Tag Box to share showcasing the HOOKED Paper PackThe box measures, 4x4" & has 18 pockets which can hold about 36 pictures.
This paper pack has some gorgeous floral designs that are best used alone without any embellishments! I selected one such page for the box. To add some dimension I colored a coordinating Pattern Chippi & used it in one corner on either side. 
Used some mulberry roses from my stash for the tags & metal charms for the corners.
 

Supplies Used:

That's all for today. Thanks for dropping by.
Until next time take care & Happy crafting!