During festive times we all love to decorate our homes in our own way. With Diwali being round the corner, I thought of doing some festive project. Papericiou'
Foiled Essential Papers are simply perfect for all our festive projects as well as Wedding-themed projects. I have made a ready to use Rangoli which can beautify your home or can make for a beautiful gift as well.
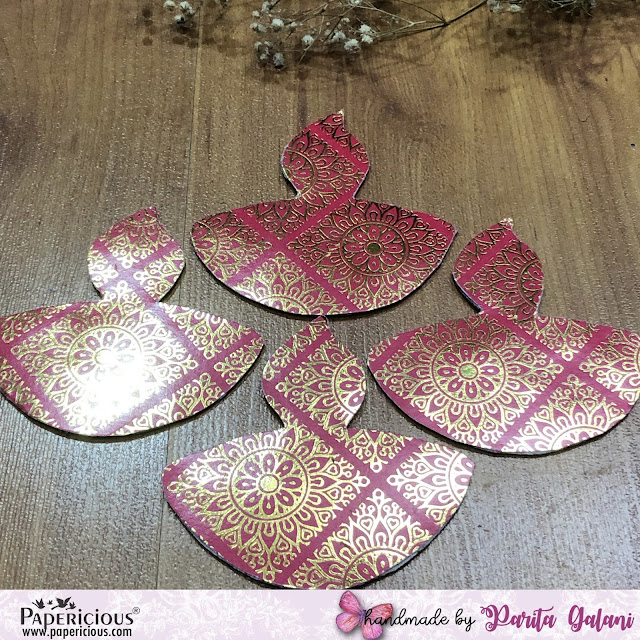
Lets have a look at my project:
Step by Step Tutorial:
Step 1 - Take a
Thick Chipboard piece sized 3.5" by 3.5", draw a Diya on it cut it and trace on the other 3 pieces, so that they are all similar in nature.
Step 2 - Trace the
Chipboard Diya on a sheet of the
Ethnica Foiled Patterned Paper and then adhere the Patterned Paper on it using liquid adhesive or any adhesive of your choice. It should look like so:
Step 3 - Take a 4" by 4"
Chipboard piece and cut it in inverted C curves as shown below.
Step 5 - Embellish it with Mirror Pieces, Sequins, or any such embellishment of your choice. Arrange the Rangoli as shown below. You can embellish it even further with Diyas, fresh flowers, or any festive embellishments of your choice.
I have one more little project to share with you guys. I followed the same method as shown above, but slightly tweaked it by punching holes to the
Thick Chipboard pieces and attaching strings and tassels.
Supplies Used:
I hope you liked my project and are inspired to create some fun projects of your own. We would love to see your work using Papericious products, so don't forget to tag us.
Festive Regards,
Parita K Galani
Hello friends!
This is
Parita Galani, here today sharing with you few festive crafts with
Papericious' recently released gorgeous
Foiled Essential Papers. I am absolutely in love with papers, with its variety of colors with different foiled patterns, they are perfect for absolutely any project.
As Diwali is round the corner I have made some variety of mini projects which is perfect for this beautiful festive season.
Project 1
I have created below an entire project using just 2 sheets of 12" by 12" of Papericious
Fun Fiesta 12" X 12" Foiled Paper Pack. It includes Mini Treat Box, Scalloped Envelope, 2 Gift Cards/Coin Gifting Envelopes and 2 Gift Tags. I so love the combination of hot pink with lime green along with foiled patterns. It's so very festive!
Project 2
I have created Money Envelopes using the
Ethnica 12" X 12" Foiled Paper Pack, which are perfect for gifting in upcoming festive as well as wedding season. The bright shades of red, orange, and blue are just so fantastic!
Lets have a look at my project:

Supplies Used:
I hope you guys liked my projects and will create such festive projects of your own using this beautiful collection.
Keep crafting!
Best regards,
Parita K Galani

Hello friends!
I have created a Pinwheel Card along with two super cute Treat Boxes, because, why not! You never need a reason to gift treats to your BFFs. This Card and Treat Boxes make for a perfect gift on any random day just to appreciate their presence in our lives.
Papericous 'Dear Friend' Paper Pack is perfect to create all quirky projects for your BFF and going down the memory lane. Let's have a look at my project:
I hope you guys liked my project and will create some fun treats for your BFF. We would love to see all your projects so don't forget to tag Papericious (@
papericious).
Best Regards,
Parita K Galani
Hello friends!
This is
Parita Galani, here today with tutorial post featuring Papericious' recently released
Rosabelle Designer Paper Collection. This paper pack with its dark hues, bold motifs, and vintage embellishment is perfect for all for vintage and romantic paper projects.
I have created a layout which looks more beautiful because of lovely color palette of this paper pack.

Step by Step Tutorial:
Step 1 - Take a beautiful paper from Papericious Rosabelle as a base paper for the layout.
Step 2 - I used 3 randomly hand cut strips from the Rosabelle Paper Pack and dabbed some dry Black Chalk Paint for a vintage effect.
Step 3 - I have taken 2 beautiful frames from Papericious Chipboards Collection and painted them with Black and Wine Chalk Paint.
Step 4 - I used several beautiful embellishments from the Rosabelle Paper Pack and its coordinating DCE Sheets. And that's about it. I had a striking layout ready in a few minutes. I also added some flowers at the end.
Supplies Used:
Thank you!
Best regards,
Parita K Galani
This is
Parita Galani, here today sharing super simple yet very cute and something really useful for upcoming festive season, featuring
Papericious Dear Friend Patterned Paper Pack. This paper pack with a fresh palate of bright and beautiful colors, floral motifs and pop elements is perfect to create many different type of projects for your friends, siblings, colleagues, as anyone can be our very dear friend irrespective of age, profession or where we meet them.
I have created a beautiful Bag Pack which can hold multiple small gifts cherishing your bond with your BFF. Its super easy to make and is ready in no time, it can be reused and kept as it is for a long time. So, let's get started to create a bag full of memories for your best friend.
Bag of Memories ft. Dear Friend
Step by Step Tutorial:
Step 1 - Take a patterned paper sized 8" by 11", score it on long side at 1.5", 5.25", 6.75" and 10.5" as shown below. 
Step 2 - On the short side, score it at 1.5" and 6".
Step 3 - All shaded area shown below is to be cut.
Step 4 - After cutting all the required areas, fold all the scored lines and do cuts as shown below, also keep the paper on the patterned side and score it at 0.5" and 6" till 4" and than little triangle is to be formed, shown in 2nd picture below.
Step 5 - Apply the two way tape as shown below and than join the box first on vertical side and than at the bottom.
Step 6 - Apply magnets on the both side of the top flap and cover it with a small circle to ensure the good closure.
Step 7 - Now for the small front pocket, take a patterned paper sized 8" by 4", score at 0.5", 3.75",4.25" and 7.5" on the long side and 0.5",2.5" and 3" on the short side, all places marked X are to be cut and than folded properly to make a small pocket. Repeat same magnetic lock procedure here as well.
Step 8 - Take two strips of 0.5" by 7" and score it at 0.75' at both side fold the scored part and stick the belt at the back of the bag as shown below.
Step 9 - I have embellished the bag with a little bow and flower and finished it with a pretty tag. You can embellish it in your own creative style. Tadaa! Our little bag is ready to be filled with pretty little gifts.
Supplies Used:
Hope you guys liked my tutorial and will create the same for your BFF. We would love to see all your creations using Papericious products so don't forget to tag us on your social media.
Keep crafting!
Best Regards,
Parita K Galani