Showing posts with label Love in Paris. Show all posts

Mixed Media Journal Page (Tutorial) by Shilpa

Hello Everyone,
Shilpa here,

Today, I am sharing with you, how to create easy Art Journal page with Papericious Love in Paris collection.


I use old book as my one of the art journal. To start this journal spread, I adhered lovely damask design paper on the base with mod podge. As a primer I used Clear gesso onto the whole surface. 


When I was waiting for gesso to dry, I cut out tags, doily and other ephemera from the paper collection. I also chose stamped image of a couple as my focal point. 


Next layer on the base, is texture , which I created with light paste and stencil. Allowed it to dry completely. 


I roughly arranged photo and ephemera on the page to check, where exactly I'll need to add the colors.


I used Colour arte primary elements in pink,peach and sand colors to enhance the texture on the page..

 and here is finished journal spread....

you are liking it?

Thanks so much for stopping by. Don't forget to join us for our "Vintage" challenge this month.


Wallet style photo holder Tutorial

Hello crafty ppl,
 its Kavitha here today and i am sharing a tutorial to make a Wallet style photo holder using "Love in Paris collection".I so love the pinks and yellows in this collection ,perfect for vintage/shabby chic projects.


Take a card stock measuring 6 1/2" by 9 1/2 ".Score at 6" and 6 1/2"
For the flap take a card stock measuring 6 1/2" by 5" .Score at 4 1/2"

To make the accordion fold which holds  the photo mats take a card stock measuring 2" by 6 1/2' and score at every  1/2"
You need two pcs  like this,just fold along  the score lines
Decorate both front n back using desired papers.

  Now attaching the lower flap to the center using the accordion fold piece,just put some glue to both the end of the accordion piece and stick it together 
I added a lot of phot mats in different size-4 by 6", 4 by 4",3 by 3" and 3 by 4".Added a pocket to the flap to hold more photo mats.
I used black card stock for the photo mats and decorated with pattern paper on one side,left the back plain to add journaling.You can use pattern paper on both side if you wish to have lots of space for pictures.

Hope you liked my tutorial.The possibilities are endless with this one,just change the color of the card stock used to  make it in vintage/shabby chic/or modern style.This can be used for any theme-Feminine/masculine/baby etc,you just need to choose the right kind of pattern paper,just imagine this one using our latest collection "Naturals",with denim print n more it will be perfect for masculine project or make it using our Baby papers range to store all those precious first year photos:)

This can be made in any size,the measurements are super easy,almost like an envelope except the accordion part,you can have space for more photo mats by increasing the size of the accordion fold piece(length wise).For the measurement i have given you have space for 5 photo mats,you can even have space for 10 photo mats.So are you going to give it a try?would love to see if you make something similar,just drop in a comment with the link:)

Thank you for stopping by.
Happy crafting,


Love in Paris

Hello and good morning! ^__^

I'm Halak and today I'll be taking you through a love themed layout tutorial.

What does the final layout look like you ask?

Like this :

So.. let's get started!

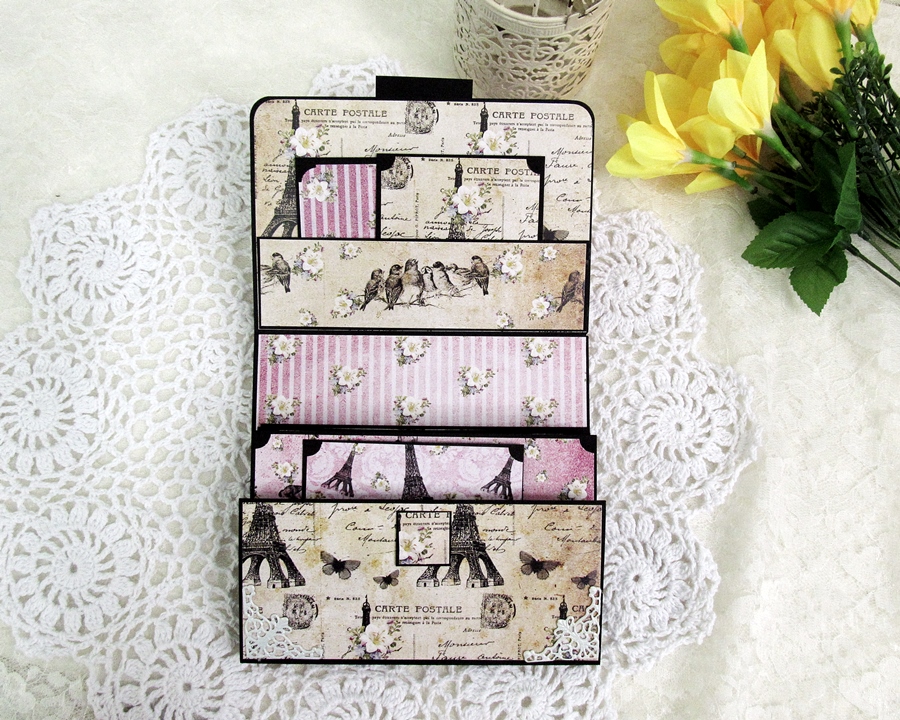
I've used the following 4 paper sheets from Papericious Love In Paris paper collection.

This paper collection is a part of Premium Collection by Papericious and man... it is GORGEOUS!

It's got that perfect blend of designs that'd make wonderful Shabby Chic and Vintage themed projects. Apart from this, it would make awesome Journal pages, especially a travel journal!

When I think of Paris, I think, Love. A romantic destination. Hence the layout. But let this not limit your imagination.. Paris is also famous for fashion and food! ^__^

I started by inking up a large stamp partially and stamping it onto the patterned paper.

Tip : Rather than inking up the whole stamp for layouts, it is advisable to ink stamps partially. Adds more interest to a project.

Next I took two sheets and cut out / hand-tore sections from it to position around the stamped image.

Then I placed the two cut-outs onto the project and decided where to adhere.

After adhering the pieces, I did some more stamping and added sentiment + small washi tape bits.

Tip : Look for stamps that co-ordinate with your theme and select accordingly for project. I was primarily going for a shabby chic look with faint vintage undertones, so I selected stamps that would give me a worn out / distressed effect.

If you do not have stamps that sport the distressed look, what you can do is ink up a stamp and stamp it lightly onto scrap paper first and then use the second generation stamp for the actual project.

After that I added some pearls, tiny flowers (and gave them a pearl center) + some more background stamping.

Used a damask stencil with pink dye ink for more texture.

I also cut out a postcard in pink (first design from the left in the image containing paper design details), hand-tore it and added random bits of it to select areas of the project.

You can see the hand-torn post card adhered in this close up image :

I also added a Papericious Adhesive Button that had a beautiful scene featuring the Eiffel Tower. (So pretty and perfect for my project!)

Lastly added some script stamping in the background and glitter to the sentiment along with a few pink enamel dots that you see in the very first picture of this blog post.

And that's how I did it!

I have one last close up to share with you folks before signing off :

Yikes, almost forgot! Once the layout was done, I matted it onto red cardstock and gave it a thin border on all sides.

Thank you so much for stopping by!
Till next time! *Hugs*


Posted via Blogaway

Altered Gift Bag | Love in Paris

Hello Papericious readers!
This is Hussena and I'm here to share the inspiration post for the Love in Paris collection. I have altered a Kraft gift bag using papers from this stack to layer and also created a co-ordinating gift tag to go along with it. Here's a look at what I've made :


To create my bag, I first selected my choice of papers from the pack and roughly measured the length of the bag & cut out my paper and distressed the edges using a pair of scissors and Distress ink- Worn Lipstick. Then I layered another paper with a die-cut border from the same collection over my base paper using foam tape. I gessoed over this layer & did some stenciling using texture paste and colored it using Lindy's Stamp Gang Spray.

The flowers are all handmade and I've placed the floral arrangement over a die-cut doily which was also diecut from the same pattern as the base paper. I've lightly distressed it with inks and added the sentiment and a few butterflies from the Ephemera Collection which was released in March.


A few more shots of the bag & tag !


The tag was also made using the same pattern paper as the bag so that it co-ordinates as a set and would be ideal for gifting.


I hope you like my today's project. Please do leave me your comments/suggestions regarding it. Would love to hear from you !

Do not forget to participate in our ongoing monthly challenge where the theme is - Anything GoesYou have a chance to win some exciting Papericious goodies :)

- Have a nice day everyone!

Love in Paris: A love card!

Hello Everyone!

It's Manu here and I know many of you had been waiting for the challenges done by Papericious and yes, we have started a monthly challenge starting this April 2016, Read all about the challenge here

Well, we all love to make various things and what more than a challenge which allows anything that you make, with an exception that the creation should have one papericious product used (craft sheets and blending tools,does not qualify for the entry). So, get going and create some awesome papericious creations and we would love to see what you would be making !

For my first post for April, I'm using the 'Love in Paris' paper stack and I totally love the pink and yellow hues in this pack!! Apart from scrapbooking I find these ideal for making cards!!!! The soft colors add a real charm to the cards. Here's what I made!


I picked up a yellow hue paper which had some nice bird on it and made a Z fold card!!! This card's fold is a real pretty one!


Assembled a few flowers and embellishments and tadaa... the card is ready!


Well, it took me less than 45 minutes to make this one and thats real quick!


I hope you like my take on the paris themed papers and make sure to play along with us in our first challenge which is 'Anything Goes' Read about the challenge rules in the link above!


Do let me know if you liked the card!! Until next time!!

Happy Crafting!
Manu