Hello everyone,
This is
Hussena and welcome back to the Papericious blog. I am here to share the second guest post by our amazing guest designer,
Kavitha, using the Papericious
'Tranquil' Paper Collection. If you missed seeing her first post using the
'Woodland Walk and
'Dream Big' Patterned Paper Packs, you can click
HERE to see her projects.
Hello everyone,
I am back with two more projects with gorgeous
Tranquil Patterned Paper Pack & coordinating
Cut and Create Embellishment Sheets. I absolutely love the greens in this collection and the flowers are so gorgeous. One is regular Slimline Card and other one in Envelope Shape. I added lots of fussy cut elements from the Cut & Create Embellishment Sheets as well as 12" X 12" papers. I just added few flowers and lace to complete the card, you really don't need anything else to create beautiful projects with this collection.
Supplies Used:
I hope you liked these projects. :)
Happy Crafting,
Kavi
-------------
If you liked Kavi's projects, please do not hesitate to leave a comment! She would love to hear what you think of her projects.
You can find Kavi on social media here:
Thank you so much for stopping by!
Have a great day everyone.
Hello everyone,
its
Kavitha here today and i am sharing a layout tutorial with "Happy birthday" collection.
This collection is so happy and bright and i just love the prints.So i decided to make a birthday theme layout for a little girl.This is totally different from my usual mixed media layouts,its clean and cluttered style with more of colors and layers and still with lots of white space left,hope you like this attempt of mine.

I took a rough 12 by 12 sheet and planned my layout first.I marked the the area where i want the pattern paper,cut them out n used as template.
Using the template i cut the pattern papers as shown
Now i glued down the papers and used a fussy cut banner from the pattern paper collection
I cut down some pattern papers in various sizes from the collection for my layers,as my base is white and the pattern papers also has more white i used some papers from pretty basics collection for my first layer so that it will elevate the layout from the background(both the collections matches so well).
I used lots of stickers and enamel dots to make it more fun n colorful
Few close ups..
Thank you for stopping by.
Happy crafting,
Hello crafty ppl,
its
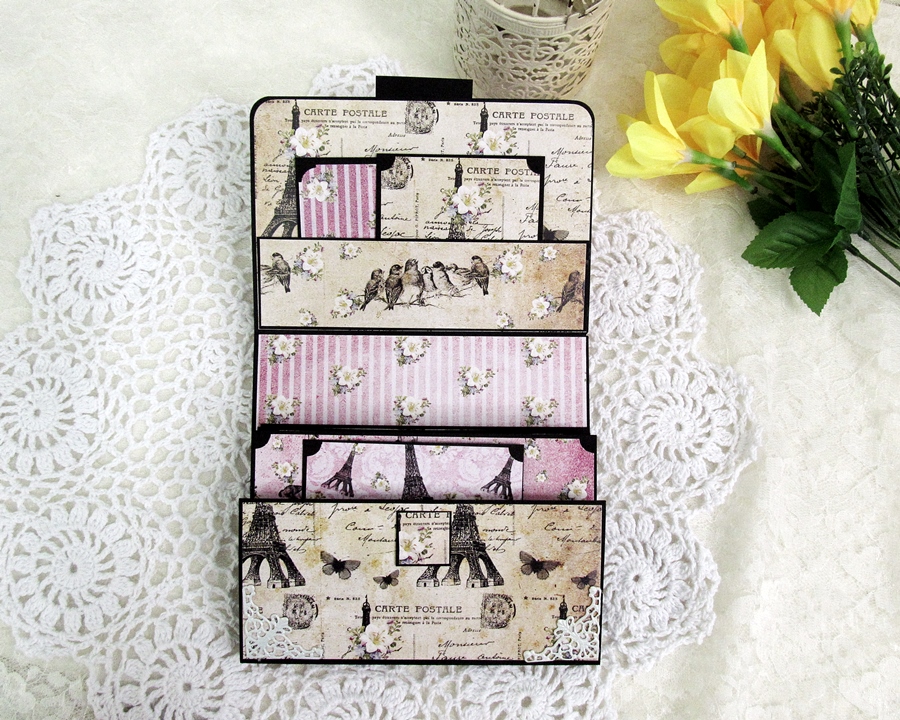
Kavitha here today and i am sharing a tutorial to make a Wallet style photo holder using "Love in Paris collection".I so love the pinks and yellows in this collection ,perfect for vintage/shabby chic projects.
Take a card stock measuring 6 1/2" by 9 1/2 ".Score at 6" and 6 1/2"
For the flap take a card stock measuring 6 1/2" by 5" .Score at 4 1/2"
To make the accordion fold which holds the photo mats take a card stock measuring 2" by 6 1/2' and score at every 1/2"
You need two pcs like this,just fold along the score lines
Decorate both front n back using desired papers.
Now attaching the lower flap to the center using the accordion fold piece,just put some glue to both the end of the accordion piece and stick it together
I added a lot of phot mats in different size-4 by 6", 4 by 4",3 by 3" and 3 by 4".Added a pocket to the flap to hold more photo mats.
I used black card stock for the photo mats and decorated with pattern paper on one side,left the back plain to add journaling.You can use pattern paper on both side if you wish to have lots of space for pictures.
Hope you liked my tutorial.The possibilities are endless with this one,just change the color of the card stock used to make it in vintage/shabby chic/or modern style.This can be used for any theme-Feminine/masculine/baby etc,you just need to choose the right kind of pattern paper,just imagine this one using our latest collection "Naturals",with denim print n more it will be perfect for masculine project or make it using our Baby papers range to store all those precious first year photos:)
This can be made in any size,the measurements are super easy,almost like an envelope except the accordion part,you can have space for more photo mats by increasing the size of the accordion fold piece(length wise).For the measurement i have given you have space for 5 photo mats,you can even have space for 10 photo mats.So are you going to give it a try?would love to see if you make something similar,just drop in a comment with the link:)
Thank you for stopping by.
Happy crafting,
Hello everyone,
Its
kavitha here today and i am sharing a super fun little mini album made using Little star collection.The colors n prints in this collection are so bright n happy and the coordinating embellishments makes the work much more easier.
Making a star shaped album was in my to-do list for long time,but lot of paper go waste for this shape,i kept wondering whether i should attempt it or not.When i saw this Little star collection in my DT pack this month i know it times to make one.Can you believe over all the album measures around 8 1/2 inches,but due to shape its looks small.
I cut the shape with my silhouette machine both in card stock n pattern papers,glued them together.For adding pic i cut circle shape with largest circle die from spellbinders and used embellishments from the paper pack.Its was super quick n fun to make.
Hope you liked my project for today,see ya all soon
Thank you for stopping by.
Happy crafting,
Hello everyone,
kavitha here today to share a card made with new release collection "Naturals".You must have seen the collection already(if not check out this
POST),it have variety of prints both bold n soft which suits for any kind of project.I used the softer version of the papers to make a beautiful shabby chic girly card with my favorite ribbons,flowers and butterflies.
For my card i used burlap and wood grain papers.I gave a little bit of mixed media touch with gesso,modelling paste n splash of colors
The bunch of hydrangea is the die cut from Ephemera collection.I added few mulberry flowers ,die cut leaves n few extra bits from my stash n the card is ready.
Hope you liked my card,stayed tuned for more inspirations.
Thank you for stopping by.
Happy crafting,