
Resin Tray using Alcohol Inks
Hello My Crafty peeps,

Today
i have come up with a super easy resin project . To some people resin seems to
be a difficult art form but believe me its super easy and you just have to try
it to know.
Before
doing any resin project we need to do some preparations .
Preparations
1. Cover
your workstation - Cover up your workstation properly . I
use cellaphane sheets to cover my work table. It is done to avoid spoiling your
work table incase resin falls on it. These sheets will be disposed later.
2. Gloves -Always
wear gloves while working with resin . I prefer Nitrile gloves when handling
resin . You can also use surgical gloves . Never do any of your resin project
with bare hands.
3. Respirator-
Always use a respirator while working with the resin specially when you blow
your heat gun or torch over it.
4. Disposable
- You will be needing some disposable cups and popsicle sticks to pour your
resin into .
5. Weighing
scale – Your will be needing a weighing scale . Always
measure your resin in the proportions mentioned on the resin bottles. Never mix
your resin by approximation. It will lead to a fail project.
For
example – The ratio mentioned on Papericious resin bottles is Resin Part A: Resin part B is 2:1 , so if I take resin
part A 20 grams then I will pour 10 grams of resin part B. Measurements should
be exact .
6. Heat
gun and a blow torch- we will be needing a blow torch or a
heat gun for our resin project . We can choose either of the two depending on
what effect we want to achieve. Both of them help to get rid of the bubbles in
the resin.
7. Resin
Part A and Part B and Resin Pigments - Always buy a good quality
resin to achieve a good finished project. Always use resin pigments to tint
your resin
Now
when our preparations are done , lets start with our project. I am making a Resin
tray . I started with priming my MDF tray with white acrylic colour .
Then using my weighing scale I mixed resin part A:B in the ratio 20:10 grams in a disposable cup using a popsicle stick. I will move my popsicle in clockwise direction only along with the sides of the cup in order to avoid infusing more bubbles in the resin. After mixing the resin I will leave the resin for 3- 4 minutes so the bubbles in resin settle themselves. Next I will take 2 more cups and add resin in them . Next I will add my resin pigment - I am using Aqua blue and Forest green from Papericious today. After mixing the pigment properly in resin I will pour it on my tray base. I added Forest green diagonally on the tray and poured Aqua blue on the sides. Also I added resin on the rim of the tray . I will cover the tray with a plastic box so that no dust settles on my resin project while its curing. After 24 hours when my 1st layer has cured completely . I will add another layer of resin following the same steps I did for the 1st layer.I always add 2 -3 layers of resin to achieve a perfect look for my project.
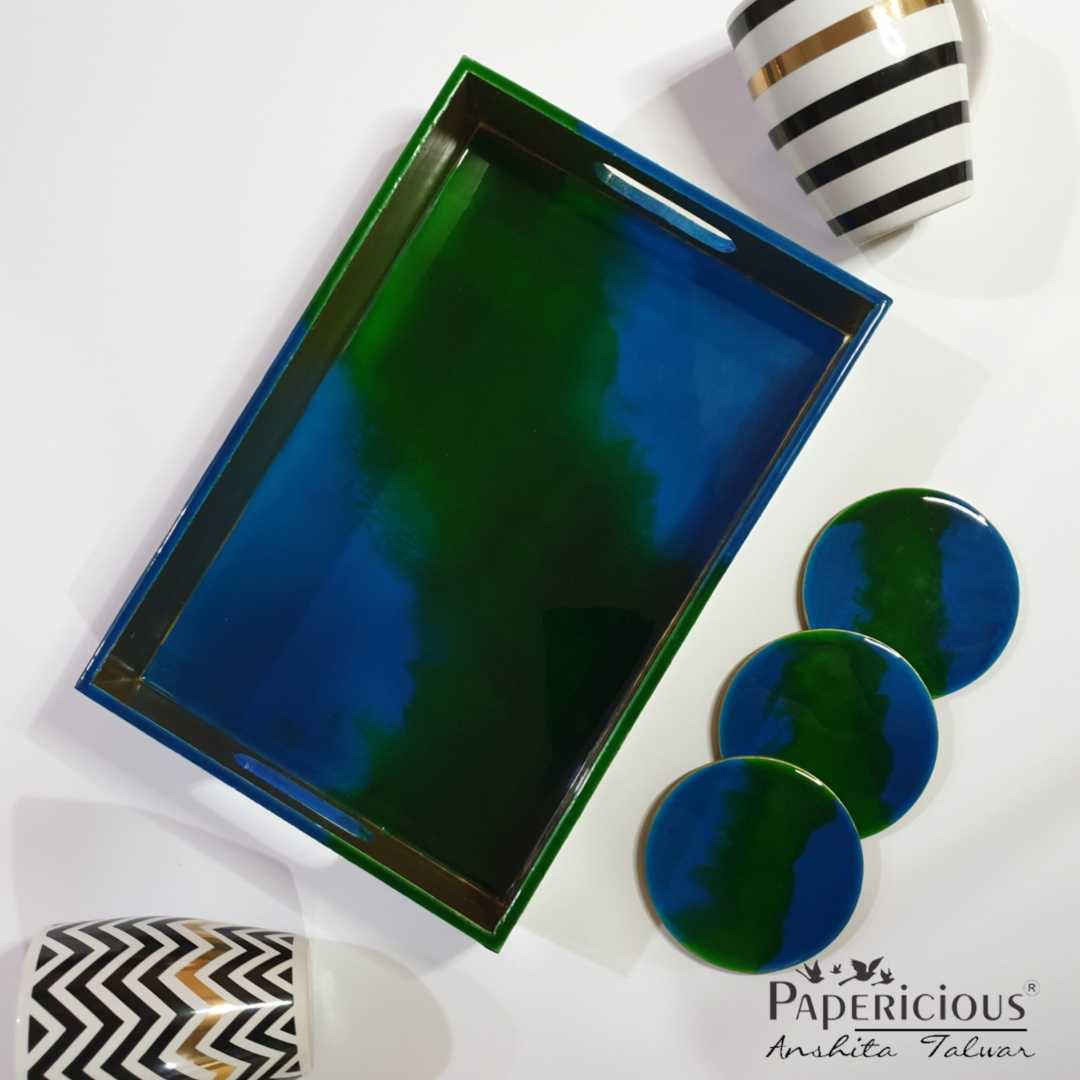
Once my resin have cured properly. I will paint the sides of the tray with Acrylic colours. I painted the inner sides of the tray golden and on the outside I painted it golden with a strip of colours – green and blue matching with the resin colours used on the tray base. I varnished the sides of the tray where I used Acrylic colours.

I
also made 4 round coasters following the same steps.
My
Resin tray is ready. Wasn’t it easy?? So what are you waiting for. Grab your supplies
and make your resin project. And don’t forget to share it me.
I
will be back soon with another interesting resin project. Until then keep creating.
Lots
of love
Anshita
Talwar
The resin supplies used are from


0 comments: