Diwali- Home Decor Products
Hello everyone,
We're happy to be back on the blog and today we have some fun Diwali Home Decor Ideas using the new 'Happy Diwali' Paper Pack and other Papericious Supplies! We also have a quick tutorial for you all!
First, let's begin with a Rangoli. Here's a look at the final project:
We're happy to be back on the blog and today we have some fun Diwali Home Decor Ideas using the new 'Happy Diwali' Paper Pack and other Papericious Supplies! We also have a quick tutorial for you all!
First, let's begin with a Rangoli. Here's a look at the final project:
For this, we have used an MDF Base, however, you can always trace/draw a design on a chipboard piece and then alter that.
Let's begin:
Step 1: Choose a pattern paper from the pack and trace the base design on the back of the paper. Make sure to trace the inner pattern as well (the design in this case).
Step 2: Using a cutting mat and knife cut the inner design traced on the paper.
Step 3: Using scissors cut along the edge of the design.
Step 4: Now that our paper is ready, let's begin adhering it onto our base. For this, we will use the Papericious Decoupage Glue. Spread the glue on your base with a paintbrush. The best part is this is slightly tacky and gives you enough time to place your paper.
Step 5: Gently place the paper, beginning on one end and smoothening it across the other. You can use a brayer, or any other tool to smoothen the paper and remove any bubbles. An old credit card also works.
Step 6: You can either cover both sides of the base with paper or paint the back like we did. So first, we painted the back with Papericious Heavy White Gesso.
Step 7: Next, add colour using Spritz Sprays.
Step 8: Once dry, time to paint the edges. For this, we used the Dots Acrylic Paint.
Step 9: Give another coat of the decoupage glue to seal the paper. This also highlights and intensifies the pattern.
Step 10: Choose the chipboard elements. Using versamark and embossing powder colour them to go with the base.
Step 11: We prefer sealing our work with a clear varnish. Do wait a day or two between the layers to cure each layer well.
Step 12: Assemble all the elements on the base. We have added some tea light holders as well, to make this a candle holder rangoli. Stick them using a glue gun.
Here are some close-ups:
That completes our Rangoli!
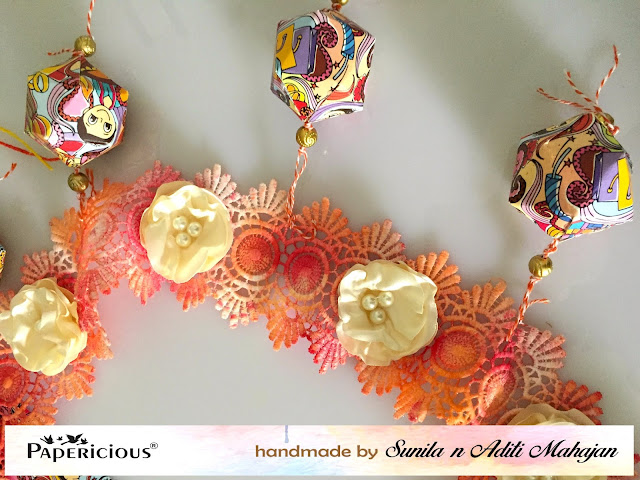
Next, we have a Toran to share with you.
For this, we used Papericious Lace as our base. We coloured them with Spritz sprays and let them dry. Meanwhile, using one pattern sheet, we created the hexagon shapes. We used a die here, and you could use anything you have. We then strung them with some beads. We then tied them onto the lace and in between stuck some fabric blooms. At both ends, we added some jute cord to help us hang this.
Products used:
Hope you've enjoyed this tutorial and are ready to create your own Diwali items!
Happy crafting!
Sunila and Aditi


Fantastic ideas! Very innovative!
ReplyDeleteThat's just beautiful !!
ReplyDeleteDiwali Home Decor is a cherished tradition that adds warmth and festivity to every household during the festival of lights. Families take great pleasure in adorning their homes with vibrant rangoli designs, clay lamps, and strings of twinkling fairy lights.
ReplyDeleteDiwali Home Decor
A fitted bed sheet , often called a bottom sheet, is a sheet specifically designed to fit snugly over your mattress.
ReplyDeleteWhen shopping for bath towels in Pakistan , you’ll often come across two main options: bath sheets and regular towels. While both serve the same basic purpose, their size, absorbency, and use cases differ significantly.
ReplyDeleteFor men seeking the best ready-to-wear formal kurta pajama in Pakistan, finding the perfect blend of premium fabric, expert tailoring, and timeless design is essential. At Hinz.pk, we specialize in high-end formal kurta pajama sets that combine luxury with convenience,
ReplyDeleteReally enjoyed this post! The right home decor item can make such a big difference in how a room looks and feels. Even a small piece like a lamp, wall art, or showpiece can add so much charm. I recently checked out Vibecrafts, and their collection of home decor items is truly beautiful — perfect for creating a stylish and cozy home. Definitely worth exploring!
ReplyDeleteThis was a really clear and informative post. You managed to cover all the important points while keeping the content simple and engaging. I found it very helpful and learned a few practical takeaways. Thanks for presenting your expertise in such an approachable way.
ReplyDeleteOkoume Marine Plywood