
Step Fold Card using Indie Chic Collection | Tutorial
Hello,
This is Ujjwal and I am showcasing the mesmerizing Indie Chic Papers through this step fold card that I created. I also have a step by step photo tutorial on how to make it, so I hope you enjoy making your own.

The papers in the Indie Chic collection are so vibrant and pretty. The color palette is unique and beautiful and I had the most fun creating this project.
Tutorial for Step Fold Card

Step 1: Use the coordinated 12" X 12" cardstock available in the collection and cut two pieces of size 12"X6"

Step 2: Score one piece of 12"X6" at 6" on the longer side, such that when you fold it, it becomes a 6"X6" card base.

Step 3: Cut the other piece of 12'X6" at 9.5" and score the 6"X9.5"cardstock at 1.5", 3", 6", 9"

Step 4: Reinforce the folds and adhere the two pieces together as shown in the picture. It will now become a long piece folded piece measuring 6" X 21"

Step 5: Pick 2 pieces of pattern papers from the Indie Chic Collection and cut matting papers for the card keeping a 1/8th margin on all subsequent layers. Exact measurements are mentioned in the image.

Step 6: Using a distressing tool or the edge of your scissors, lightly distress the edges of the pattern papers.

Step 7: Fussy cut the journaling sheet and the element sheet to create your unique, coordinating embellishments.


This is Ujjwal and I am showcasing the mesmerizing Indie Chic Papers through this step fold card that I created. I also have a step by step photo tutorial on how to make it, so I hope you enjoy making your own.

The papers in the Indie Chic collection are so vibrant and pretty. The color palette is unique and beautiful and I had the most fun creating this project.
Tutorial for Step Fold Card

Step 1: Use the coordinated 12" X 12" cardstock available in the collection and cut two pieces of size 12"X6"

Step 2: Score one piece of 12"X6" at 6" on the longer side, such that when you fold it, it becomes a 6"X6" card base.


Step 4: Reinforce the folds and adhere the two pieces together as shown in the picture. It will now become a long piece folded piece measuring 6" X 21"

Step 5: Pick 2 pieces of pattern papers from the Indie Chic Collection and cut matting papers for the card keeping a 1/8th margin on all subsequent layers. Exact measurements are mentioned in the image.

Step 6: Using a distressing tool or the edge of your scissors, lightly distress the edges of the pattern papers.

Step 7: Fussy cut the journaling sheet and the element sheet to create your unique, coordinating embellishments.

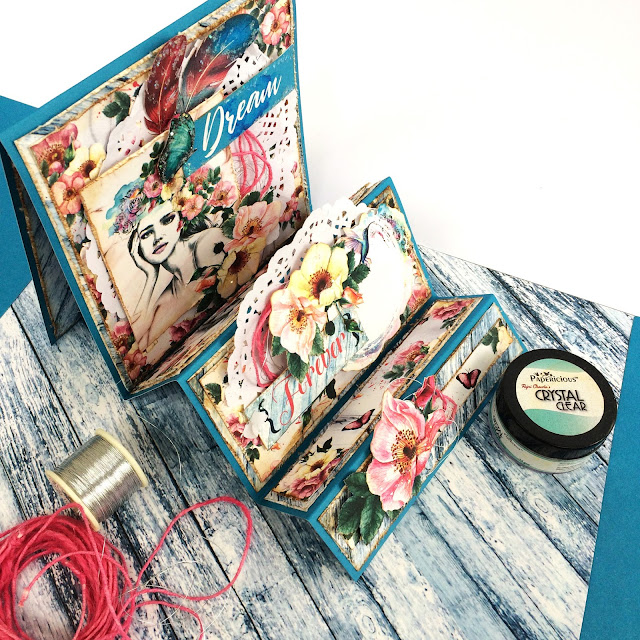
Step 8: Add the beautiful Crystal Clear Glitter to make the embellishments shine.

And then just put all the elements together to finish the card. I also used some doilies, Papericious Jute cord and some silver thread to add accents.


Love, Ujjwal
Supplies Used
Glitter - Crystal Clear - by Rajni Chawla

Papericious Indie Chic Paper Pack

Ink Blending Tools - Rectangular


Beautifully vibrant !! loved the step card ,thanks for the tutorial Ujjwal :)
ReplyDeleteSo pretty! :) :)
ReplyDeleteGorgeous paper and the card is magnificent, I love it!!! Great job & thanks for the tutorial!
ReplyDelete