
Vellum projects and tutorial
Hello crafty friends!
Today I am sharing tutorial project and few other projects using Papericious vellum paper , pattern papers ,white chippies.we also have twinkling spark and clear embossing powder in our new release..so that also I have used in few of my projects.. as there is more to share I am going straight to my tutorial project...for that I have made envelopes in different style..here is step by step instructions..


 Step:2- now as see in picture and stick tacky tape or glue on left 3.25" side and on bottom flap .
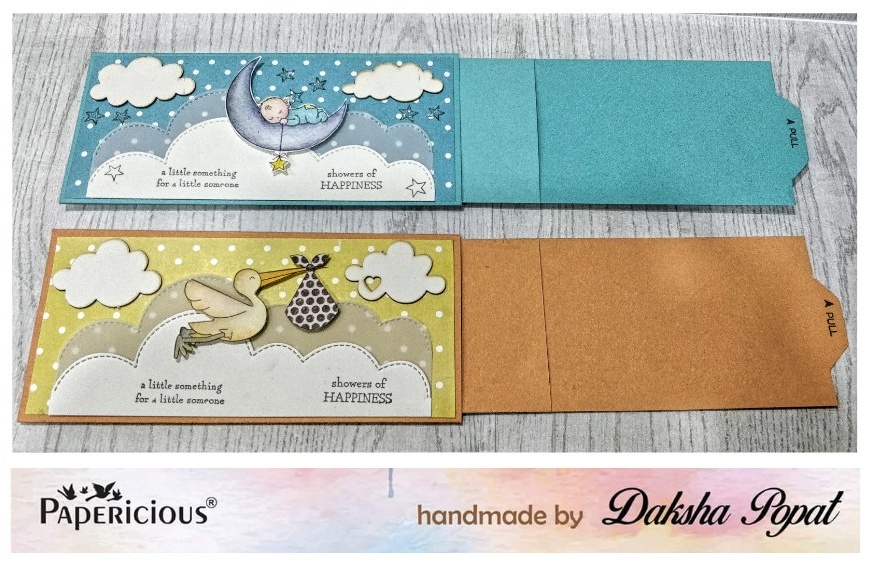
 Removing paper from tacky tape n stick the envelope..you will get one pocket..now let's make slider pocket card for that in which we can put money for gifting purpose.

 Step:3-for slider pocket card we need card stock size 9.25" * 3"..and on 9.25" side score ar 2" , which you can fold and stick two sides with glue ..it will form a pocket to hold money...


Step:4- on opposite sides of pocket make a tab using punch board..see in picture

 Now slide this pocket tab in pocket envelope n trim extra bit to adjust..
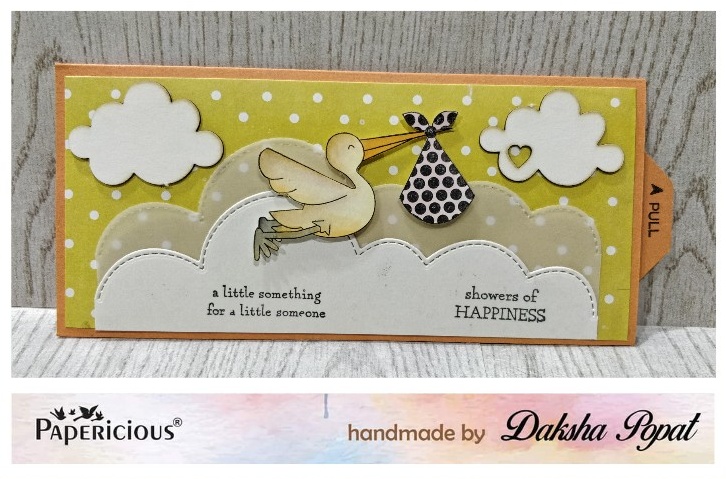
 Step:5- then top front part decorated using polka dot paper , decorated using white n vellum cloud diecuts ,white cloud chippies


 Final look of my envelopes...


In these envelopes I did embossing technique with embossing folders.... Envelope base is made using Papericious Ethereal paper ..on top I have used Papericious vellum which I have embossed using embossing folder and decorated using Papericious white chippies,vellum butterfly..which I have heat embossed with black versafine ink and papericious clear embossing powder...and to cover sticking glue I have used flat pearl stickers / rhinestones

In this card I have used Papericious modelling paste with evergreen bough distress oxides n applied using stencil..used black splatters effect using Altenew stamp..and in main focal point I have used white flourish leaf diecut and butterfly diecut with vellum..used happy birthday stamp sentiment from Altenew.
 In this card I tried parchment look..first I have stamp image on vellum paper..then I have embossed from back on rose part and few other places... edges I have first distressed n then embossed with embossing tool...did layering with black n white card base..to stick vellum on black cardstock I have used glossy accent in few place n in four corners I have used eyelets... finally to give more dimensions..I stamp the rose part again on vellum and did embossing from back..used white pencill in few places in back part..n then fussy cut and glued to the rose part with silicone gel...to keep card simple I have used white chippi with small sentiment.
 In this easel card I have used vellum Coloring technique..I have colored the stamped image from back did little bit of embossing from back and then glued with silicone gel..to give raise effect....on edges I have used glossy accent and our new release twinkling spark glitter ...I really love the effect.
That's all for today..hope I have inspired you....thank you for stopping by..
Love n Hugs
Daksha
Supplies used


Today I am sharing tutorial project and few other projects using Papericious vellum paper , pattern papers ,white chippies.we also have twinkling spark and clear embossing powder in our new release..so that also I have used in few of my projects.. as there is more to share I am going straight to my tutorial project...for that I have made envelopes in different style..here is step by step instructions..

step:1- take 7"x6.75" card stock , score at 3.25" and 6.50" on 6.75" side.


Step:4- on opposite sides of pocket make a tab using punch board..see in picture


Step:6- after checking placement of stamp image did stamping using MISTI tool.
Step:7- colored the image with zig water Colors,used glossy accent n twinkling spark glitter dust in stars..


When I got Papericious new release vellum papers in my DT kit..I tried few techniques and created few cards n envelopes..which I am also sharing...


That's all for today..hope I have inspired you....thank you for stopping by..
Love n Hugs
Daksha
Supplies used


really beautiful creations Daksha...my absolute favourite is the Post Card with Rose !!
ReplyDeleteBeautiful creations Daksha.
ReplyDeletebeautiful designs.
ReplyDelete