Birthday set and a tutorial
Hello, Monika here.I just love gorgeous 3D chiboards and sequins mixes from Papericious.Today I would like to show you how to make a heart shaker box.
Every 3D shaker chipboard set includes 4 pieces of chipboards and one cut out piece of acrylic sheet.
1. Redraw on the paper 5th layer of chipboard and cut it out. I used one of Back to Basics papers.
2. Paint white back and edges of 5th layer, stick the scrapbooking paper to its front. Stick together 3rd and 4th layer and paint their edges, paint white first layer and additional chipboard.
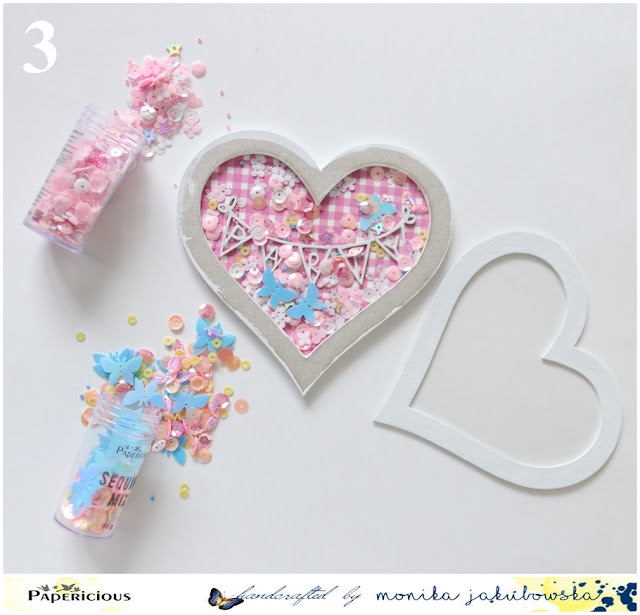
3. Stick 3rd and 4th layers to the 5th layer, stick the additional chipboard at the center and add sequins inside. Stick 1st and 2nd layers to the rest of the shaker box. It is ready now. We could use it as a great card embellishment.
4. We could also stick on the back a piece of magnetic mat. I cut out a magnetic mat with a die, it looks nice.
My magnetic shaker-box looks now like this:
It`s a part of birthday set for little girl, so I wanted it to be safe to use, with no dangerous elements. I just love those gorgeous sequins.
I also made a small birthday card.
Flowers I made with Sigma cardstock and added some Frosting Powder to make them shine. I also used chipboards Let`s Party and Circle Flourish Lace.
Papericious products used:
3D Shaker Heart
Back to Basics Paper pack Premium Edition Blush scrapbook papers
Circle Flourish lace Sigma cardstock
Let`s Party Theme Chipboard
Sequins Mix: It`s a girl
Sequins Mix: Spring
Frosting powder
Alphabet & numbers chipboard
Thank you for watching. Have a great day!


Beautiful card n tag !
ReplyDeletethank you so much :*
ReplyDelete