
'Celebrate'- Mixed Media Card & Tutorial
Hello crafty friends!
This is Hussena here with my first post for the Papericious blog. This month Papericious has come up with 2 Premium Paper packs and Embellishment sheets with some really amazing and gorgeous designs. Our DT member, Shalini has already shared a beautiful project using 'The Vintage Attire' collection and I am focusing more on the 'My Golden Garden Collection'. It's a perfect shabby-chic collection and you will love these papers and their designs once you have them in your hand. So here's a look at what I've created!


I have created a shabby, mixed media card and I'm sharing a tutorial on how I created the card base and the floral embellishment. These papers have some really beautiful flower images and also neutral designs like dots, hearts and my very favorite, chevrons and it's quite easy to paper piece the images to create any project.
Here are few steps on how I went about it :
Step 1- I have paper pieced few of the flowers and the leaves from the My Golden Garden pack.

Step 2- After paper piecing the images, I have distressed the edges lightly using Scattered Straw and Vintage photo Distress inks. here, I would like to add that I have recently been using the Papericious Blending Tool and it's been a dream to work with it. It's very light weight and it's velcro has a very strong adhesive backing and so it holds the foam very well as compared to the branded one I have been using plus it is flat on the edge and so it's very easy to distress tiny areas using the edge of this tool.

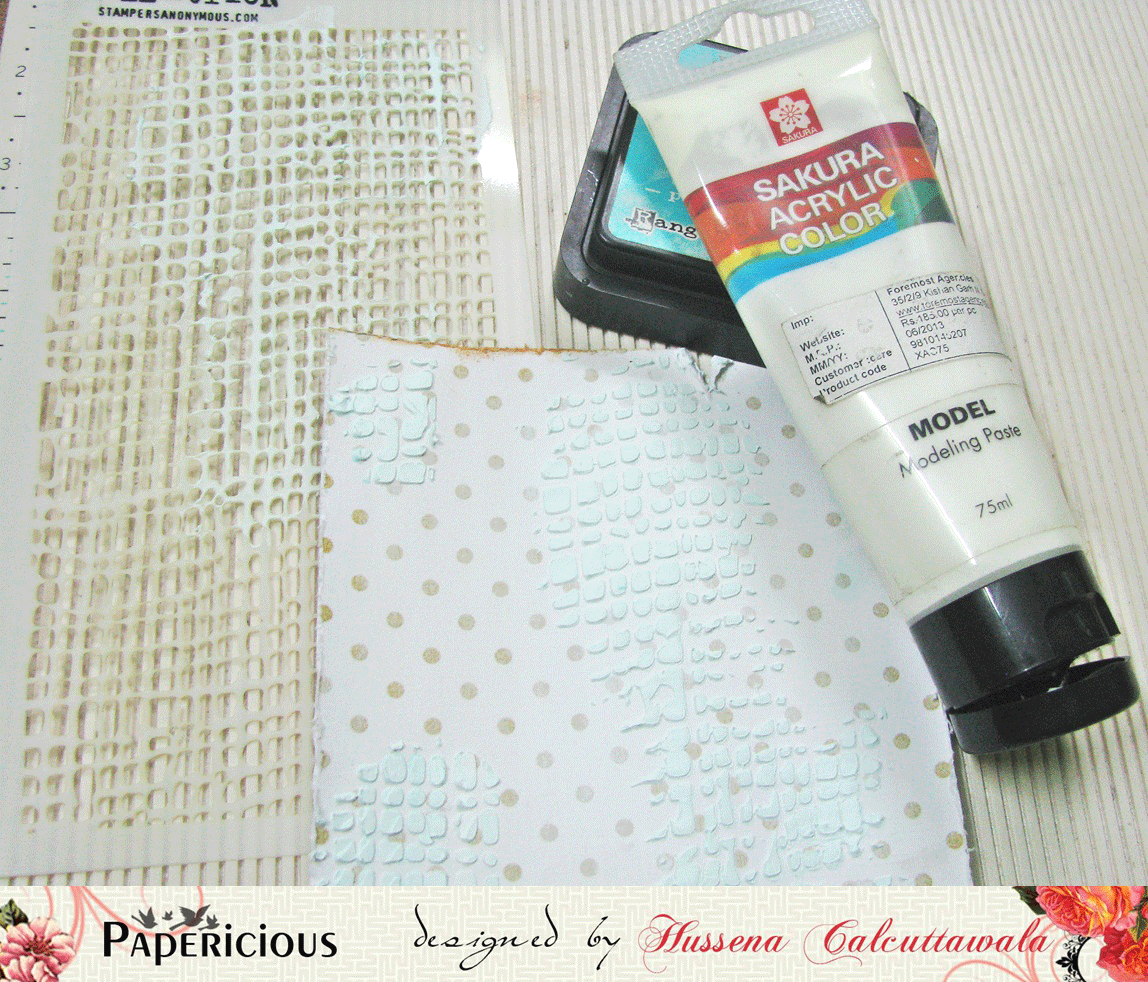
Step 3- I have taken the card base panel from one of the dots design pattern paper from this pack and applied a single coat of Gesso on it to prepare my surface so that it will take the colours well.

Step 4- After applying Gesso, I distressed the edges of the paper using a pair of scissors. Also did some paper tearing on the top and the bottom of my card panel.

Step 5 - Using Scattered Straw Distress ink, lightly ink the distressed edges. This will give a finished look to your card panel.

Step 6 -Using Modelling paste and a stencil, I have created some texture on the paper to add a nice, embossed look.
Then, I added some black paint splatters using a paint brush and finally I assembled all the embellishments on my card.
I have used the 3D Dome sticker, and the Circular Collage Sheet - Blue Dreams (1 Inch circle) to create a gorgeous epoxy sticker. I have layered the epoxy sticker on the 1.5 Inch- Vintage Time Circular Collage Sheet. Here's a look at what I have created :

After I finished my card, I went ahead and created a mixed media tag too using The Vintage Attire- Labels embellishment sheet and My Golden Garden paper collection.


Hope you like my projects..Would love to hear your views on it. :)
Have a nice day everyone!


Beautiful card and soo well prepared tutorial and lovely tag
ReplyDeleteLovely tag and card.. Need to try out Papericiuos paper !!
ReplyDeleteLovely tag and card.. Need to try out Papericiuos paper !!
ReplyDeleteYour hands work like magic , Hussena. Your card and the tag, both look exquisite. Thanks for sharing the tutorial. :)
ReplyDeleteSo gorgeous Hussena. Your work always inspires me.
ReplyDeleteSuper pretty
ReplyDeleteSuper pretty
ReplyDeleteLovely job Hussena and thanks for the wonderful tutorial.
ReplyDeleteThank you so much Ladies ..Your appreciation mean's a lot to me :)..Glad you liked the projects and tutorial !
ReplyDeleteGorgeous..vintage feel to the card n tag Hussena !
ReplyDeleteso pretty
ReplyDeleteLovely as always, Hussena!!! Thanks for the tute!
ReplyDeleteGorgeous! wonderful paper collection!
ReplyDeleteBeautiful tag such pretty n dainty prints you have matched, cant take my eyes off it :)
ReplyDeleteBeautiful projects Hussena! ^__^ Absolutely love the card and tag combo! <3 Thank you for the lovely tutorial!
ReplyDelete