Hello friends!
This is
Parita Galani, hoping all of you are safe and doing fantastic! It's a difficult time at the moment and yet more reason to indulge in and create creative things to stay sane!
Today I am here with tutorial post featuring the
Happy Day Paper Pack. This collection with its fun elements and beautiful colors is perfect for all birthday and carnival themed projects.
These days, monthversaries of babies are in great trend, we often see beautiful pictures marking each monthly birthday till the 1st birthday, so I have created a beautiful photo frame which can present this journey beautifully and colorfully. The
Happy Day Paper Pack was so perfect to make this cute project.
Presenting - Polka Dot Baby Photo Frame

Step by Step Tutorial
Step 1 - I have taken an 12" by 18" chipboard, and covered it with two similar patterned papers from
Happy Day Paper Pack.

Step 2 - I took 12 paper pieces sized 3" by 3" from the Happy Day Paper Pack, and arranged as shown below, adhering 4 pieces in each line.
Step 5 - Lastly, I added few sentiments from the
Paper Pack. Ta-dah! Our layout is ready to go for framing. You can always add and arrange embellishments as per your liking.
Step 6: I highly recommend it to get it framed, however you can always get it displayed in your own creative way. This frame will be perfect, beautiful and memorable gift for any new parents. They surely will cherish and treasure it for years.
Supplies Used:
I hope you guys liked this tutorial post and will create some interesting projects using Papericious Happy Day Paper Pack, and don't forget to tag us, we would love to see your creations.
Take care!
Best regards,
Parita K Galani
This paper with its hues of blue and pretty whimsical sea elements takes us back to beautiful beach days memories for sure. The
Blue & Beyond Patterned Paper Pack is perfect to create all your beach holidays and summer projects.
I have made a Dream Catcher with a twist on a wooden hoop. I have taken a wooden hoop, then used a beautiful paper from
Blue & Beyond as my base paper. Next, I cut out and adhered another another printed paper from same collection. I layered it with pretty die cuts and elements from the
Blue & Beyond Paper Pack and its coordinating
Die Cut Embellishment Sheets. Finally, I added some flowers, paper twine, and sea shells to complete the look. I added various ribbons at the bottom in hues of blue and white and my project was complete.
So, let's have a look - Bohemian Summer - Dream Catcher
Supplies Used:
Hope you guys like my project. Please tag us on Facebook/ Instagram (@papericious), so that we can stop by and take a look at your creations using the Papericious - Blue & Beyond Collection.
If you'd like to add your own spin to this Dream Catcher, you can add a picture or your favorite quote or any beautiful sea shells you collected from that trip to customize the piece.
Stay healthy & Take care!
Best Regards,
Parita K Galani
Hello Friends!
This is
Parita Galani, here today with tutorial post using Papericious newly launched Paper Pack -
Blue & Beyond. Who doesn't love sea, we all would have some amazing memories associated with a good beach day.
Papericious - Blue & Beyond Paper Pack is just amazing to make beautiful projects to preserve your special memories in more beautiful way. Its amazing color palette with different designs and embellishments sheet is just so amazing to create any project.
I have created a very simple yet very unique Flip Book, which can be used to preserve your special beach day memories using Papericious Blue & Beyond Paper Pack and its matching Die Cut Embellishment Sheets.
Presenting Sea Shell Story Flip Book:
Step by Step Tutorial:
Step 1: I have taken natural sea shells approximately 3.5" by 3". I chose two pattern papers from the Papericious Blue & Beyond Paper Pack, traced the top shell on both paper front and back respectively, and then cut it. The paper has really good thickness, so I pasted it directly on the front and back using regular adhesive.
Step 2 - I used various embellishments from Papericious Blue & Beyond Die Cut Embellishment Sheets and from the paper pack's Embellishment Sheet to embellish the pages. I kept decoration very minimal as the papers itself are very attractive.

Step 3 - To give it a 3D look, I adhered all embellishments with foam glue dots.
Step 4 - To decorate the front page of the album, I used embellishments from the Papericious Blue & Beyond Die Cut Embellishment Sheets. I also added some glitter and pearls and adhered everything down using silicone glue to give it a 3D dimension.
Step 5 - Finally I tied it together using Jute Twine along with some charms to give it more rustic effect. You can also use large ring binder hoops if you like. I punched some holes in the sea shell with the help of a Laser Machine, while for the patterned papers, I used a One Hole Paper Punch. I simply passed twine from the base till the top shell and tied it with some charms and decorative jute ribbon. Ta-daa! Our pretty Flip Book is ready to preserve your beautiful memories.
Supplies Used:
Papericious Blue & Beyond 12" X 12" Patterned Paper Pack
Papericious Blue & Beyond Die Cut Embellishment Sheets
I hope you liked this tutorial and will create something beautiful from this amazing paper pack.
Take care & Stay Safe!
Best regards,
Parita K Galani
Hello friends!
Greetings for the day!
This is
Parita Galani. Hope you all are doing fantastic!
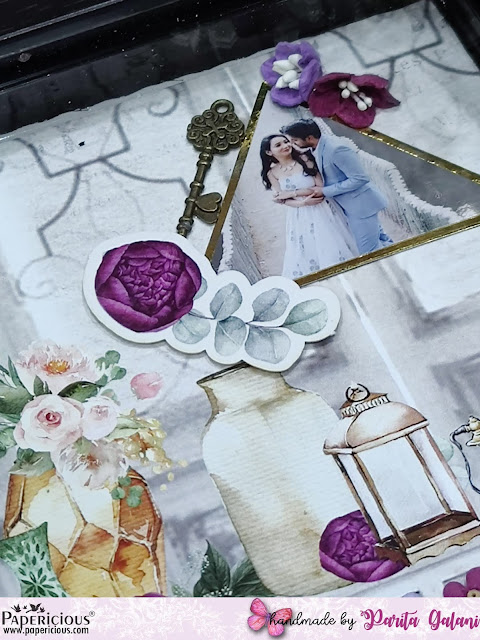
I am here today with inspiration post- You & Me Photo frame using Whimsical and romantic
Papericious New Release - The Date Night. I am in love with dreamy and vintage vibe of this collection and its truly very beautiful. Its perfect to create almost any type of ethereal paper craft.
I have created a super simple yet very beautiful photo frame using Papericious- The Date Night Paper Collection and its coordinating Embellishment Sheets. I am loving it how beautiful it has turned out.
Presenting
You & Me Photo Frame:
Supplies Used:
Papericious 'The Date Night' 12" X 12" Patterned Paper Pack
The Date Night - Die Cut Embellishment Sheets
I cant wait to see all dreamy projects you guys create from this beautiful paper pack.
Best regards,
Parita Galani