Transparent Treasures of Affection - A Well Wisher's Card
6:30 pm
Eva’s Giftionery
0 Comments
6:30 pm Eva’s Giftionery 0 Comments
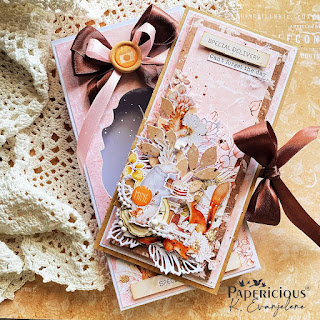
Hey Everyone! I have a beautiful card to share with you all, today, using the My Little Bestie Paperpack. Designed to capture the essence of your feelings and wrap them in a palette of brown, orange, and baby pink, this card is more than just paper and ink – it's a work of art that will touch the heart of your special someone.
The moment you lay eyes on this card, you'll be captivated by the harmonious blend of brown, orange, and baby pink. These hues have been carefully chosen to symbolize warmth, joy, and tenderness. As you open the card, a beautiful double bow adorns the top, inviting you to dive into the heartfelt message that awaits inside.
Express your love, gratitude, and admiration in a heartfelt message that resonates with your unique bond. Whether it's a celebration of an anniversary, a birthday, or just a spontaneous expression of love, this card is the ideal canvas for your emotions.
Give the gift of emotions, wrapped in the embrace of artistry – because some moments deserve to be cherished forever.
Love,Eva
WELCOME FAMILY PHOTO FRAME
10:01 pm
Gayatri Rani
0 Comments
10:01 pm Gayatri Rani 0 Comments
WELCOME FAMILY PHOTO FRAME – Ft. Pre-Marked Family Photo
Happy Friendship day to papericious fans & fellow crafters!
"Family is not an important thing. It's everything"
This is Gayatri here on the blog presenting you new photo frame by coloring the pre-marked family photo. Through a painting we can see the whole world.
So, I made a photo frame using Pre-marked Family mdf photo with a welcome note. These pre-marked bases are very easy to paint.
I have used all the chalk paints "Ripe pumpkin, Peacock blue, Orchid pink, Wild rose" sent by Papericious to make this Family photo even more elegant. They are quick to dry. One must try these chalk paints and pre-marked bases.
Here are some of the pictures of my art piece. It can be used as a home décor.
Thank you for joining me on the blog today. Hope you liked this project.
Happy crafting!!!
Shaker card & a shaker tag
11:00 am
madhabi's craft studio
0 Comments
11:00 am madhabi's craft studio 0 Comments
PICNIC BASKET
4:04 pm
Leo Krafty
0 Comments
4:04 pm Leo Krafty 0 Comments
Hai Friends,
I am here again with a cute idea. How about a picnic ideas?? Yes my project turned this collection into a picnic basket for your little one.
So let's make with me.
For that i have taken one 12*12 inch sheet from Baby's Day Out collection and done with some markings. As shown below.
Then you can cut through the dotted lines and rest of them you can scored it.
Secure every strips to the center. Now it turned into a closed box. Adding a box gives extra secure look. Checkout the measures for box too
And Again i added another 1.5cm strips for box carrying. Added enough embellishments and chippis to make it more attractive.
The colorful wheel - A PhotoFrame
11:10 am
craft_n_much_more
0 Comments
11:10 am craft_n_much_more 0 Comments
Hello Readers, Greetings for the day. This is Bhairavi here , presenting another cute project for Papericious with the most gorgeous paperpack- "Baby's Day Out". A completely different concept of photo frame with a twist idea for a photo prop. The most precious photo of your little one is something that needs a special place on your wall.

 Here is presenting my next project with the most colorful and cheerful paper pack - My little bestie. The photo space is surrounded by the different textured and colors from the paper pack to ensure the mix of emotions of the memory.


The motifs are the most perfect one for this paper pack as they fit so well with the concept and the theme. Brings out the freshness of the memory as well.


The two layered colorful wheel is something that shows a depth of the memory and the freshness it brings. This paper pack has the most perfect color combination for your little ones memories.


3D Airplane Box- ft: Baby's Day Out Paper Pack
11:00 am
PAPERTWISTERIndia
0 Comments
11:00 am PAPERTWISTERIndia 0 Comments
Hope you all are doing well! This is Chaitali, back with an inspiration for you all!!
As you all know I love making 3D projects..So, Today I have a very special project to share with you all. It's a 3D Airplane Box. Perfect for kids birthday party. You can put small sweet treats in it.
Now let's see how it looks like..❤️
I hope you all it! Thanks for Stopping by!❤️
Love,
PAPERTWISTERIndia🤗❤️
LIPPAN ART WALL CLOCK
3:16 pm
Gayatri Rani
1 Comments
3:16 pm Gayatri Rani 1 Comments
LIPPAN ART WALL CLOCK Ft. Pre-Cut acrylic mirrors
Hello everyone !
Gayatri here. Today we are going to look into "WALL CLOCK done with LIPPAN ART". It can be used as a home décor.
In today's project, I have used plain Mdf base in size 12 inches, Fevicryl mouldit epoxy compound, Chalk paints (Ripe pumpkin, Wild Rose, Peacock Blue), Acrylic mirror cutouts.
Firstly, I took MDF base and marked the circles to set a clock in it. Then I took Fevicryl mouldit in equal ratio 1:1, and then mixed it thoroughly, and rolled it in a noodle diameter to develop on the mdf board. After the epoxy dried completely, I painted with white acrylic paint as a base. Then I used vibrant chalk paints to elevate the design. Then pasted the mirror cutouts according to the design. After that, I set the clock movement machine including the Hour hand, Minute hand, Seconds Hand. You can see the finished project images down.
Thank you for joining me on the blog today. Hope you liked this project. Don't forget to try this art.
Happy crafting!!!
About Us

- Papericious is a vision started as a result of lack of craft supplies in India. This MADE IN INDIA production was started to provide craft supplies at affordable prices and best quality to all the international craft market. Starting from Scrapbook Papers, we have made beautiful Chipboards, Laces, Fabric Flowers, Art Mediums, Die Cuts, Stickers, Planner Kits etc. This journey is just 3 years old but has many many miles to go. Stay tuned with us, we have a lot surprises to pamper your crafting needs
Papericious
Followers
Find us on Facebook
Popular Posts
-
 Papericious Big Birthday Giveaway!
-
 Papericious + Mudra Collaboration Blog Hop - Day 1
-
 Wedding Envelope
-
 Chipboard album with a giveaway!
-
 May Challenge Winners
-
 Papericious Mini July Release 2017
-
 2016 MEGA GIVEAWAY!!
-
 Papericious + Mudra Collaboration Blog Hop - Day 3
-
 Decoupage Trays with Belle Love Papers
-
 DIY Desk Decor and Tags using Etheral Paper Pack







.png)


0 comments: