Waterfall Calendar - Tutorial
Hello everyone, this is Tanvi with my tutorial
post for this month, showcasing the beautiful Fleur Fun paper pack.
It is time to say good bye to 2018 & welcome another
year. I love making my own calendars & sending them across to near &
dear ones. Am sharing one such make for 2019 – a mini calendar cum note holder
that you can carry on the go.
Before moving to the tutorial let me
share a few pictures of the finished project -
I have used a mini envelope slider die
on the cover & will use them to insert mini tags with names & the year.
.
This booklet measures 5x7” & holds
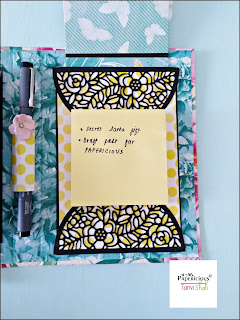
a calendar on one side & on the other is a pocket insert and a sticky note
pad. On the spine (inside) I have a pen holder too! No more digging in my bag
for a pen now.
For the calendar pages I have made a
waterfall insert.
TUTORIAL –
You will need chipboard, card stock
& pattern papers trimmed to the following sizes –
Chipboard – 5x7” – 2 pieces & ¾ x7”
– 1 piece
Pattern papers – 8x12” & 6 ¾ x 10 ¾”
for the covers.
Attach the chipboard
pieces to the cardstock. Make sure to maintain a 1/8" gap between the
spine piece and the cover pieces of chipboard.
Trim the cardstock
corners at an angle and attach double-sided adhesive & Wrap the chipboard,
also glue the pattern paper to the inside. This is how it will look. Gently
fold the covers while scoring in the 1/8" gutter between the
spine and the covers.
Next we make the waterfall section.
You will need –
Card stock - 11
x 4 ¼ “. Score along 11” side at 5 ½ &
pattern paper – 5 3/8 x 4 1/8” – 2 pieces
Card stock – 4x4”
- 6 pieces & pattern paper - 3 6/8 x 3 6/8" - 6 pieces
Card stock –
9 ½ x 3 7/8” score on the long side at 3 ¼ , 3 ½ , 3 ¾ , 4, 4 ¼ , 4 ½ & 4 ¾ “. Burnish all the folds. This will
form the base of the waterfall mechanism. Lay it down with all the score lines
to the right. Line up the first 4x4 piece along the second score line from the
right. Continue gluing all the pieces with tacky tape.
For the
sliding mechanism you will need a piece of cardstock - 1 x 7 ½ “ score at 1 ¾ &
5 ¾“ Wrap it around the other side of the waterfall & glue it about ½ “
from the edge. Next put tacky tape on the loose ends of this strip, line the
waterfall to the fold of the 11x4 ¼ “ card stock. The waterfall insert is now
ready. Print & Cut the calendar pages to size & glue.
Next we will need a piece of card
stock 4x6” & pattern paper – 3 7/8x 5 7/8” for the pocket & 3 ½ x11”
for the insert.
Here are some close ups of the project -
 |
Here is a flip through of the calendar -
Hope this inspires you to make one for yourself. You can play around with the inserts & themes similarly to create your own unique organizers, planners or reminders.
Happy & crafty 2019 friends, will be back in the New Year with some more crafty inspiration 😊
Until then, do visit & comment on all our posts to win some awesome goodies!
Supplies used -


Wow it's awesome. When I was is school I also used to make my own calendar. This inspires me to make a calendar again.
ReplyDeleteThis is amazing, love all the details. Love that there is a pen holder too. Thanks for the tutorial, would love to try my hands on it.
ReplyDeleteNice idea to gift someone this new year!
ReplyDeleteGreat idea of gifting , beautiful step by step tutorial, love all the elements!
ReplyDeleteLoved it! Completely fresh idea...never seen waterfall calender💟
ReplyDeleteAmazing, its superb idea for gifting in Christmas & NEW YEAR. I totally loved ur project. Be rocking
ReplyDeleteThat's a brilliant tutorial on how to make a wonderful calendar. Love every bit of it, especially the waterfall element.
ReplyDeleteYou have the best ideas . I am lovin it☄☄☄⭐
ReplyDeleteThese papers are so lovely and vibrant. And combined with your idea, this makes such an awesome gift. thanks for sharing this
ReplyDelete