Showing posts with label Papericious March Release 2016. Show all posts

Let`s go

Hello crafty friends, Monika here.
Today I would like to show you a mini album made with Let`s go paper pack.


Let`s Go is a travel theme pack, these papers are fantastic for holiday albums. I added lots of chipboards from four chipboard sets: Moments, Let`s Go, Arrows and Criss Cross. I embossed them with white embossing powder.


I love the paper with tickets, I used it for one of my pages. Just look how perfect these vibrant papers fit to holiday photos.


As a final touch I added some microbeads, gause and fantastic, yellow sequins.


Did I mention, that I adore Papericious chipboards? They are soooo great!


Papericious products used:
Let`s Go Papericious Designer Edition
Chipboard Moments
Chipboard Let`s Go
Chipboard Arrows
Chipboard Criss cross
Yellow cup sequins

I hope you like my inspiration.
Thank you for visiting. Have a great day.

Memory box Album with a tutorial

Hello Everyone!

I'm Manu and yes I had two consecutive posts this time on the papericious blog!!! I'm back with a tutorial on how to make a Memory Box Album!!! Well, this album can house a lot of pictures and messages, yet is very unlike the normal handmade albums we do!! This one has lots of flaps and is a lot interactive one!!! And yes, Memory Box Album is what I call this one as. Used the Ephemera collection which is the March release from Papericious and trust me, this collection is to be loved loved loved by all the Vintage loving folks out there!!! 

Here's the Memory Box Album!


I totally love making albums and different types of albums is what I look towards making !!! This one is an absolute favorite of mine these days!!

Lets see how Did I make this one!


The Good thing about this album is that keeping the base structure same, we can do a lot of different types of panel placements to make these albums interactive!!

I took a piece of 8*6 cardstock(remember to take a high gsm paper for this album). The other two panels are 4.5*8 and 4.5*8 which on which I have scored at 1/4 at three regular intervals to add dimension to the album!!! This way, while adding more panels and pictures inside, the album can accommodate everything!


Here are the measurements of the panels!!! Like I said, that there is no particular rule to be followed and the placements of the panels can be done as per your imagination and wish!! Remember to add more depth to the album on the side panels if you wish to make it very much picture centric album!!!


Here's how I have done the embellishment!

The Front page!!! 

This is how the album opens up!!

This is the right hand side panel all opened up!


Here's the middle panel opened up!! 

The middle panel has a waterfall structure to keep up with the every growing pictures and moments associated with them!!!

I hope you all liked the Memory Box album!!! Do try out the new packs and I'm sure that you will love them as much as I do!!!

Happy Crafting!
Manu

Tic Tac Toe themed card

Hello Everyone!!

I'm Manu and I'm sure that you all must have loved the creations made by the DT members with the March release. Papericious launchedtwo new paper stacks called 'Naturals' and 'Ephemera'. While Naturals have papers inspired by nature and not only they are wonderful for making layouts, they serve as a perfect backdrop for the pictures you take too! Ephemera is  to be loved by Mixed Media crazy folks!! It houses some really nice mixed media compatible designs. What more, Ephemera also has a co-ordinating diecuts pack and the pack has some lovely wordings and floral collection!!!

I have worked with the Naturals pack and here's a card that I made with it!


I totally loved the fact these the naturals collection could also be used to make a little artistic card!!! So love this one!!! I'm sure that I'm gonna make a few more of these!!

Here are some more close ups of the card!!!

Totally loved the soft hues of this paper collection!!


Making this card was real simple
I had 9 squares of size 2*2 cut out and then had the sides distressed. Stuck these on to another paper from the pack at a little distance and finished by putting this panel on the cardstock. The best effect comes when each layer is struck using the foam tape. One can them embellish the card !


I hope you all liked the card and yes, there are good more surprises in the store for you all. Stay tuned and keep loving papericious!!

Happy Crafting!
Manu

Mixed media layout tutorial

Hello everyone,
Its Kavitha here today to share a tutorial for making a "Mixed media layout" using the new release collection "Ephemera".This collection is so soft n shabby with beautiful pastel colors and floral prints which inspired me to create a girly soft shabby chic style layout.

So here is my layout,the papers are of high quality,holds the colors well n perfect for mixed media projects

So lets see the process:

I took two pattern papers of purple shade from the pack,torn the edge of one of the paper,distressed it and glued it to another one.

I cut some pattern papers from the same collection to 3*4 and 4*5 inches in size for layering,and also took few journal cards from the paper pack.I roughly planned my layout and marked it down.

Leaving the marked area,applied clear gesso to rest of the paper where  i am going to add colors.Once the gesso dried i used a stencil n modelling paste to create some texture around the arrangement.

Now i started to glue down all the papers except the pic(which i will add at last to prevent it from staining of colors).As you can see i made some changes,added  some horizontal lines as well as couple of doilies inbtw layers.I also used chipboard for few layers to add dimension 

Now its time to add some colors(my favorite part).I used silk acrylic glaze n twinkling H2o's from colourarte. I used few shades of purple,started from lightest color of purple n moved onto to darker shade.

As you can see in the previous picture,the colors look separate from the page,so i took some white gesso in finger,applied it  to the edges of the colors n blended it well with the paper,now  you can see the smooth transition of colors,soften the edges well to make it look one with paper.I also added some ink splatters with the darkest color.

I did some stamping with kaisercraft texture stamps n archival inks.Then applied some soft gloss gel randomly and sprinkled finnabair glitter, and silver glass glitters.

Now its time for embellishments,the "Ephemera" collection comes with  gorgeous coordinating die cuts.I added few of them-the flowers,butterfly postage and the title"Beautiful".I also added adhivise buttons from previous collection and some prima flowers to finish off.

Here is some close-up of the details for you.


I hope you all enjoyed my tutorial and find it useful,feel free to ask any questions if you have,i will be more than happy to help.Keep checking our blog for more amazing inspirations.


Happy crafting,


You and Me-Papericious -Naturals

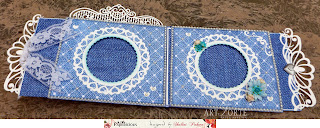
In this age of emails and what's app,  do you remember the last time you gave a card to someone you care for, someone who is special, someone whom you want to share your cherishes memories with. Today I present a card which is more than just a card. Its a card frame which can house two photographs of you and that someone special in your life. It has space to jot down those special memories and events that you share and which binds you together.

Made from the latest collection of pattern papers from Papericious-Naturals, which has awesome collection of paper designs for all moods --- denim ,sand,pebbles,brick,woodburlap. Just select the one that best suits your creative mood and occasion to make this special and personal giveaway. Decorate it with trinkets, laces, designer cutouts and paper flowers and you get one of the nicest memoir that you can share with someone close to your heart
So this holiday season, let your creative buds bloom with the "Naturals" collection from Papericious and let the love blossom 🌸 
Have a Lovely Day!!!