Showing posts with label altered box. Show all posts

Altered Box ft. Cut and Create Embellishment Sheets - SMILE


Altered Box (SMILE)  

Hello friends!
This is Nandini. Here I am back again with an altered art project. My luv for Mixed Media and colours have got the wings with the lovely products of Papericious. Some days before I just got a box  which is to be thrown away, but instead of dustbin it has got place at my craft table and I have renovate it with Mixed Media. 

Here is the procedure:
Take the box and paint it with the Chalk Paint “Bracket Green“.  Make some textures using Modelling Paste and stencil. Spray using brush some Lamp Black Chalk Paint on it. Let it to be dry. For the focal point, I have taken the Victorian Gate from the Papericious 3D Shaker Collection. For the colouring of the window, do the first coat with Gesso and second coat with Natural White Chalk Paint. Put some Crystal Clear Glitter on the wet paint so that it will be fixed with the colour only. Put some Sequins in it and cover it with an OHP sheet. To decorate it with flowers, take Cut & Create Embellishment Sheet "Blush". This collection has beautiful images of flowers, leaves, butterflies, hearts and keys. Do fussy cutting of all the images and make a beautiful composition near the gate. It gives a beautiful vision of a garden window which can make anyone smile. Take the sentiment "Smile" from the "Moments" Collection and colour it with Gesso and White Chalk Paint. To enhance its beauty, put some Crystal Clear on the sentiment. Let it be dry and settled.

Some more pictures: 


Supplies Used:


8. Blush - Cut and Create Embellishment Sheet

Hope you all have enjoyed this post. Thank you for stopping with us!
Do not forget to leave some some love and comments for me.
Luv & Hugs,
Nandini Ramchandani

Altered gift box with Ethereal paper.

Hello crafty friends,
Daksha here..Today I am back with a cute altered MDF gift box..I bought this cute little gift box on my recent visit to Starmark..and the moment I got this , I wanted to do something on that....so here it is..


I got this box ready with primed..  I have directly applied Papericious chalk paint..to get exact shade of my paper print..I have mixed two Colors  and applied.
When color dried properly I have applied pattern paper design from Ethereal paper pack with gel medium..edges distress with vintage photo distress ink.
I have fussy cut butterflies from monochrome paper pack.. highlighted with Papericious new release twinkling spark glitter..and used with foam dots.. Used Papericious white chippis with foam dots.
 'SMILE' sentiment is MFT die cut..I have used three diecuts to give dimensions to word smile..
Thank you.. that's all for today..hope you have liked my project..
Love n Hugs
Daksha

Supplies used


Altered Art with Decoupage papers and Glue

Hello people. 

Chirali this side wishing you all a belated happy diwali. I hope you enjoyed the holidays to the fullest. 

So today, it’s all about the gorgeous Decoupage papers and Glue, recently released by Papericious. Papers are so beautiful with which you can turn any waste thing into a useful one. 

In diwali, you must have got a lot of sweet or dry fruit boxes. Don’t throw them away. They can be turned into a very useful home decor piece. So one of my today’s project is one such Altered box and second one is my old dirty clutch. 


See these. An old dirty clutch which got many coloured scratches but it’s not at all damaged from inside so to make it useful, I altered it and second one is an empty chocolate box. 

Altered projects are here: 


Yaaayyyy!!!
I turned the box into a photo frame and that old clutch into the brand new one. 


 I painted whole box with French Blue chalk paint. The middle part is a bit outside which measured 7.5x7.5 inches. I wanted to make it a magnetic frame to ease changing of photos so I cut the same blue coloured paper and sticked on the back side after putting 4 magnets at desired distance. Then I made a stand and attached it with a Brad. Then decoupage started.  There are many different designs in deco papers. I have used two of them in frame. The Peacock Medley has been used as a base and Blue Roses has been used as a decoration to the frame. Supplies list is at last. 


Due to magnets, one can pull out all the layers of photo (Even this acrylic piece along with magnets) and gift it again as a chocolate or dryfruit box and then that person can use it as a photo frame. Isn’t it a great idea to gift someone a useful box which will last long too?


Some closeups!

Now the second one - altered clutch!


I painted the clutch with Pearl Pink chalk paint. Then fussy cut flowers and a butterfly from Pretty Peonies deco paper. Before sticking, I kinda distressed edges with cream coloured chalk paint. After applying decoupage glue and adhering them with clutch, I applied cream chalk paint roughly through brick stencil. 
And then applied deco glue all over.


The second side of the clutch is the second paper of same design, rounded the edges, distressed the edges with cream chalk paint and then the same decoupage process. 

And done!! 


My ever new clutch is ready! :)

I hope you like the projects. 

Thanks for stopping by. 

Hugs,
Chirali. :)

Supplies used:

Incredible India Box

Hello friends,
 This is Nupur here from Nupur Creatives
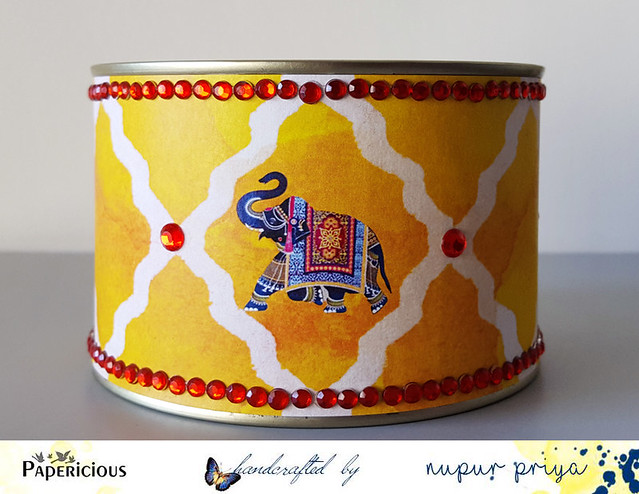
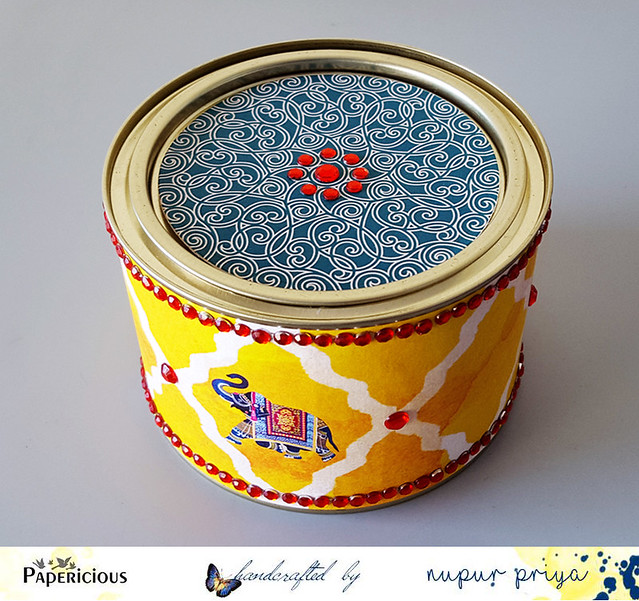
Today I am sharing a simple decoupaged box / tin.
I had an empty Threptin Biscuit tin & decided to give it a makeover.
I have used Incredible India Paper pack to decorate it. As the name suggests this paper pack has gorgeous designs inspired by India. I decided to use the design with elephants.
20161102_102238
The tin already had dull gold edges so I left it like that & covered rest of it with pattern papers using Mod Podge. I decorated it with red rhinestones to bling it up...
20161102_102250
This was quick & easy project but I love that it still adds the ethnic touch with bright & cheerful color to my work space & is so useful for storing small items...
Hope you like it too...
Thank you for visiting today :)
nupur
Materials Used:
Incredible India Paper Collection


Wedding box and Gift card holder tutorial


Happy my dear crafty friends and welcome to my second October Papericious post.
Today I am going to share a full paper crafting tutorial for a book shaped handcrafted box and a gift card holder.
This project was made with the most delicious Wedding kit and yes, this is a wedding trinkets box and a wedding gift card holder we are going to craft today.
So follow my easy instructions and you can make the very similar box and gift card holder in no time.
Step 1: Cut the thick chipboards to two pieces of 11 1/2*17 cm. and one piece to 3 cm*17 cm.  You can use any chipboards, even to recycle some old boxes.


2. Cut the Wedding kit dark red cardstock to fit the chipboards and leave 1 cm. for the folds.The cardstock here is shown with the front side up.


3. Use double sided glue and cover the chipboards as shown.


4.Glue three pieces of cardstock on the bare chipboard's as shown using the very same double sided glue.
Add the same glue around all four sides of the dotted cardstock for the next step.


5. Use your scoring board or score by hand the glossy pearl cardstock from the wedding kit. You just need one 30*30 cm. cardstock and score it on 1 cm so you get 12 mountain scores. Cut the cardstock into two parts vertically. Cut  each half into two pieces -one 11 cm long and one 16 1/2 cm. long.


6. Arrange one long and one short folded piece over the glue strip as shown. Arrange the second two pieces to get the full frame of folded cardstock. Add another layer of double sided glue over the folded frame.


7. Heat emboss the cover edges with gold embossing powder as shown.
You can use brand of gold ink and gold powder or just use clear embossing ink with gold powder.


8. Use stitched rectangle dies to make two die cuts for the front cover.


9. Glue the die cuts as shown over the front cover.


10. From this step on I wouldn't show  each paper piece cutting, the general arrangement of the elements.
So here is the inside of the cover here. I die cut a dark red cardstock and layered with smaller patterned cardstock die cut. Two hand cut post cards were added over the inside cover.  Then die cut two stitched circles and add the sentiment over it.


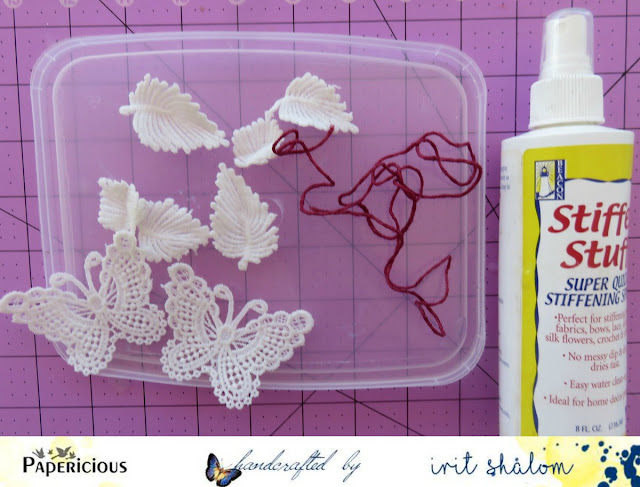
11.Use fabric stitffener over a few of lace cuts to make them " standing" after they are dry.
Make the same procedure with a long piece of red waxed twine. Let all pieces dry.


12. Die cut the stitched oval and add the lady's image inside the folded frame.
Cover the frame with deep red patterned cardstock as shown.
Add the hand cut word " Happiness" on the right low corner.
Tie the red and pink waxed twine around the cover.


13. This is how the finished front cover looks after I added a couple of die cut doilies using red cardstock and heat embossed a  few more die cut doilies with the same gold embossing powder.
The doilies, fabric flowers, leaves, butterflies and twine were arranged over the cover and some sequins and pearl beads were added as shown.


Here is a close  up of the main cluster over the front cover of the box.


And the upper embellished part is here:


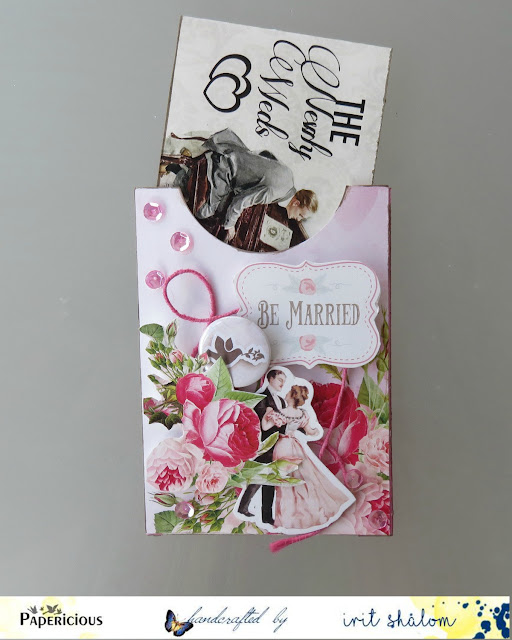
14. Now lets make the gift card holder.
 Make a small  bag using patterned paper and cut the half circle on the top with punch.
Cut  the  gift card size strip using two connected paper images.


15. Embellish the bag with twine. hand cut paper, image and sentiment as shown.


16. Add photo corners to keep the gift card inside.


This is how it looks with a folded card holder inside the bag.


And this is how it looks with the gift card holder inside the box.


I hope you like my small tutorial and you can make the very similar  project with our fantastic Wedding Kit !

Papericious Products Used:All products are from the Wedding kit

Paper Stack-The Wedding Kit
Fabric Flowers
Laces
Ribbon
Twine
Sequins
Pearls
Adhesive Flairs

All these products available at:


www.lulupu.com

www.thecraftshop.in

www.craftadda.com

www.imaginationsonline.com

Anantha Stationery

www.krafterscart.in

Nirmal Stationers, Delhi