Showing posts with label Papericious Grey Bloom Paper pack. Show all posts

Chipboard album with a giveaway!

Hello and good morning dear friends! ^__^

I'm Halak and today's project features a chipboard album that I created out of a single sheet of 12" x 12" chipboard by using the stunning GREY BLOOM paper pack by Papericious.

Yep, one single sheet.

The idea started with the paper pack actually. I saw it and went woah... it's beautiful, how did ever I miss checking out this paper pack!

I wanted to be able to show the versatility of this pack and I ended up using the whole pack (all the designs from the pack) for this project.

Before we delve into the project let me warn you that this post is LONG and picture heavy. So, sit back, relax and check this project out at leisure.
It's a tutorial, but constructed a little differently so as to enable to impart as much info as I can.

Let's get started!

Here's the chipboard sheet.

I broke down this 12" x 12" sheet into 6 parts that formed the base of my album.

After that I selected 6 designs (12 pieces in totality, 2 of each design) and cut them to chipboard size.

These are the 6 designs I selected for my base.

Now here's where the tutorial differs. Rather than teaching you how to make an album which requires the skills of cutting and gluing down papers and is pretty basic, I will teach you how to select papers and make your project.

Note the 6 papers that I selected. I deliberately chose 3 sheets that were all grey and the other 3 that had red.
I did that to maintain a design balance.
I could have taken 12 different sheets of pattern papers (one sheet on each side) instead of taking 6 designs, but I picked 6 designs for my base because out of the remaining designs I wanted to create embellishments for my album.

Let's have a look at all the 12 pages. I removed the pages out of the binder ring to be able to photograph them better.

The cover image :

Pages 2 and 3

Pages 4 and 5

Pages 6 and 7

Pages 8 and 9

Pages 10 and 11

Back cover (Page 12)

You must have wondered what are the odd bits like tags, rhinestones, die-cut pieces et al.

Well, it's a present for a crafty friend so along with designing some fun pages I added in a bunch of crafty stuff that she could use.

It's a fun idea and makes a beautiful present for your crafty friends!

Note
When you saw the album, did you notice the colors I used?

I used : Black, white and red cardstock. At some places I used a couple of pink (light and dark) rhinestones.

Why?
Because, when you look at the pack closely, you will see that apart from grey, these three colors are what you can see in the designs.

Why didn't I use grey?
Of course I could use grey too. But I decided on using the grey patterned paper from the Papericious paper pack (the one with the white leaves) because it looked a whole lot more prettier than the generic grey cardstock so I went with that and the remaining 3 colors. ^__^

Top tip
If you select  colors that are on the patterned papers it will make your album color co-ordinated and the effect will be more eye pleasing than slapping down any random color that you fancy.

What all can be done with Papericious patterned papers?

Actually, a LOT. Papericious patterned papers are very versatile. You can adhere them as-is, die-cut them, make fun tags or envelopes, the choice really is yours!

Did you know?
Papericious papers have gotten a whole lot more AWESOME!
They have upgraded in quality and are now available in 200 gsm!

Here a few of my favorite pages from the album where you can see the versatility of this gorgeous GREY BLOOM paper pack.

Made some fun tags :

Made a mini-envelope that I filled with die-cut words.

Note the die-cut words. They are... yup, red and white.
Now look at the envelope color.
Red and white.

See what I mean? Always think color co-ordinated.

I also die-cut these papers and paired them with words to create pretty pages.

This brings us to an end of this post.

For adhering paper I used red tacky tape and for small embellishments, I used generic PVA glue. (Fevicol)

I hope you are feeling inspired and will give this project a try! ^__^

GIVEAWAY

To help you start out and as a motivation to try out this project, I'm giving away a sampler pack of 6" x 6" papers from the GREY BLOOM paper pack and from the Pattern Collection Volume 1 paper pack (a total of 32 sheets, 8 designs per pack and 2 sheets of each design) to 2 lucky ladies.

Along with these beautiful papers, you'll be getting a card from me along with a little surprise! ^__^

To participate and for a chance to win, you only gotta do these 2 things :
1. Follow Papericious Blog

2. Join Papericious Facebook Group
    To join, click >> HERE

Once you are done doing the 2 things, just write "done" on this blog post via comment.

Entries close 25th July 2016 (midnight).

Winners will be announced 29th July 2016.

Till next time folks! Have a lovely day! *Hugs*


Posted via Blogaway

Altered Phone Stand with Grey Bloom Premium collection

Hello Everyone,

I've altered project to share with you today!


I've used Papericious lovely Grey Bloom collection for Altering this phone stand.


It looked something like this before, I don't know what was it used for. 
As I always forget where I've kept my phone.... I decided to turn into phone stand.


All embellishments are diecuts using Papericious papers.


I cut out roses from Grey Bloom collection. ..aren't they fab!


It is fun to turn something old into new! 
Hope you are inspired!
Papericiuous Grey Bloom Collection has lovely and elegant papers , can go with any kinda projects! 


Mini Album using Dusk and Dawn

Hello, lovely people,
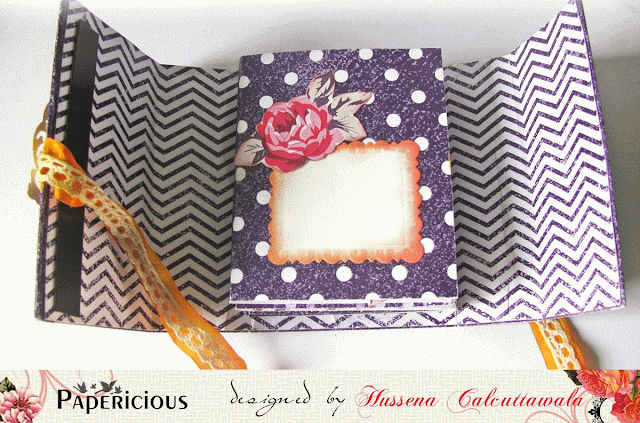
This is Hussena here and I have a very fun and beautiful mini album to share with you all which I have made using the Papericious Dusk and Dawn collection. I also have a tutorial on how to make it, so sit back, relax as you scroll through this picture heavy post!

I'm starting with few pictures of the album cover and the insides on how I have embellished this album using the Dawn and Dusk collection as well as die-cuts from the previously released Golden Garden and Vintage Attire Embellishment Sheets. You will find a few paper pieced flowers from the Papericious Grey Bloom collection as well!
 
A look at how it looks all opened up :


TUTORIAL 

 Step 1- Take a piece of chipboard and cut it up into the following measurements :
11cms X 5 cm, 11cm X 6.5 cm, 11cm X 8 cm, 11 cm X 3.6 cm, and last 11 cm X 3 cm.

(These measurements are given in centimetre only, but if you want it in inches, then you can Google convert it.)

Step 2- Take a piece of pattern paper. I have used the Dawn and Dusk collection and cut it into 30 cm X 14 cm. This will form the cover of your album.
Now, please your chipboards on this pattern paper as shown below, keeping a 0.5 cm gap between each chipboard.

 Step 3- Now, take another piece of coordinating pattern paper measuring approximately 28cm X 12cm and stick it in the inside as shown below. Score in between the chipboard pieces to create creases on the pattern paper so that it folds easily.
After you have glued both the pattern papers to your chipboard pieces, fold it up. it should look like the picture below. 

Step 4- Add strips of Magnetic tape measuring approximately 3cm X 9 cm on the two flaps of the album so that it can be closed.

Step 5- Now to create the inside pages, take pattern papers measuring 16.5 cm X 10 cm. Score it n half and keep a 0.5 cm gap in the centre of your score. Your score lines should be 8cm/0.5cm/8 cm.
Stick these pages in the opposite direction creating a zig zag fold like you do in an accordian fold.  You will approximately need 6 of these papers.
Now, the base of your album is all ready. you can go ahead and embellish it in any style you want. i really had a lot of fun using only Papericious products to create the insides of this album. :)

I hope you liked my today's post and you find the tutorial useful. Please leave your comments/suggestions on how you liked my project. Would love to hear from you!
Have a nice day everyone!

Introducing- Papericious Adhesive Buttons

Hello, everyone!
This is Hussena here and I'm very excited to introduce the new Adhesive Buttons from Papericious. These buttons/flairs have adhesive foam behind and come in TWO sizes of 1 inch and 1.5 inch. They have a very well finished plastic coating on the top and add such beautiful dimension to your projects.

So, here's a look at the gorgeous buttons being released. :)


Here's a look at two of the designs that I got to work with. 
You might have seen these designs before, as they were introduced in our Circular Collage Sheets which come with Adhesive backed Dome Stickers. These buttons differ from those Collage epoxy stickers in the sense that this has more dimension compared to them and when I tried using both on my projects, I definitely felt that these flairs/buttons gave more dimensional look and ofcourse, the designs are gorgeous!!

So, here's a look at what I created using these buttons. I have two projects to share today. The first one is an altered hoop and the second one is a Mixed media tag!
For this hoop, I have used the Pattern Papers from the Papericious Grey Bloom collection and the Wooden Collection. The pink flowers and the leaves are fussy cut from the Grey Bloom collection paper and mounted on square foams for dimension. As you can see, I have used these buttons for the centre of my bow as well as a part of my sentiment.  These make very pretty centres and look great on cards, layouts and mixed media projects!


Here are few of the close ups!


Moving on to my Mixed Media tag :

 I first created a burlap flower using the Tim Holtz Tattered florals die and layered it with some tulle and fabric cotton laces and finished it off with our Adhesive button. Isn't it gorgeous??
I have created the background of the the tag using embossing paste and a stencil with Distress Stain Sprays.


  Hope I was able to inspire you a little on the different ways you can use our Adhesive Buttons. For more ideas on how to use these buttons, I would urge you to check out our design team samples coming up soon.

Thank you for your time and have a nice day everyone! Please do not forget to leave your comments/suggestions. I love to get feedback from you :)