Showing posts with label home decor. Show all posts

Rustic Decoupage Kitchen Hanger


 Hello everyone , Today I am on the Papericious blog to share with you a handmade decoupage wall hanging plaque - perfect country style decor for cozy home or kitchen for hanging coffee mugs or some utility items. I created it using amazing  Decoupage papers and ornate MDF base with frame , both by Papericious.

Material Used 

Decoupage is the main technique I have used to make this wall Hanger. 

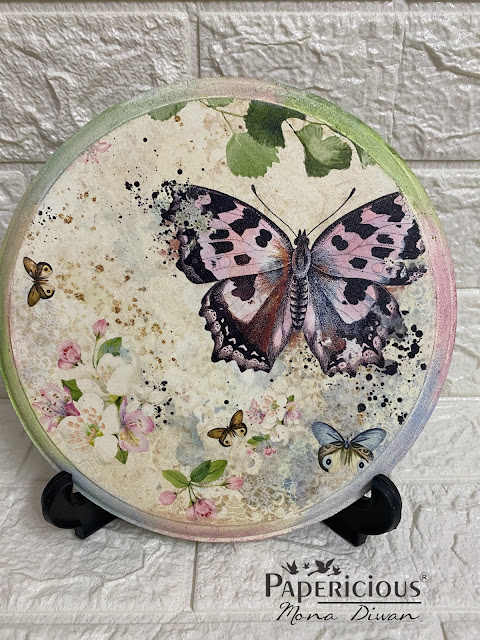
First I painted the base using Folk Art Chalk Paint- Sheep Skin. I then painted the frame using Folk Art Chalk Paint - Java.I highlighted the frame using Prima Antique Gold Wax.  My Caffeine Time. Decoupage paper pack has two papers and I combined both the papers on the wooden base and pasted them using Papericious decoupage glue. Once the paper was pasted I applied one coat of decoupage glue on top of that. In the last I sealed my project using two coats of Papericious Varnish. I then glued the frame on the base using Fevicol. Lastly hooks were attached to the plaque to add some utility to it.

This wall hanging cup hanger plaque is made for your special space in your home! A little touch can make you feel special in every aspect! This kitchen hanger also makes an ideal choice for a housewarming gift as well.

Hope you liked the project.

Happy Crafting!

Love


 Supplies Used

Papericious Decoupage Paper- My Caffeine Time

Papericious decoupage glue

                                                                   Papericious Varnish.


Set of Royal Wooden Wall Plate & Up-Cycled Lamp

 Hello Everyone, today I am on the Papericious blog to share with you a set of up-cycled bottle lamp and decoupage wall decor I created using amazing  Decoupage papers by Papericious.

I created the wall plate using amazing MDF bases which have smooth and perfect finish.This royal wall plate handcrafted to perfection will add warmth to any corner of your home.It goes well with modern/ethnic/boho decor.

SUPPLIES NEEDED

  • Round 8" decoupage base 
  • Decoupage Paper
  • Decoupage Glue
  • Varnish
  • Various shades of chalk paints
  • Scissors
  • Sanding Block
  • Drill Machine 
  • Empty wine bottle
  • Bulb holder and bulb
  • Electric wire
I started with a vision for making a wall plate which can be used as table decor as well.
 First I used the chalk paint " Sheep Skin" as base coat and then I used the Papericious decoupage glue for sticking the decoupage paper on the base. 
                                               
Further I sanded the extra paper off the MDF base and shaded the edges of the plate using coordinating colors.Finally I sealed my project with  Papericious Varnish
You aren’t going to believe how easy this is, there are minimal ingredients and steps and you really can’t mess this up. I am happy with the final result and enjoyed the work so much so that, I can foresee additional pieces in my future. This is a great beginner craft, even if you’ve never done anything creative before. This plate makes an  ideal gift for yourself or your loved ones during the festive season/house-warming/anniversary/wedding. As I said, if you are a beginner, you should try this project. You’ll love it and because there isn’t much too it, wrinkles are easy to avoid. I hope you like what I have created. 

For making lamp first I cleaned my bottle using alcohol swab to remove any stickiness. Then I drilled a hole in the bottle for inserting wire.     

Later this beautiful, up-cycled bottle was hand painted in white color. Then it was decorated with a decoupage technique, using this gorgeous,butterfly decoupage paper. I pasted the paper using Decoupage Glue .To add shabby chic, aged kind of look I distressed the bottle and added splashes of colors on it. Outside of the bottle is varnished for durability using Papericious Varnish . I  inserted wire and attached a bulb holder and I finished it off with a lamp shade on top. It creates unique, decorative centerpiece that brightens up your decor with this simple yet elegant country style accent.


I really enjoyed creating this lamp which makes a great gift as well. So, what are you waiting for? Pick up any empty wine bottle and decorate any space in your home or office with this beautiful bottle lamp.

SUPPLIES USED 

                                                                   Papericious Varnish.


Triangle Kid Room Decor ft. Dream Big


Hello Crafty Minds,
This is Tulika here from C 4 Craft, and I am so delighted to be back on the blog after a long gap, but with a super cute project featuring the Dream Big Collection from this month's NEW Release by Papericious. I hope you have already checked out the September 2020 Release, and if not yet, then don't forget to have a look. I am sure you will love every bit of it.

Now, let's talk about my inspirational project that I will be sharing today. I have made a triangle shaped wall decor for kids room with the Dream Big Patterned Paper Pack and the Cut & Create Embellishment Sheets. I have added Papericious Dream Big Theme Chippis too. Have a look - 
Supplies Used:


I had a great time making this cute wall decor and working with this amazing paper pack. Hope you liked my project and found it inspiring. Please don't forget to leave me some love. See you again very soon!
Love and Hugs,
Tulika Saha

Bird House ft. Blooms & Berries by Kirti Gupta


Hello Crafty Friends,
Kirti from Kirti's Kraft Kastle here. How are you doing this winter?
I am sure, during winters, the best thing to keep yourself warm is to do Crafting!
And when we have some amazing newly launched Paper Packs by Papericious like Blooms & Berries in our hand, we just can't stop creating some beautiful creations with it.

Sharing today my recent creation with Blooms & Berries, a Bird House!
When I saw this paper pack Blooms & Berries, all I could feel was inspiration from from nature. And proceeded with the same thought and decided to create this bird house. I wanted to use these papers for some unusual use of scrapbook papers, so I went ahead to use them for adorning my home decor, which can also be use as Lamp, Shade when fitted with electric circuit over lamp stand.

This Bird house is made of Grey Chipboard by Papericious and is adorned with Embellishments from Papericious Elements Sheets - Blooms & Berries & Indie Chic

Here are some close-ups of my bird house for you all!


I hope you find this inspirational to create and use this wonderful paper packs for creating your own version of home decor.

Supplies Used:


Thanks for stopping By,
Love,
Kirti Gupta

Bloom Chimes ft. 'Blooms & Berries' Tutorial Post


Hello Friends,
Season's Greetings!

This is Parita Galani from Mystic Hue.I am here today with a tutorial post of Bloom Chimes featuring Papericious Blooms & Berries Patterned Paper Pack Collection.

I have created a Hot Air Balloon for the top of the chimes and in the hanging have given the photo space and at the bottom I have attached fussy cut element from the same paper pack. This beautiful paper pack is so perfect to make beautiful gifts and decor for this season of merry and joy.

So presenting Bloom Chimes:


Here is the Step by Step Tutorial for making Bloom Chimes:-

Step 1 - I have taken a 3” by 5” piece and drawn the petal shape for the Hot Air Balloon.


Step 2 - Cut the first shape and than trace and make 6 more such petals. We will need 7 such petals to make Hot Air Balloons.


Step 3 - When petals are ready fold them into half such that design part is on the inside.


Step 4 - Now we will start sticking the petals one by one, keep petal adjacent on the plain part and stick one at a time.


Step 5 - When you are about to stick last petal insert a thread/rope of your choice, keep some over the top for hanging and approx 15” on the down to hang picture and embellishments.


Step 6 - After inserting the rope, stick the last petal from both the sides and our hot air balloon is ready.


Step 7 - Now cut out two pieces  3” by 5” paper from the paper pack and stick them back on back approximately 5” down from the Hot Air Balloon.


Step 8 - Lastly, I have stuck fussy cut roses from the paper pack at the end and it was approximately 5” down from the photo space.Cut off the excess thread and our Bloom Chimes is all set to be hanged with your favorite photos.


Material Used:

Papericious BLOOM & BERRIES 12" by 12" Patterned Paper Pack 


I hope you have enjoyed this tutorial and will make your very own Bloom chimes. Do let me know in the comments how do you like it.

Keep crafting! 
Best Regards, 
Parita Galani

Cloud Hanging - Jack & Jill


Hello people!

Chirali this side with a cute room decor project for kids' room using Jack & Jill Paper Pack. It's a cloud shaped hanging which would have photos too.

Here it is:
I cut four same shaped clouds from four sheets of Jack & Jill paper pack and stuck them, after folding in half, to each other from their back. 

First I cut a cloud on one sheet after drawing on the back. (12x12 pack it is which will make this hanging of almost 11x11 inches. Then I put it as it is on another sheet. For rest of the two sheets, I flipped the first cut cloud so that I can stick them as shown in the picture.

Afterwards, I put some photo mats and added fussy cut elements from the same pack. At last I added cotton on the edges and some small cotton clouds as hanging, and DONE.

Here are all the sides of the hanging along with some different angles:


Some closeups to make them look a proper cloud:


A mirror effect, which I clicked just like that but I loved it afterwards:


You do not need any other thing to decorate your project when you have such a beautiful paper pack.

I hope you liked it.
Thanks for stopping by.

Hugs,
Chirali :)

Supplies used: