Showing posts with label 3D Chipboards. Show all posts

Shadow box ft. Moonlight Bella


 Hello Friends
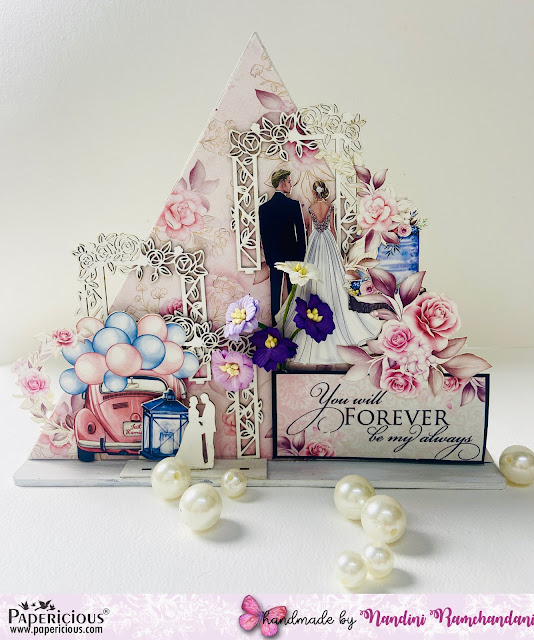
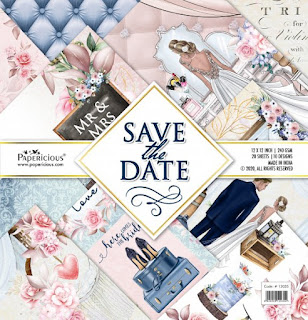
Nandini here, I am back with a tutorial of beautiful shadow box designed with the newly released paper pack collection - "MOONLIGHT BELLA" from PAPERICIOUS. Each paper from this collection is unique in designs. It has soothing eye candy color schemes.
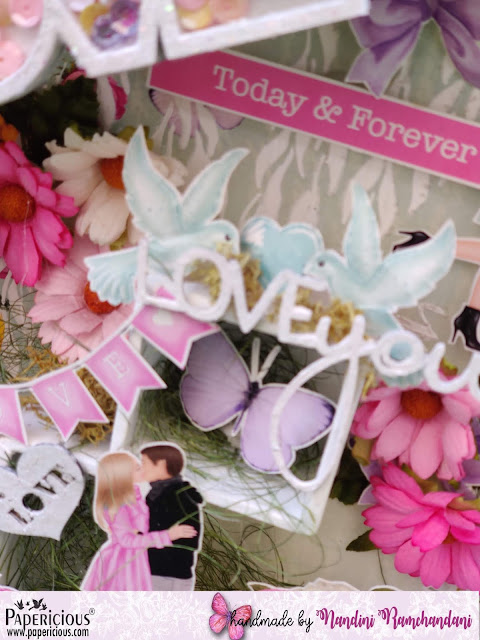
Here, I have taken a wooden shadow box and colored it with white gesso from Papericious. Cover the inner sides and base with amazing papers from Moonlight Bella collections. For holding the precut elements I have created a sort of border and pasted the elements on it in a delightful composition. 
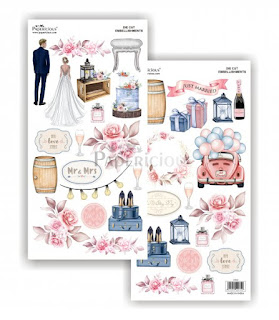
To decorate this shadow box I have used motif sheets from Moonlight bella and Serenity.  To enhance its beauty , I have added some flowers and sentiments on it.  
You can find detailed video tutorial here:
 Some more pictures


Supplies Used
Hope you like the project.
love
Nandini Ramchandani


Triangle Layout Ft. Save The Date

Hello Friends
Hope you all are keeping well. Nandini Here, Back with a video tutorial of a beautiful triangle layout ft. Save The Date from Papericious. This Delightful collection features a rich and chic pastel color pallet, with the beautiful images of bride, groom, balloon, roses, which is perfectly suitable for love theme projects.
Here sharing some more images of the project.


Material Used
Checkout the full process video here:
Hope you liked the project.
Happy Crafting!
Love
Nandini Ramchandani


Altered Heart ft. Billet Doux | Video Tutorial


Hello Everyone!
This is DT member, Shakti, here with you my another post of the month. This time I am here with a tutorial project for you all.

For this I am using Billet Doux Patterned Papers  with Billet Doux CCE. I took a heart shape MDF cut out from my stash to alter with the amazing supplies from Papericious. I have used Victorian Gate- Papericious 3D Shaker Chippis with some Party Sequins and some Rajni Chawla's Frosting Powder and Turret- Papericious Chalk Paint.
Let's have a look:


Let's watch the Video for Step by Step Tutorial:

List of Supplies Used:


I hope you guys enjoy the Tutorial!
Thank you so much for watching.
Have a nice day!

Folio Album ft. Billet Doux - Video Tutorial


Hello friends,
This is Puja and Sneha from Kalakriti. Welcome to another Video Tutorial Blog at Papericious. We have created this Folio Album using "Billet Doux" Paper Pack from Papericious. The Paper Pack is just amazing starting from quality, patterns and designs of the papers. We have also used Billet Doux -Cut and Create Embellishment Sheets, Be Mine Papericious Chippis, Shabby Chic Sequins, and Chipboard.

Have a look at the Folio Album created by us:
Here is the Video Tutorial for you all guys!
Do show some love on the Tutorial

Supplies Used:
Papericious Billet Doux 12" X 12" Patterned Paper Pack
Papericious Cut & Create Embellishment Sheet - Billet Doux

Hope you will like the project.
We hope we have inspired you to create the Folio Album. Do share your creations.

Lots of Love,
Kalakriti

Shadow Box ft. Me Before You | Tutorial


Hello dear friends!
 Wishing you all a very happy & prosperous New Year. 
Nandini here with a Tutorial Post of a Shadow Box featuring "Me Before You" .This time Papericious has come up with a wonderful paper pack "Me Before You" especially for the season of love. This is the perfect paper pack to create different projects for this season of love. It has variety of floral and couple images which is the perfect solution for the making of  Valentines' projects. 


Here is the procedure:
Step 1I started by selecting two paper sheets from the collection Me Before You. Cut the sheets accordingly to the size of the Shadow Box and paste it properly.
Step 2 Cover the edges of the Shadow Box with Papericious Modelling Paste. Create textures while covering the edges.
Step 3Create some design on the background by using stencil and modelling paste.
Step 4Put some mini and micro stones on the wet modelling paste so that it'll be settled with the paste.
Step 5Colour the MDF Embellishments and Grey Chippies first with Papericious Gesso and then White Chalk Paint. Apply some Frosting Powder on it and let it be completely dry.  After it dries, put some Sequins in it to make a perfect Shaker. 
Step 6Then adhere some different small boxes in it and start decorating it with the Cut and Create Embellishments from the "Me Before You" Cut and Create Embellishment Sheet.
Step 7Paste all the fussy cut elements and embellishments to make it look beautiful. To enhance its beauty, decorate it with some flowers. 

Some more detailed pictures:


Supplies Used:
Papericious "Me Before You" Patterned Paper Pack
Cut and Create Embellishment Sheet - "Me Before You"

I hope you all have enjoyed this tutorial. 
Thank you for stopping with us!

Luv & Hugs,
Nandini Ramchandani