Treat Boxes using Hooked Paper Collection

12:27 pm Palchincreation 0 Comments


Hello everyone,
Priya here again. Today, I have two Treat Boxes to share
 using Papericious HOOKED Collection.


Instructions :
Start with a 6*8 1/2 inch piece of White Cardstock and
score at 2'' vertically, turn and score at 2'', 4'', 6'', and 8''.

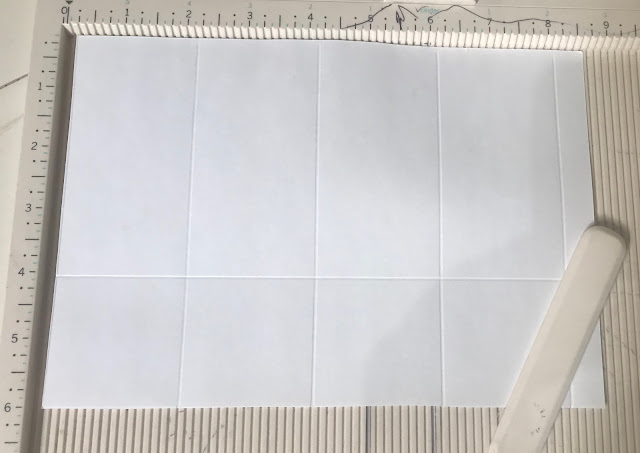
Cut the bottom 2'' square panels up to the 2'' mark and fold along scored marks.
Trim off bottom right tab and add double sided tape to where you will be forming the box
(I also used a Heart Die to make a heart shaped window in my box).

Make a lid out of a 41/8'' square piece and score all four sides of the paper at 1'' and glue them.

Add a piece of Acetate Sheet and form the box and decorate the box with Pattern Papers and Embellishments.

2nd Treat Box


Instructions:
You'll need a 4" X 12'' cardstock or Pattern Paper.
Position the paper as seen in picture and score at 6''.

Turn the paper and make a little notch at the 2'' mark , repeat on the opposite end.

Line up the notch and the centre score and score a
line connecting the two points .

Repeat on all sides and you'll end up with a diamond shape scored out.

Fold along the diagonal lines.
You have just finished making a little Treat Box.

Now, you can embellish the box as you want.
Here is my sweet Treat Box designed with lovely Hooked Patterned Papers.

That's all from me today!
Thanks for stopping by and hope you give one of these
 cute little boxes a try soon!
Love,
Priya

Supplies used :


0 comments:

Zig Zag Mini Fold Album By Swati

11:00 am swati nahata 0 Comments


Good Morning!
Hello Guys, I hope y'all are doing great. This is Swati from Swati's Crafting World bouncing back with another pictorial post. I've a new tutorial to share with you today featuring the "HOOKED" Paper collections by Papericious. Please visit www.papericious.com to buy this & other amazing collections of Papers, Cardstocks, MDF Trays, Shakers, etc.

ZIG ZAG MINI FOLD ALBUM


An interactive fold album with zig zag mechanism on one side & waterfall on the other. A beautiful album that has a lot of space to accommodate your beautiful & precious memories. There are two pockets on the ends with tags. It's spacious & can house 25+ Pictures and/or Tags.


ON TO THE TUTORIAL :


STEP 1 : Take 5 pcs cardstock of size 4" x 4 3/4".
STEP 2 : Take 4 pcs cardstock of size 11 3/4" x 6".
STEP 3 : Mark at 1" on 2 pcs, & add glue.


STEP 4 : Join 2 pcs - 11 3/4" x 6" - 2 Pairs.

STEP 5 : On one pcs of  glued cardstock, score at 1 1/2", 4 1/2", 5", 9 1/2", 10" continue 4 1/4", 
4 1/2", 8 1/2", 10".
STEP 6 : Cut at 10" score & fold all score line. The base is ready.
STEP 7 : On another piece of glued cardstock, score at 4 1/4", 8 1/2", continue 4 1/4", 8 1/2", continue 4 1/2". Fold all score line.

STEP 8 : Score at 1/2" on 4 3/4" side on all 5 pcs.
STEP 9 : Position the album base. Attach longer piece (zig zag fold) to the left side of the album & then attach the smaller pieces (waterfall) to the right hand one after another.

STEP 10 : Add magnets to the waterfall flaps.

STEP 11 : Add pattern papers on the side, then add tacky tape and/or glue & fold it to make pockets.


DETAILED PICTURES :


SUPPLIES USED :


That's all for today. Hope you like it & will definitely try this. I would love to see your gorgeous creation. Thank You so much for dropping by. Your likes, comments, creation from my tutorials, & shares motivates me to prepare more craft ideas & tutorials for you.
Until next time take care & keep crafting!
LOVE,
XOXO


0 comments:

A Wall Decor using I Love You Paper Pack

11:00 am Parul 0 Comments


Hello friends,
I think by now you must have understood my style in paper crafting. It's all CAS (clean and simple)!
No matter how hard I try to layer and embellish my projects my hands stop cooperating with me and the project ends up being a CAS again. Lol.

And today, I am here with yet another inspiration project.  I keep making some Wall Decor Frames now and then because they make such a nice gift for friends and family. 
I started with thick White Card Stock and made a Shadow Box Frame with it. You can find several videos on YouTube which explain how to make this frame. You need be little careful with corners and patience is the key :)
Then I took out three patterns from the I Love You Paper Pack from Papericious and cut out 3 hearts from each. With the help of ruler I folded them into half and adhered to the frame. And that gives you that 3D look to hearts which you can see clearly in following pictures.

You can make a number of patterns like this. Hope you liked the project :)
Supplies Used:

0 comments:

Double Pocket Mini Album by Tanvi Shah

11:23 am Tanvi 0 Comments

Hello Crafty people! I am back with my newest project share with you - A Double Pocket Mini Album. This is a good example of using Valentine theme paper packs all the year round. A am loving the clean & simple look of this mini album measuring 4x5" with scope for adding many pictures in both the pockets. 
I have put together a pictorial for this, hope you will give it a try.
For the base use a piece of Black Card Stock measuring 11 1/2 x 8", score it as shown in the image.
Next cut as shown below:
Mat all the sections with pattern papers of choice. I am using the I Love You Paper Pack. For the pockets trim black card stock to 5x3 1/2" & score at 1/2 & 1" along the shorter side.
Glue the 1/2"edge to the base as shown here
Glue this to the triangular folded edges to create the pocket.
Use either Velcro or magnets for the closures.
The inserts measure 4 3/4x3 3/4", 
I have used eyelets to hold 5 together. Use the pockets to hold chocolates, cards, gift cards, etc.
 

Supplies Used
Thank you for visiting today,
Happy Crafting!

0 comments: