Showing posts with label Papericious Star Gazer. Show all posts

Pop-Up Box Card ft. Star Gazer by Nikkita Sethi


Hello everyone! 
This is Nikkita, and today I am back with a cute Pop-Up Box Card featuring the adorable Star Gazer Paper Pack from Papericious.
I have used the Elements Sheets and fussy cut the cute images and used in my card. These papers are just amazing, too cute and I totally love using them in my projects. 
These are perfect for any baby theme projects.

Card when folded flat.

Isn't this a cute one? I totally loved making the card.
Hope you like my inspirational post.
Do leave some love.

SUPPLIES USED
WHITE 12" X 12" CARDSTOCK

STAR GAZER 12" X 12" Patterned PAPER PACK

HAPPY CRAFTING!
LOVE,
NIKKITA

Baby Announcement Box ft. Pretty Pixie


Hello everyone!
This is Priya here back today with a beautiful Inspiration Project to share with you:
BABY ANNOUNCEMENT EXPLOSION BOX
This is ideal for sending to your eagerly awaiting loved ones to tell them that your bundle of joy has arrived!

For this project, I have used PAPERICIOUS PRETTY PIXIE Paper Pack Collection, Baby 3D Shaker Chipboard and Papericious Its A Girl Sequins.

This paper has gorgeous shades of pink colours, perfect for the announcement of a little girl or any baby project. 


This adorable buttons and balloons are fussy cut from same paper collection.

This cute baby is fussy cut form Papericious Star Gazer Paper Collection.


Well, that's all from me today.
I hope you guys like it!
Love,
Xoxo

Supplies Used:


Fun Nursery Decor using Star Gazer - Tutorial


Hello everyone!
This is Parul here! Hope you are enjoying the New Release from Papericious which is filled with loads of cuteness. :) Today, I bring to you a fun nursery decor piece with tutorial which I have made for my cute little nephew Ahaan who is just few months old.

To begin, I selected all the material needed for this decor piece. I took two pattern papers from Star Gazer Paper Pack, one light blue with polka dots and one navy blue with stars.

I first cut a 10" wide cloud from light blue polka dot pattern paper and kept it aside. I also cut this cloud from a thick plain card stock and stick patterned cloud on it so that cloud can be extra strong.
               
Later, I cut 9 drops (each 4" tall) from dark blue starred pattern paper.

Next, I stitched these drops with one another with my sewing machine 3 drops in one strand.

I also took 2-3 embellishments from Ohh Baby Chippis and coloured them with blue brush marker to go with same colour theme.

I die cut the letters in Ahaan's name twice and then stacked them to bring thickness as embellishments.

Now is the time to assemble
First, I adhered the names and embellishments on the cloud and then the strands of rain drops :)
Later I made two holes in cloud and put a ribbon through it to make the hanging arrangement.


Hope you liked this. I would love to know :)
Thanks!
Love,
Parul

Supplies Used:

Fall Card with an unique hidden feature by Swati


Hello Guys!
This is Swati from Swati's Crafting World with a Pictorial Post. I've made this card with the newly launched paper pack - STAR GAZER. The Papers are a gorgeous medley of Vintage & Shabby Chic designs in BABY Theme & comes in two sizes - 12x12 & 6x6. These paper pack includes Milestone Paper Tags & Element Sheet. I'm sure you're going to love these adorable papers. The card looks so adorable in person. And here's the close-up picture.

FALL CARD WITH AN UNIQUE HIDDEN FEATURE

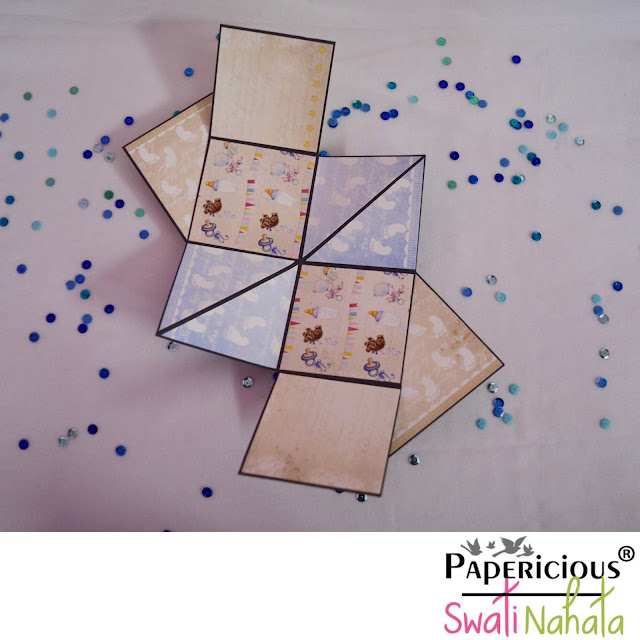
This cute little card is designed in a way to delight someone. The fall card has an hidden mechanism inside it. It can store your memory pictures & can be customized as per your need. The hidden mechanism inside can dig 6 pictures and/or tags. I've decorated the top with a cute shaker element. 


ONTO THE PICTORIAL

STEP-1
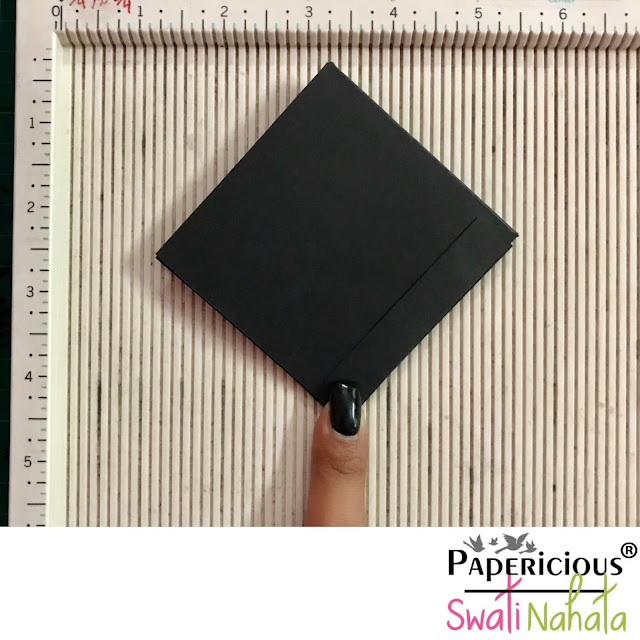
For the base - 103/4"x 41/4". Score at 51/4" & 51/2" from 103/4" side.
STEP-2
For the hidden mechanism - 
1. 6"x6". Score at 3" from all the sides & then score diagonally.

2. Inside Flaps - 3.5"x3" (2 pieces). Score at 0.5" from 3.5" side. And then add the flaps as shown in the picture.

STEP-3
Add pattern papers & paste the hidden mechanism as shown in the picture below.

STEP-4
I've decorated the top of the card with Papericious 3D Shaker Feeder Chippis & painted it with Papericious- Chalk Paint, Duck Egg.

DETAILED PICTURES


DETAILED VIDEO


MATERIALS USED:

STAR GAZER PAPERICIOUS PAPER PACK


Well that's all from me today. Thank You so much for dropping by. I hope y'all like it. 
Your likes, comments & shares will definitely excite me to prepare more craft items & I'll be thankful to y'all for it. Update your love in the comment section below.
Until next time, Take Care & Keep Crafting!
XOXO 

Personalized Room Plate ft. Star Gazer


Hello everyone!
Priya here with you again. Today, I have an adorable Personalised Name Plate to share with you. A beautiful makeover to your kids room!

I have used the amazing Star Gazer Paper Collection from Papericious to design my nephew's room plate.

Instructions:-

1. I took one plain MDF size 12" X 4" and primed the surface using Gesso.


2. Then, I selected two papers from Star Gazer Collection and one fussy cut sheet from same collection  and layered them on my MDF base using Papericious Decoupage Glue.


4. Then I colored the MDF letters using Chalk Paints and arranged them on my base and also used some Papericious Baby theme Chipboards for the decoration.
5. And lastly , I have used a metal chain for wall hanging and that's all my cute name plate is ready!
Few close-ups:
 Look at these amazing Chippies from Papericious which is just perfect for your any baby theme project to make them more adorable and cute!

I've used two shades of Chalk Paints to color them for more precious look.

Well, that's all from me today!
I hope I inspired you guys enough!
Thanks for watching!
Xoxo

Supplies Used: