Showing posts with label Papercious Golden Garden. Show all posts

Papericious July Challenge | Moodboard

Hello everyone!!
Good morning, it's Hussena here to bring you the brand new challenge for this month. Thank you to all those who played along our last challenge. We will be announcing the winners shortly.
We have a very beautiful Moodboard to inspire you this month.


Here is a look at our Moodboard, which is the courtesy of our DT member, Halak Shah :) 

Our challenge for you this time is, to get inspired either from the colours of this moodboard, or any/all elements from the moodboard like for example - you might be inspired by the Woodgrain background, the flowers, the glitter or even the golden mesh. Whatever inspires you, incorporate it in your project and please MENTION it in your post so that we DT members have a clear idea about your inspiration.


{Papericious Challenge #4 Guidelines}

  • You can create any project - Cards, Layouts, Albums, Altered items, 3D projects, Home Decor etc.
  • You must mention how and what has inspired you from our Moodboard. This is very important for your entry to qualify.
  • The last date for submission of your projects is 9th August, 2016 at 11:59pm IST.
  • Please go through the General Guidelines HERE before you link up your project. Any project not following the rules, will be disqualified and it will not be eligible for the prizes.

Now, what's a challenge without prizes, right?! Papericious will be giving away TWO prizes every month -

  • The DT will be selecting a Merit Winner at the end of every challenge who will stand a chance to win a gift voucher worth INR 500 from the Papericious store.
  • We will be also be having a Random Winner from all the entries who enter their projects every month to win a Papericious 6 X 6" Pattern Paper Pad

Everyone's got a equal chance here so whether you are a novice or an experienced crafter, all are welcome to play along our challenges :)

And as always, we have some gorgeous inspiration lined up for you. Here's a look at the creations :

Halak Shah
( I was inspired by the woodgrain texture, white - tan - gold color combo and the white flowers.
I used patterned papers from Papericious Naturals paper pack along with tan leaves fussy-cut from Papericious My Golden Garden paper pack )

( I was inspired by the colours as well as the white mulberry flowers, the woodgrain background and the mesh from the Moodboard )
 I have used the Papericious - My Golden Garden paper for the base, then layered it with the Papericious Wooden collection and finally used the Papericious Infinity Collection papers for die-cutting that doily.

Hope you're inspired to play along our challenge. We would love to see your entries using Papericious products!


How to use stickers in your Retro Chic planner !

Hello everyone,
This is Hussena here and today I am sharing with you all the different accessories and stickers that you get with the Papericious Retro Chic planner and how to use them.

First let's have a look at what you get along with the Retro chic planner :
As you can see above, you get 3 sticker sheets and one journal tabs/tags sheet with your planner. 

Here's a closer look at all the 3 sticker sheets when taken out of their packaging :
The sheet on the left hand side is the icons and tabs sheet. It contains various stickers for your day to day use and I will be showing you how I have used them in my below pictures. The sheet in the middle is a clear sticker sheet with some fun sentiments and images and when you stick them on paper they seem almost like stamped images.
The third and the last sheet on the right hand side is the hole-guard sheet and it helps to reinforce your planner pages. See the picture below to get an idea on how it's used :

The brown circle you see below the binder rings are the hole-guards.

Now moving on to how to use the Icon and tabs stickers in your planner. Here's how I have used them in mine :

This is the monthly spread page and the dollar icon on the first represents the due payments that I have to make on the first of the month. The telephone icon against my mom's doctor appointment is self explanatory..Also notice that I have highlighted certain dates by using colored round stickers. These were actually punched from a colored cardstock. I have also done some stamping to highlight certain important dates.

This is my first week spread for the month of February. Here I have used a couple of stickers, washi tapes and stamping to make my page more colorful.

As you can see, I have used the 'Pay Day' icon sticker for the first of the month when I supposedly get my salary :)...You can use this on any date on which your payday falls though. The blue 'To do' sticker along with the horizontal 'heart checklist' sticker  is to note down the tasks for the given day or even the tasks you have to do in the particular week.

There are small 'Happy birthday' banner stickers included in the icon sheets to help you highlight the birthdays you want to remember of your family or friends.

The Weekend highlighter sticker.

The shopping cart icon sticker.

This is the second week of Feburary page and I have highlighted the Valentines' day with a quote taken from our If Only collection.

I have used the transparent stickers on the dotted washi to highlight the important task I had to do before V-day.

The Instagram icon.

The dinner icon and the 'To buy' tab.

And lastly, the blog challenge page and I have embellished it with a few die cuts from our Infinity collection and Golden Garden collection.

Hope you find this info useful for using the stickers in the Retro Chic Planner. If you have any questions regarding any of the icons stickers, do let me know in the comments and I will get back to you ASAP.

Thank you so much for joining me today and have a nice day everyone :)

Mixed Media Canvas using If Only Pack

Hello friends,
This is Hussena here and today, I have a mixed media canvas to share using our latest valentine release the"If Only" collection. I totally love the beautiful papers in this collection which is such a perfect mix of unconventional valentine designs and colors.
So here's a look at what I have created :


And, here's few close-ups of the canvas :


The centre heart is created using small triangle pieces of paper from this collection. I have used five of the designs from this collection and have alternated it. The base of the heart is a thick watercolor paper which was die-cut using a heart die. The base of the canvas is layered with torn and distressed paper strips from the collection and I have gessoed over it. The small floral arrangement on the either side is from Papericious 'My Golden Garden' and 'Infinity' collection. These collections have the most prettiest florals in them ! 
And, ofcourse how can I forget the gorgeous butterflies which is again from the Infinity collection. The dark green leaves on the lower side are actually paper pieced from the 'If Only' pack since this collection also has gorgeous blooms in it.

Hope you like my canvas and are inspired to create something similar using our If only Paper pack. My team mates have been sharing some really fabulous inspiration using this pack. Hope you have checked out their work! :)

Mini Album using Dusk and Dawn

Hello, lovely people,
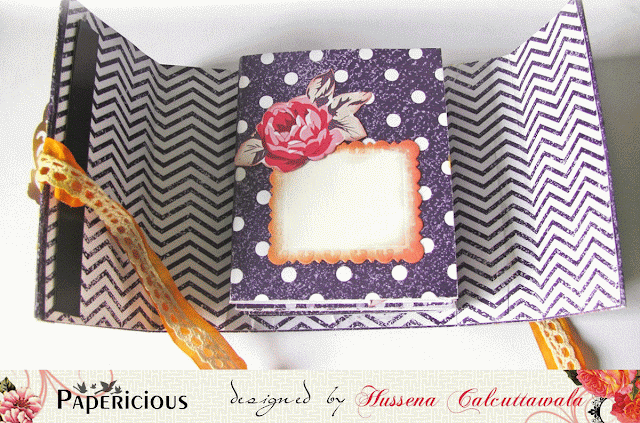
This is Hussena here and I have a very fun and beautiful mini album to share with you all which I have made using the Papericious Dusk and Dawn collection. I also have a tutorial on how to make it, so sit back, relax as you scroll through this picture heavy post!

I'm starting with few pictures of the album cover and the insides on how I have embellished this album using the Dawn and Dusk collection as well as die-cuts from the previously released Golden Garden and Vintage Attire Embellishment Sheets. You will find a few paper pieced flowers from the Papericious Grey Bloom collection as well!
 
A look at how it looks all opened up :


TUTORIAL 

 Step 1- Take a piece of chipboard and cut it up into the following measurements :
11cms X 5 cm, 11cm X 6.5 cm, 11cm X 8 cm, 11 cm X 3.6 cm, and last 11 cm X 3 cm.

(These measurements are given in centimetre only, but if you want it in inches, then you can Google convert it.)

Step 2- Take a piece of pattern paper. I have used the Dawn and Dusk collection and cut it into 30 cm X 14 cm. This will form the cover of your album.
Now, please your chipboards on this pattern paper as shown below, keeping a 0.5 cm gap between each chipboard.

 Step 3- Now, take another piece of coordinating pattern paper measuring approximately 28cm X 12cm and stick it in the inside as shown below. Score in between the chipboard pieces to create creases on the pattern paper so that it folds easily.
After you have glued both the pattern papers to your chipboard pieces, fold it up. it should look like the picture below. 

Step 4- Add strips of Magnetic tape measuring approximately 3cm X 9 cm on the two flaps of the album so that it can be closed.

Step 5- Now to create the inside pages, take pattern papers measuring 16.5 cm X 10 cm. Score it n half and keep a 0.5 cm gap in the centre of your score. Your score lines should be 8cm/0.5cm/8 cm.
Stick these pages in the opposite direction creating a zig zag fold like you do in an accordian fold.  You will approximately need 6 of these papers.
Now, the base of your album is all ready. you can go ahead and embellish it in any style you want. i really had a lot of fun using only Papericious products to create the insides of this album. :)

I hope you liked my today's post and you find the tutorial useful. Please leave your comments/suggestions on how you liked my project. Would love to hear from you!
Have a nice day everyone!