Showing posts with label Papericious Paper Stack-The Wedding. Show all posts

Twist and pop Wedding card

Hello.
Some weeks ago I have seen a friend that My dear friend Raluca made. It was Twist and pop card.
She showed and explained to me how to make it and I have to admit it was one of the most fun
card foldings I have ever made.


You can see the cool twist and pop at this video:


I used THE WEDDING paper pad. This paper pad is amazing. It includes even beautiful Love sentiments and some Ilustrations to color .

Embellishment:
LACES 
Fabric flower
JUTE CORDS
Ribbon

That is what pop ups at inside of the card.


The tools:
I used BLENDING TOOL


LOVE -  I cute each letter from the Wedding  papper pad and glue with epoxy dots.


SEQUINS 
Here I used one of those Love sentimentsfrom the wedding paper pad.


Here you can find the information about all our retailers all over India and even internationally.
Thanks for stoping by
Hugs, DT Diana


Wedding card with a box

Hello, it`s Monika here.
Today I would like to show you a wedding card made with Wedding Collection Kit.
 
I used beautiful, romantic papers and added an image.

I also used gorgeous fabric flower, leaves and branches cut out from pearlized cardstock, leafy lace, some jute twines and adhesive button.


Materials Used:
Papericious Wedding Scrapbook Pattern Papers
Wedding adhesive buttons
Leafy Lace
Papericious Sequins
Fabric Flowers
Jute Twines
All the items are available at:
www.lulupu.com
www.thecraftshop.in
www.craftadda.com
www.imaginationsonline.com
Anantha Stationery
www.krafterscart.in
Nirmal Stationers, Delhi
Best wishes!

Wedding box and Gift card holder tutorial


Happy my dear crafty friends and welcome to my second October Papericious post.
Today I am going to share a full paper crafting tutorial for a book shaped handcrafted box and a gift card holder.
This project was made with the most delicious Wedding kit and yes, this is a wedding trinkets box and a wedding gift card holder we are going to craft today.
So follow my easy instructions and you can make the very similar box and gift card holder in no time.
Step 1: Cut the thick chipboards to two pieces of 11 1/2*17 cm. and one piece to 3 cm*17 cm.  You can use any chipboards, even to recycle some old boxes.


2. Cut the Wedding kit dark red cardstock to fit the chipboards and leave 1 cm. for the folds.The cardstock here is shown with the front side up.


3. Use double sided glue and cover the chipboards as shown.


4.Glue three pieces of cardstock on the bare chipboard's as shown using the very same double sided glue.
Add the same glue around all four sides of the dotted cardstock for the next step.


5. Use your scoring board or score by hand the glossy pearl cardstock from the wedding kit. You just need one 30*30 cm. cardstock and score it on 1 cm so you get 12 mountain scores. Cut the cardstock into two parts vertically. Cut  each half into two pieces -one 11 cm long and one 16 1/2 cm. long.


6. Arrange one long and one short folded piece over the glue strip as shown. Arrange the second two pieces to get the full frame of folded cardstock. Add another layer of double sided glue over the folded frame.


7. Heat emboss the cover edges with gold embossing powder as shown.
You can use brand of gold ink and gold powder or just use clear embossing ink with gold powder.


8. Use stitched rectangle dies to make two die cuts for the front cover.


9. Glue the die cuts as shown over the front cover.


10. From this step on I wouldn't show  each paper piece cutting, the general arrangement of the elements.
So here is the inside of the cover here. I die cut a dark red cardstock and layered with smaller patterned cardstock die cut. Two hand cut post cards were added over the inside cover.  Then die cut two stitched circles and add the sentiment over it.


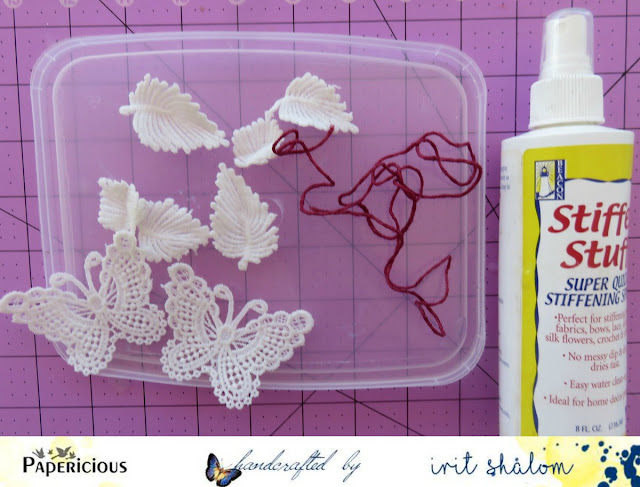
11.Use fabric stitffener over a few of lace cuts to make them " standing" after they are dry.
Make the same procedure with a long piece of red waxed twine. Let all pieces dry.


12. Die cut the stitched oval and add the lady's image inside the folded frame.
Cover the frame with deep red patterned cardstock as shown.
Add the hand cut word " Happiness" on the right low corner.
Tie the red and pink waxed twine around the cover.


13. This is how the finished front cover looks after I added a couple of die cut doilies using red cardstock and heat embossed a  few more die cut doilies with the same gold embossing powder.
The doilies, fabric flowers, leaves, butterflies and twine were arranged over the cover and some sequins and pearl beads were added as shown.


Here is a close  up of the main cluster over the front cover of the box.


And the upper embellished part is here:


14. Now lets make the gift card holder.
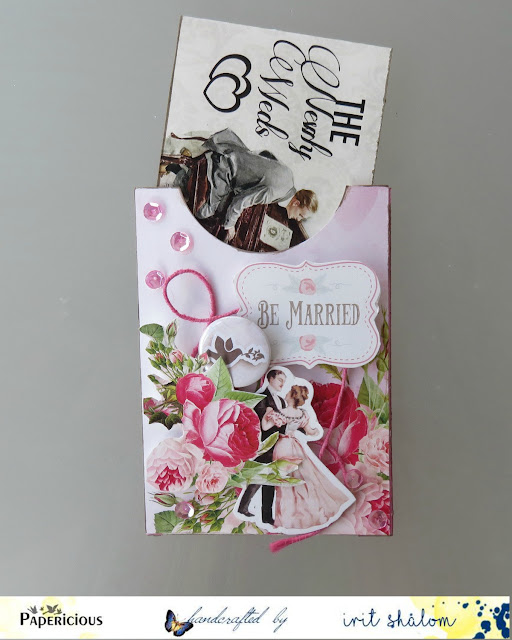
 Make a small  bag using patterned paper and cut the half circle on the top with punch.
Cut  the  gift card size strip using two connected paper images.


15. Embellish the bag with twine. hand cut paper, image and sentiment as shown.


16. Add photo corners to keep the gift card inside.


This is how it looks with a folded card holder inside the bag.


And this is how it looks with the gift card holder inside the box.


I hope you like my small tutorial and you can make the very similar  project with our fantastic Wedding Kit !

Papericious Products Used:All products are from the Wedding kit

Paper Stack-The Wedding Kit
Fabric Flowers
Laces
Ribbon
Twine
Sequins
Pearls
Adhesive Flairs

All these products available at:


www.lulupu.com

www.thecraftshop.in

www.craftadda.com

www.imaginationsonline.com

Anantha Stationery

www.krafterscart.in

Nirmal Stationers, Delhi


Quick cards using The Wedding kit


Hello! Erum here today to share with you a couple of quick cards using products from The Wedding kit..
 I have used very few pieces from the cut and create embellishment sheet. There are so many more cards that I could create  using this kit, I promise to share more cards in the future.
.


What I did was cut out the pieces that I thought would go together. 
Actually these pieces are for three cards that I originally planned to show you but ran out of time to make the third one! YIKES!
Anyhoo!
Here is the first set I came up with up.

 And here is the second.


The one I shared above had only two elements that I liked together so I thought I'd add some lace from the kit. Below are the cards together.


Let's look at the first card.


Since we were making quick, CAS cards I thought I should definitely add some watercolour to the background. I wasnt very happy with just the watercolour so added partial stamping too.
To add a bit of texture I added this lace butterfly from the kit, isn't it just beautiful?!
Everything you see here apart from the stamps and the rose is from The Wedding kit, including the twine and sequins.
Don't get me started on how beautiful the sequins look in person!!! 


On to the next card. 

For this one I wanted to give the card a very soft look because of the elements I used here.
The cake, banners and the "We Do" sentiment all are in pastel colours and they look very pretty.
I added very light watercolouring to the background along with gold heat embossing.


Here is a closer look at the elements and the beautiful sequins.


I hope I got some of those crafty juices flowing!
Take out your kit, take this particular sheet out and start brainstorming!
I would love it if you could share on our Facebook page and tag me.
Also, if you like to see more quick cards out of The Wedding kit, do let me know and I will have another post ready for you!
That's all from my side today. Don't forget to check out our CURRENT challenge
Hugs and love,
- Erum


Page "Dream" by Nini Scrap + tutorial

Hello to everyone,

Back on the blog for you are my new realization.
I used Wedding Package leaves. Super beige colors.

This time around I very rarely used media. I stayed in a shabby and sleek base ... All the papers in this collection we need any addition, papers of beauty ensures that your photos be enhanced by the papers.

Having no wedding photo, I decided to take a picture of my boys.
And this is what gives his: