Showing posts with label DT Diana. Show all posts

Shaker card

Hello crafties,
This is Diana  showing you my last creation.

For this Shaker card I used; Back to Basics paper pack. 
Later on you will see how I combine those patterns.

Papericious released wide collection of Shaker Chipboards. It has never been that easy to make a shaker. Just perfect. For my card I used 3D shaker chipboard: Fancy tag.
It includes 4 layer of chipboard and 1 acrylic cutout. As you see I took yellow pattern and made a sketch around the bottom part of the chipboard. then I cut it and glue it above.


I decided to choose this sweetie girl from old Swedish company Hänglar and colored with Distress Markers. Afterwords I glue it on the yellow pattern and stamped "Shine".


July release has many Sequin mixes.  I used Sequin mix Spring


I put Sequins inside the frame and covered with rest of Chipboard layers. The top layer I painted with Black gesso.


The  Background I cut different patterns in squares. And on the side I used Jute cord baby blue.


I hope you like my Shaker card.
Hugs
DT Diana


Shaker Wedding card

Hello my friends

Here is Diana.
Today I am showing my Shaker Wedding card.

A friend of mine is getting married next week and I made a card for the couple.

I used the 3D Shaker Chipboard HEART. I colored it gold and silver to highlight it.  And I glued the lace around the heart to make it more vintage look. The background is Papericious Premium Edition - The Wedding.
Inside the Shaker I used the new Sequins mix - Vintage.


Inside the Shaker I glued the pattern from the same wedding pack and I stamped a beautiful and short expression. Forever and Always.

Inside the card same Wedding paper pack

 Here you can see the whole card.

The products I used:

Thanks for stopping by
hugs, DT Diana


Mini album Indie Chic


Hello dear friends

This is Diana
This time I have made my own mini album. I started from a greeting card and somehow ended up with this cute mini album. For this project I used the latest Papericious release Indie Chic. It has gorgeous patterns with feathers, dream catcher, flowers, butterflies and much more. For the base I used CS from the same pack. I made some small tags with Jute cords.


Here you can see close up for the cover
I finally tried the Crystal clear glitter and let me tell you, it makes a magic. When it dries you see the great effect of the diamonds that sparkling in rainbow colors. That will be addicting!  


I used some fabric flowers that contains different colors and sizes in the package and also this big pink fabric flower, chipboards (leaves collage) that I painted with black gesso and put some Crystalclear on top to decorate. 


Back of the card. So nice cards with sentiments in this pack. Just cut and glue! Easy and beautiful.


Now a little tour inside the album. 

This pack has great die cuts and cards. I used those to make two doors. To make sure the doors will not move I used a magnet. 


When the doors are opened there is more decorations and die cuts.


When we open all sides the waterfall pages can be seen.You can put a photo even at this cover of waterfall pages.


I hope you liked my little project.
I used the following products (beside those I linked to)


Thanks for visiting and I hope you liked it 
Hugs, DT Diana


Mixed Media Dream Catcher

Hello my crafty friends.

This is Diana once again.

Today I am showing you a Mixed Media canvas 55 cm x 40 cm. I just love the dream catcher new chipboards. What a great variety of design. and even few sizes too.
First I tried to build the composition and took some of the items I thought will work together. Laces, chipboards, wood frames, metal charms and more. During the process I changed some of the items.
When I glued everything I covered with new black Gesso and some Inka gold for the finish.


Background:  I found some old net that I kept from som package I received. I glued it and when it dried I covered with black Gesso.And highlighted with Inka gold.

I used so many different products:
Chipboards: Gears, Keys, Criss Cross, Moroccon lattice.
Flowers:  Fabric flowers blooms.
Lace: Fancy chain
Jute Cord - Baby Blue


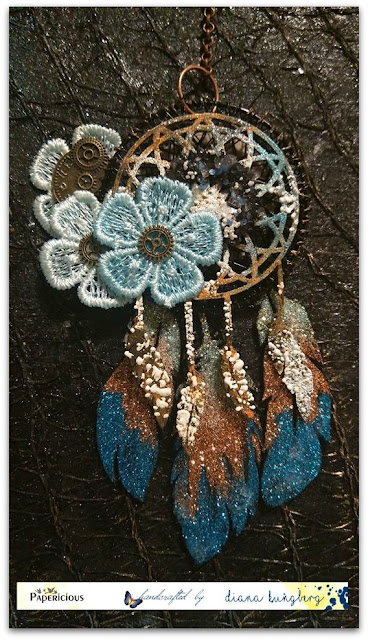
The bottom part of the Canvas  is a Dream Catcher. For that I used the Small dream catcher Chipboard package and the feathers from the Heart dream catcher chipboard package.
Flowers: Blooms. The Dream catcher I painted with Black gesso and with Inka gold and afterwords I used Embossing powder Frontage. Feathers chipboards I covered with 3 different glitter colors.

The view of the whole Canvas

Here are some products I used making this canvas


Thank you for stopping by. Hope you loved this Canvas
Hugs, DT Diana


Piggy bank

Hello my friends

This is Diana again

Today I am showing a piggy bank I made for my son Mark.

I am new to Mixed Media, but love to try and learn.  For this project I used an old wood box from memory game and painted it with Papericious new Black Gesso. Afterwords I covered all sides with new release of paper pack Azealian. I thought this pattern reminds me of Sand and dessert so I went through my sons rubber toys and found a Lizard.  I painted with same black gesso and then made highlights with inka gold.


Rest of the box I decorated with new Chipboards Honeycomb collage. I love their quality since they are quiet thick.


Beautiful patterns make this project look so cool.


Products Used:


I hope you love my project
Thanks for stopping by 
Hugs, DT Diana


Shadow box

Hello friends
This is Diana and today I will show you my Shadow box.

I have made this Shadow box for a dear friend of mine for her 40's birth day.
I really hope She will like it.
Here I used the Die cuts from the Whimsical pack and I cut few of the same flowers to make 3D layers. I chalked with vintage photo Distress and I used my Blending tools.
I added some Shabby Bricks from chipboard collection to give it more feeling of the house wall.
I used some White gesso on the bricks.

At the bottom you can see the new beautiful collection of the fabric flowers.
I added som small bottles for the decorations and filled them up with some white sequins.
On the big bottle on the right I added number 40 since she turning 40. I preferred to make those as small as possible so she wont feel as 40. :)


Here you can see the close up for the die cuts.At the window I used same fabric flowers to make a curtain.


The backside of the box: I cut the beautiful card from the Whimsical and made is as packet. Inside I cut some 2 tags if she would like to write something.


Here is the front of the Shadow box. The background of the box is a pattern from Whimsical. Just gorgeous colors and design.


Hope you like that project 


Thanks for visiting 
Hugs,
DT Diana