
A flip- flap album using Love Actually (Tutorial ) + An Altered hoop
Namaste Friends!!
This is Kriti from Handcrafted Expressions by Kriti , hope you all are doing well.
Today I have created a flip-flap album using Papericious newly launched valentine themed paper pack Love Actually and shaker chipboards.
This paper pack has very bright colours...its very beautiful with lots of die- cut elements and sentiments...
This is what I have created...


This album is 6" x 6" in size with a spine of 1" and it has flaps...flaps...and flaps...
Now, I will explain it with a pictorial....please bear with me as it is a picture heavy post...
STEP BY STEP TUTORIAL
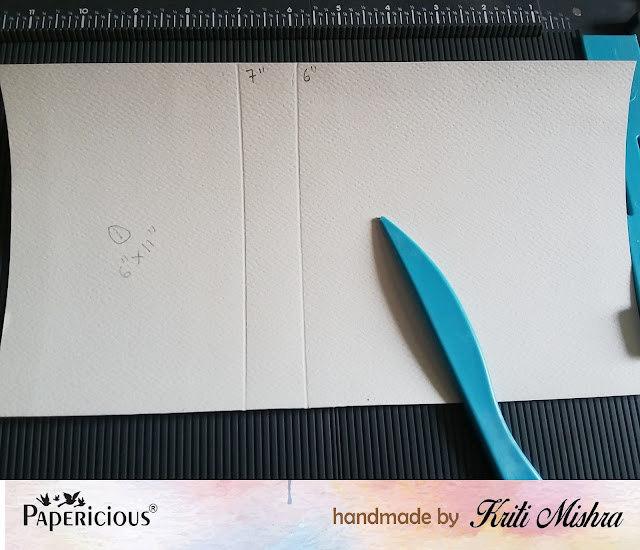
STEP 1. Take 8 pieces of paper of size
a) Piece 1:- 6" x 11" and score on 11" side at 6"and 7".


It opens up like this...


This is Kriti from Handcrafted Expressions by Kriti , hope you all are doing well.
Today I have created a flip-flap album using Papericious newly launched valentine themed paper pack Love Actually and shaker chipboards.
This paper pack has very bright colours...its very beautiful with lots of die- cut elements and sentiments...
This is what I have created...


This album is 6" x 6" in size with a spine of 1" and it has flaps...flaps...and flaps...
Now, I will explain it with a pictorial....please bear with me as it is a picture heavy post...
STEP BY STEP TUTORIAL
STEP 1. Take 8 pieces of paper of size
a) Piece 1:- 6" x 11" and score on 11" side at 6"and 7".

b) Piece 2:- 6" x 5.5" and score on 5.5" side at 3.5" and 4.5".

c) Piece 3:- 6" x 5" for back reinforcement.

d) Piece 4 and 5:- 6" x 7" and score on 7" side at 5" and 6".

e) Piece 6 and 7:- 6" x 6.25" and score on 6.25"side at 4.75" and 5.25".

f) Piece 8:- 6" x 9.5" and score on 9.5" side at 6" and 6.5".

STEP 2. Attach piece 2 to piece 1 as shown

After attaching the album will look like this

Now, for back reinforcement attach piece 3 as shown

Now attach piece 4 and piece 5 to the left and right of the arrangement, as shown

Next, attach piece 6 (left) and piece 7 (right) over piece 3, leaving the 1"spine , as shown

Lastly add piece 8 over the piece 3, as shown

And, voila...album is ready with lots of flaps....
Some close- up pics....


It opens up like this...


Now, moving onto my second project...
I have altered an embroidery hoop using some Papericious art mediums and pattern papers.
Have a look...

For this firstly I have covered the entire hoop with two coats of Papericious white gesso, then applied the Papericious crackle paste. When crackle started to appear, I sprayed the hoop with blue color in an uneven manner.
After that I took a paper from Papericious Azealian paper pack and covered it with clear gesso. Using Papericious modelling paste and rose stencil given some texture to it...
When it dried, sprayed it with blue color.
And lastly added my embellishments.(i have used few sheets from Papericious Diwali Paper Pack too)
Few close-ups....


Hope you like the project...
Kriti Mishra
Supplies used


