Showing posts with label Diana Kungberg. Show all posts

Papericious May Monthly Challenge

Hello dear crafty friends!
I am Irit from Irit Shalom Designs and I am bringing your our new May challenge.


This month we decided to make it pretty simple and all you need to do is to add flowers and one or more die cuts to your challenge project. 

             
  •  You can create any project - Cards, Layouts, Albums, Altered items, 3D projects, Home Decor etc.
  • Add flowers of any kind and die cuts of any kind. You can use our gorgeous fabric flowers, to make Sigma cardstock ones or just to use other flowers on your creation. As for die cuts you can use our Papericious die cuts packs or just to cut your own of any  kind. Then make the project and just remember that you need to use Papericious products as your main focus to qualify for the win.
  •  The last date for submission of your projects is 9th June, 2017 at 11:59pm IST.
  • Please go through the General Guidelines HERE before you link up your project. Any project not following the rules, will be disqualified and it will not be eligible for the prizes.

Now, what's a challenge without prizes, right?! Papericious will be giving away TWO prizes every month -

  • The DT will be selecting a Merit Winner at the end of every challenge who will stand a chance to win a gift voucher worth INR 500 from the Papericious store.
  • We will be also be having a Random Winner from all the entries who enter their projects every month to win a Papericious 6 X 6" Pattern Paper Pad

Everyone gets a equal chance here so whether you are a novice or an experienced crafter, all are welcome to play along our challenges.


And as always, we have some gorgeous inspiration lined up for you.

Here's a look at the creations :

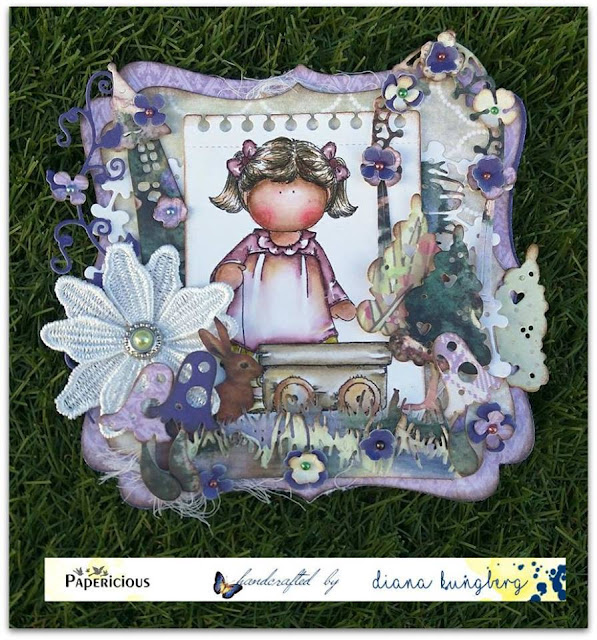
Diana made this beautiful card for this challenge showcase using the most adorable Papericious Whimsical collection and new fabric flowers


Irit made this fancy Spring card using the same, just released, Whimsical collection  with lots of die cuts, Papericious Fabric Flower and some other paper flowers covered with the most popular Papericious Crystal Clear powder.

So this is your turn to play!

Please remember, use of Papericious products is a MUST for your entries to qualify. We can't wait to see your creations!


Exploding Box

Hello crafties!

Here is Diana once again.
Today I am showing you a new project and it is an Exploding box/album.
In theend of thepost you can check out the video.
Here you can see the lock of the box.
I have used Femina paper pack for this project. The lock I decorated with few different patterns from the pack as a base and the Embellishments I used: Fabric Flowers - FL3001 and Fabric Flowers - FL5002.
Chipboards -  Flourish.


Here comes some of the details photos of the outside of the box
I used the Femina pattern for the houses. 

This side I designed and decorated with the die cuts from Femina. The are really cute.The grass Is made with help of Joys dies and the paper pattern is from Blush

Even here I used the die cuts from Femina. The flowers on the Hot air balloon I made from the sequins.

When you take off the lock, all the pages are falling out of the box. Inside it some surprises. 
some pockets for photos, some tags and much more. The thing you see in the middle is a glass bottle that I decorated with lace, pattern and some special words that symbolize the meaning of this box. 
This box I made for my best friend who is always there for me. She helps me with everything. She is really my hero. So I thought that Box/Album can be something special for her. The meaning of the box is that like once a month her family members will write some special note to each other, fold it and keep it in the box and in the end of the year they can sit together, read and feel the love of each other. The top of the bottle I decorated with Epoxy dots where I used die cut from Femina.
The details of the bottle  and the Album/box you can find in the end of the post where is the detailed Video.

Here is how the album looks from the bottom.

The Video check out here


Lots of hugs from me!

Slider Card with Blush pack

Hello crafties!

Here is Diana once again.
I would like to show a new card.

I will try to explain the process :

1. You should  score as it shows  at step one. (this is the inside part of the card that  will be shown at the front).
2. You  cut the front part of the card and make a frame.

 3. As you see at the picture you glue the bottom part to the back side of the card, The pink beautiful part is the part you drag up to reveal the inside message.
4. I cut a small trim and glued on top. Just tiny detail.
5. you put the glue on the other border and you glue it on the top of the front frame.

Here you can see a close up for the decorations. I used many of the die cuts and I chalked the borders to give it more effect. I used Papericious Blending tool. The flowers, the butterflies and the pennant and much more die cuts you will fiend at the beautiful Blush paper pack. I had some Lace as well.


That how the card looks when you pool the heart up and reveal the message. The message comes as well from The Blush paper pack where it many beautiful sentiments. This message I decorated with some die cuts as well. Very fun to cut them and use differently. The girl is stamp from Hänglar and I colored it with distress markers and her clothes and the Heart I stamped on paper and glue with 3D pillows.


Here is the front of the card when it closed and the back side of the card where you can take out a tag and write more personal message.


The video will be shown as soon as possible.
Thanks for visiting and I hope you will find some inspiration.
Hugs, DT Diana


CAS Cards - Different Styles

Hello my dear friends
This is Diana showing you few new CAS cards.

I have made 3 different CAS (clean and simple) cards. All 3 little bit different style. Some of you that know me, know that I love to work with many layers. This time I tried to challenge myself and to make Clean and Simple cards. To make it more interesting all of them still different.

1. Shaker card


I used the latest paper pack from the January Launch Perfect Affair 
Have u seen the lovely mix pack of Sequins? You can find it here.
The tag and the cutting die I have chalked with Distress Ink and I used the Blending tool.


Card no. 2

Look at this lovely mix of Sequins.


Inside of the card
So lovely patterns

The romantic die I cut twice and used tiny 3D pillows to create a volume.
The small Photo corners I used also pappern from same pack.


Card no. 3

 Same pack of Sequins. Reminded me bubbles. The love that all around us. 
I cut small hearts with help of cutting dies and used pattern papper from the same Perfect Affair.
the Chipboard you can find here.

The paper pack including beautiful die cuts. I made a little tag of that and thought of writing sentiments on the back side.


Hope You like my cards.
Lots of hugs,
DT Diana


Tea Cup with Flowers!

Hello my dear friends
This is Diana once again.

I am so excited to show you my latest creation with the Blush paper pack.
I have made a tutorial to share it with you.

I got inspired of a Swedish crafter - Rose-Marie Strandberg.
The template is very easy as you can see.  The size you choose depends on if it is a card or another type of art you planning to make.
This one is about 10 cm big. 

I used those dies to make small details for the cup. Below the cup you can see 2 tiny legs I made for the plate and the handle for the cup.


Now I choose the patterns for my card. To the right you can see the half round piece. It is actually a plate I made for the cup to stand at. I made it for freehand. I made a fold of 4-5 mm and you will see in next step why.
I thought it can be very cute to make the tea-bag from the beautiful sequins Mix Blush. I have made a knot with Jute Cord black.

 I decided to have the pink wood pattern for my cover of the card. The first thing was to connect the kitchen plate. To be able to do that I cut at the bottom of the paper a cut few mm longer than the plate. And those 5 mm that I made a fold I just put inside the paper through the cut.

Here you can see the plate from above. So cute. I  filled the cup with flowers.

Inside the card I decorated with those patterns from the amazing new release : Papericious Premium Edition - Blush

The paper pack includes even wonderful sentiments and some die cuts.  


Back of the card I cut  this frame from the paper pattern that including some cards.

 Now you can see my creation from different angles.
The teabag is really cute. Love it.

Here on the right you can see a miniature bottle made of glass. Inside I put some more Sequins from Mix Blush release. 

Hope you love my card as much as I do.

Lots of hugs from me!

Fairies Globe Shaker card

Hello my friends.
Diana is here.

Today I am showing a shaker card. It is my 1st but it will be many more. That was so fun to make.
I will try to show you step for step how I created it.
I used Yoghurt lock to make the globe shaker "glass".

I did cut the circle in same size as the lock. I wanted to build 3D scene so I cut different things 
from the Paper pack Fairy Land. and I made few layers.

I used 3D pillows tomake layers.

  
Here you can see the mushrooms, the flowers and the fairy that I added to the scene.
Next step was to choose the background of the front of the card. I really love this wood pattern.

 Here  you can see those beautiful Sequins I used for the globe shaker. I decided to mix few different colours and styles of sequins to create more magical forest feeling. Papericious has such an amazing variety of the sequins, please do check. 

Here how I made the Globe Shaker. I made a sketch and then cut it with cardstock. 

Here I have chalked the design ark from the pack that I will use at the back of the card. 
I used Blending tool and Distress ink. 


The back side of the card. I used some of the diecuts from the pack and created even here 3D with few layers.
Inside of the card. The Fairy Land pack includes many beautiful sentiments.


Here you can see the whole card

Retailers all over India and even internationally you can find over here:

I hope you liked my card
Thanks for stopping by
Hugs, DT Daina 


Mixed Media creation

Hello my friends.
Diana is here.

This time I would like to show you mixed media painting I made for my girl to hang on the wall.
I tried for the1st time to make my own handmade flowers. It was so fun that it will be many more.
To make those flowers I used Sigma Cardstock. It is 180 gsm. Works great for making handmade flowers and even for stamping and coloring images.
After I made the flower I embossed it with Frantage blue. I wanted this shabby chic look and of course glitter.  To make the flowers I used different dies.


I colored the image with Distress markers. The tag I decorated with a little heart from this Chipboard.
and with Jute cord : Baby Blue and Ivory.
I used even this lace. I cut it in the middle to get the right size for this creation.


I build the painting with many layers.  Here you can see I used this Chipboard and I covered it with glue and put glitter on to change the color and the texture of the Chipboard to suit more my design. I love when you can use 1 thing in many ways. 
I used two different paper packs. The blue background is Naturals and the layer above with the wood pattern is from the latest launch Fairy Land pack.
I chalked all ages in all patterns with Distress Ink Vintage and I used this Blending tool.


Same thing I made with Love. That piece you will find in the Theme chipboard  - The Wedding.


Thank you for stopping by!
Hugs,
DT Diana