Showing posts with label Erum Tasneem. Show all posts

Mixed Media Card


Hi everyone! Erum here with a new card to share using the Jack and Jill Paper Pack.
I started by applying White Chalk Paint on the background. Then I coloured over it with a blue-green watercolour.
Next, I dyed some gauze and applied chalk paint onto some twigs. I glued these onto the card front and started to arrange my flowers.
Once the flowers were arranged, I added a lot of white chalk paint splatters. I also mixed the blue-green watercolour and chalk paint and added splatters of that as well.
In the end, I adhered a sentiment.
I thoroughly enjoyed making this card. I wanted to do something different using these papers. I hope you liked my card.

Supplies Used:


February Challenge - Oh So Lovely!


Hello friends,
Parul here! Welcome to the February Challenge - Oh So Lovely!
Erum and me are super excited to host the challenge this month with a lovely them to play along. <3
Having Valentine's Day on it's calendar this month of February automatically becomes so lovely.
Isn't it? And keeping that in mind we have theme Oh So Lovely.
Oh yes ! Love is in the air! <3

The theme of project should be LOVE. So be it something from you to your partner/spouse or from you to a couple that you know. You can include elements associated with word "Love" or use sentiments on your project which would be apt for the challenge.
February Challenge- "Oh So Lovely"
Please note - The main focus should be on Papericious products

Challenge Rules:

1.You can create any project - Altered Items, 3D projects, Home Decor, Cards, Layouts, Mini Albums, Scrapbooks, etc.

2. Remember that you need to use Papericious Products as your main focus to qualifying for the win.

3. The last date of submission of your projects is 10th March, 2019 at 11:55pm IST.

4. Please go through the general guidelines HERE before you link up your projects. Any project not following the rules will be disqualified and it will not be eligible for the prize.


Prizes:
Now onto the exciting part, the prizes! Papericious will be giving away TWO prizes every month:
The DT will be selecting a Merit Winner at the end of every challenge who will stand a chance to win a gift voucher worth INR 500 from the Papericious Store.
We will also be having a Random Winner from all the entries who enter their projects every month to win a Papericious 6"x 6" Pattern Paper Pad.
Everyone gets an equal chance here, so whether you are a novice or an experienced crafter, all are welcome to play along with our challenges.

Now it's time for inspiration. I made a card using I Love You Paper pack from Papericious. This paper pack has got amazing pattern papers for creating any project on love theme. I fussy cut the typewriter and the heart from element sheet and for background I cut a piece from the intro sheet of this paper pack. Its beautiful. isn't it? To add some dimension to the card I adhered typewriter and heart with the help of foam tape and Voila!

Supplies used:


Now let me share very talented Erum's inspiration project for this challenge. She die cut several hearts from the Pretty Basics Paper Pack using different pattern papers and set them aside. Next, she used a stencil to emboss her card front which she adhered to a top-folding card base. After this, she adhered all the die cut hearts on the card front with foam tape. To finish, she die cut some letters to form the word hugs and glued them below her heart arrangement. To this, she applied glossy accents for interest.


Supplies Used:


Well that is all. 
Do play along this challenge. I would love to see what you make.


Vintage Card with Decoupage Papers


Hi everyone! Erum here today with a grungy, vintage, floral card.


I used the gorgeous Fly Away Decoupage Paper for my card. I started by gluing it down to a panel to increase its sturdiness. Next, I took a scissor and tried to roughen up the edges. I love the look of the torn bits of edges.

Next, I adhered this panel onto an offwhite mat. I inked this mat slightly to match the vintage look of the card front.

I then prepared my flower. I decided I would use just one flower so that it looks a bit different from the cards I shared previously.
I placed my elements and glued the flower down. Then I die cut this intricate frame and added a sentiment on it.

To finish off, I cut out the butterflies from the decoupage papers and adhered them to my card front with hot glue.

I hope you liked my card, I love how grungy and vintage it looks. It has been a while since I made a card like this. The photos came out terrible.

Thank you for stopping by everyone!! I love reading your comments!


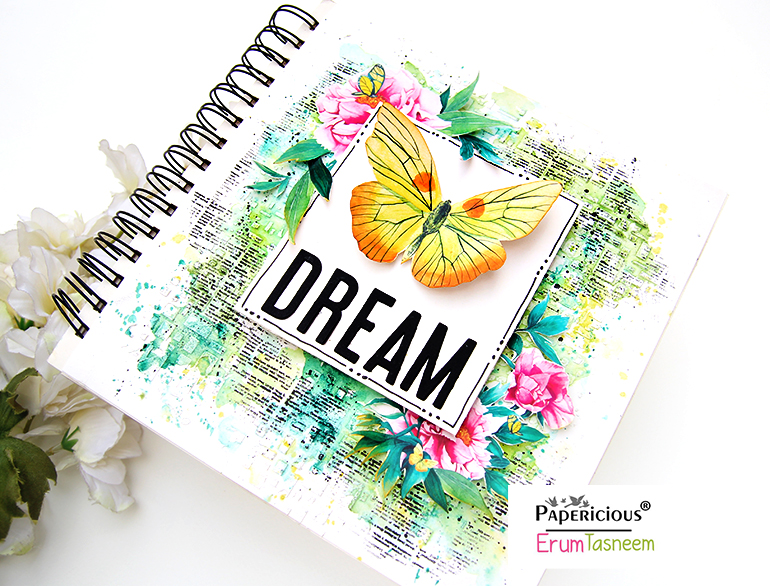
Fleur Fun Blank Journal with Erum

Hi everyone!!
Erum here with a gorgeous, very inky, arty Blank Journal!
Love how this turned out.
I am using the Fleur Fun papers for my project today and I decorated the cover of my blank journal.
I started by adding thick gesso to my background through a stencil. I used a heat gun to dry this quickly so that I could move onto the next step.
The next step was to apply colour and I used a mix of greens that I picked out from all the leaves from the paper!  I kept the cardstock to air dry while I fussy cut a few flowers and leaves out of the pattern paper. 
This was fairly easy to do and you don't have to be super careful while doing this. The images on this paper are quite forgiving! 
Next, I cut out a large butterfly and adhered it to a piece of cardstock leaving some space below it to place my inspirational word.  
For this I used alphabet dies and cut the letters four times and layered them up to form thick letters.

I glued them all below the butterfly. In the end, I added some text stamping using Versafine. Did this at the end because I wanted to be sure where I wanted to add more stamping and where to add a little less. I just covered the whole thing with stamping because it looked really cool!
I hope you like my project!! I am loving it! It looks so good in person!
Thank you for stopping by and all your lovely comments.
Supplies Used:

A Colourful Card using Fleur Fun


Hi there everyone!
Erum here today with a very bright, colourful, floral, card to share.

I have used papers from Fleur Fun Paper Pack. I picked out the yellow polka dots paper from the 6x6 pack. I tore it off instead of cutting it to give it a more distressed feel. 

Next, I worked on the background. First I heat embossed with clear embossing powder and then added watercolour to it using pink, orange, yellow, and a bit of green. Then I wiped it off with a slightly damp tissue so that the clear embossing is visible.
Next, I adhered the polka dotted piece onto the background with foam tape then tucked in some mesh. After this, I assembled the floral elements and then added a lot of paint splatters to give it a more grungy look.

I used the Natural White Chalk Paint to paint over the Pattern Chippis. As soon as that was dry, I coloured it pink to balance my flowers. I tucked these under the polka dotted panel as well. To this, I added a few splatters of Natural WHite CHalk Paint mixed with yellow paint.
To finish off, I stamped a sentiment and cut it in a fishtail banner and then adhered a couple of butterflies.
There is a lot of texture on this card and I love how it turned out, floral yet grungy.

I hope you liked my cheerful, colourful, card!
See you soon!


Floral, Shabby Chic Card with Jack and Jill Papers


Hi there everyone!
I am very excited to share today's card with you. I have used the Jack & Jill collection and I wanted it to use differently than last time. 

I started by using a dotted blue pattern paper from the Jack and Jill collection. First I distressed the edges of this paper then added a light colour wash of blue. 
As soon as it was dry I adhered the Pattern Chippis on the panel. Before adhering the chipboard element, I covered it with Natural White Chalk Paint.
Next, I arranged my florals and added tons of Natural White Chalk Paint splatters. I also added bots of yellow paint here and there to balance the flowers. I also added a lot of glitter to the flowers.

In the end, I adhered the sentiment strip and a few butterflies.
I hope you liked my card! I love how it turned out.