Showing posts with label Papericious Decoupage Papers. Show all posts

Farmhouse Style Sign For " Coffee Bar "


This is Mona here, and I am on the Papericious Blog to share with you a Home Décor Plaque which I made using  Papericious - My Caffeine Time Decoupage Paper and Chalk Paints. 

Need Coffee? Here's Your Sign!

Give your walls something which can describe your love for coffee. Today I am sharing with you this signboard I created using Papericious Decoupage products.
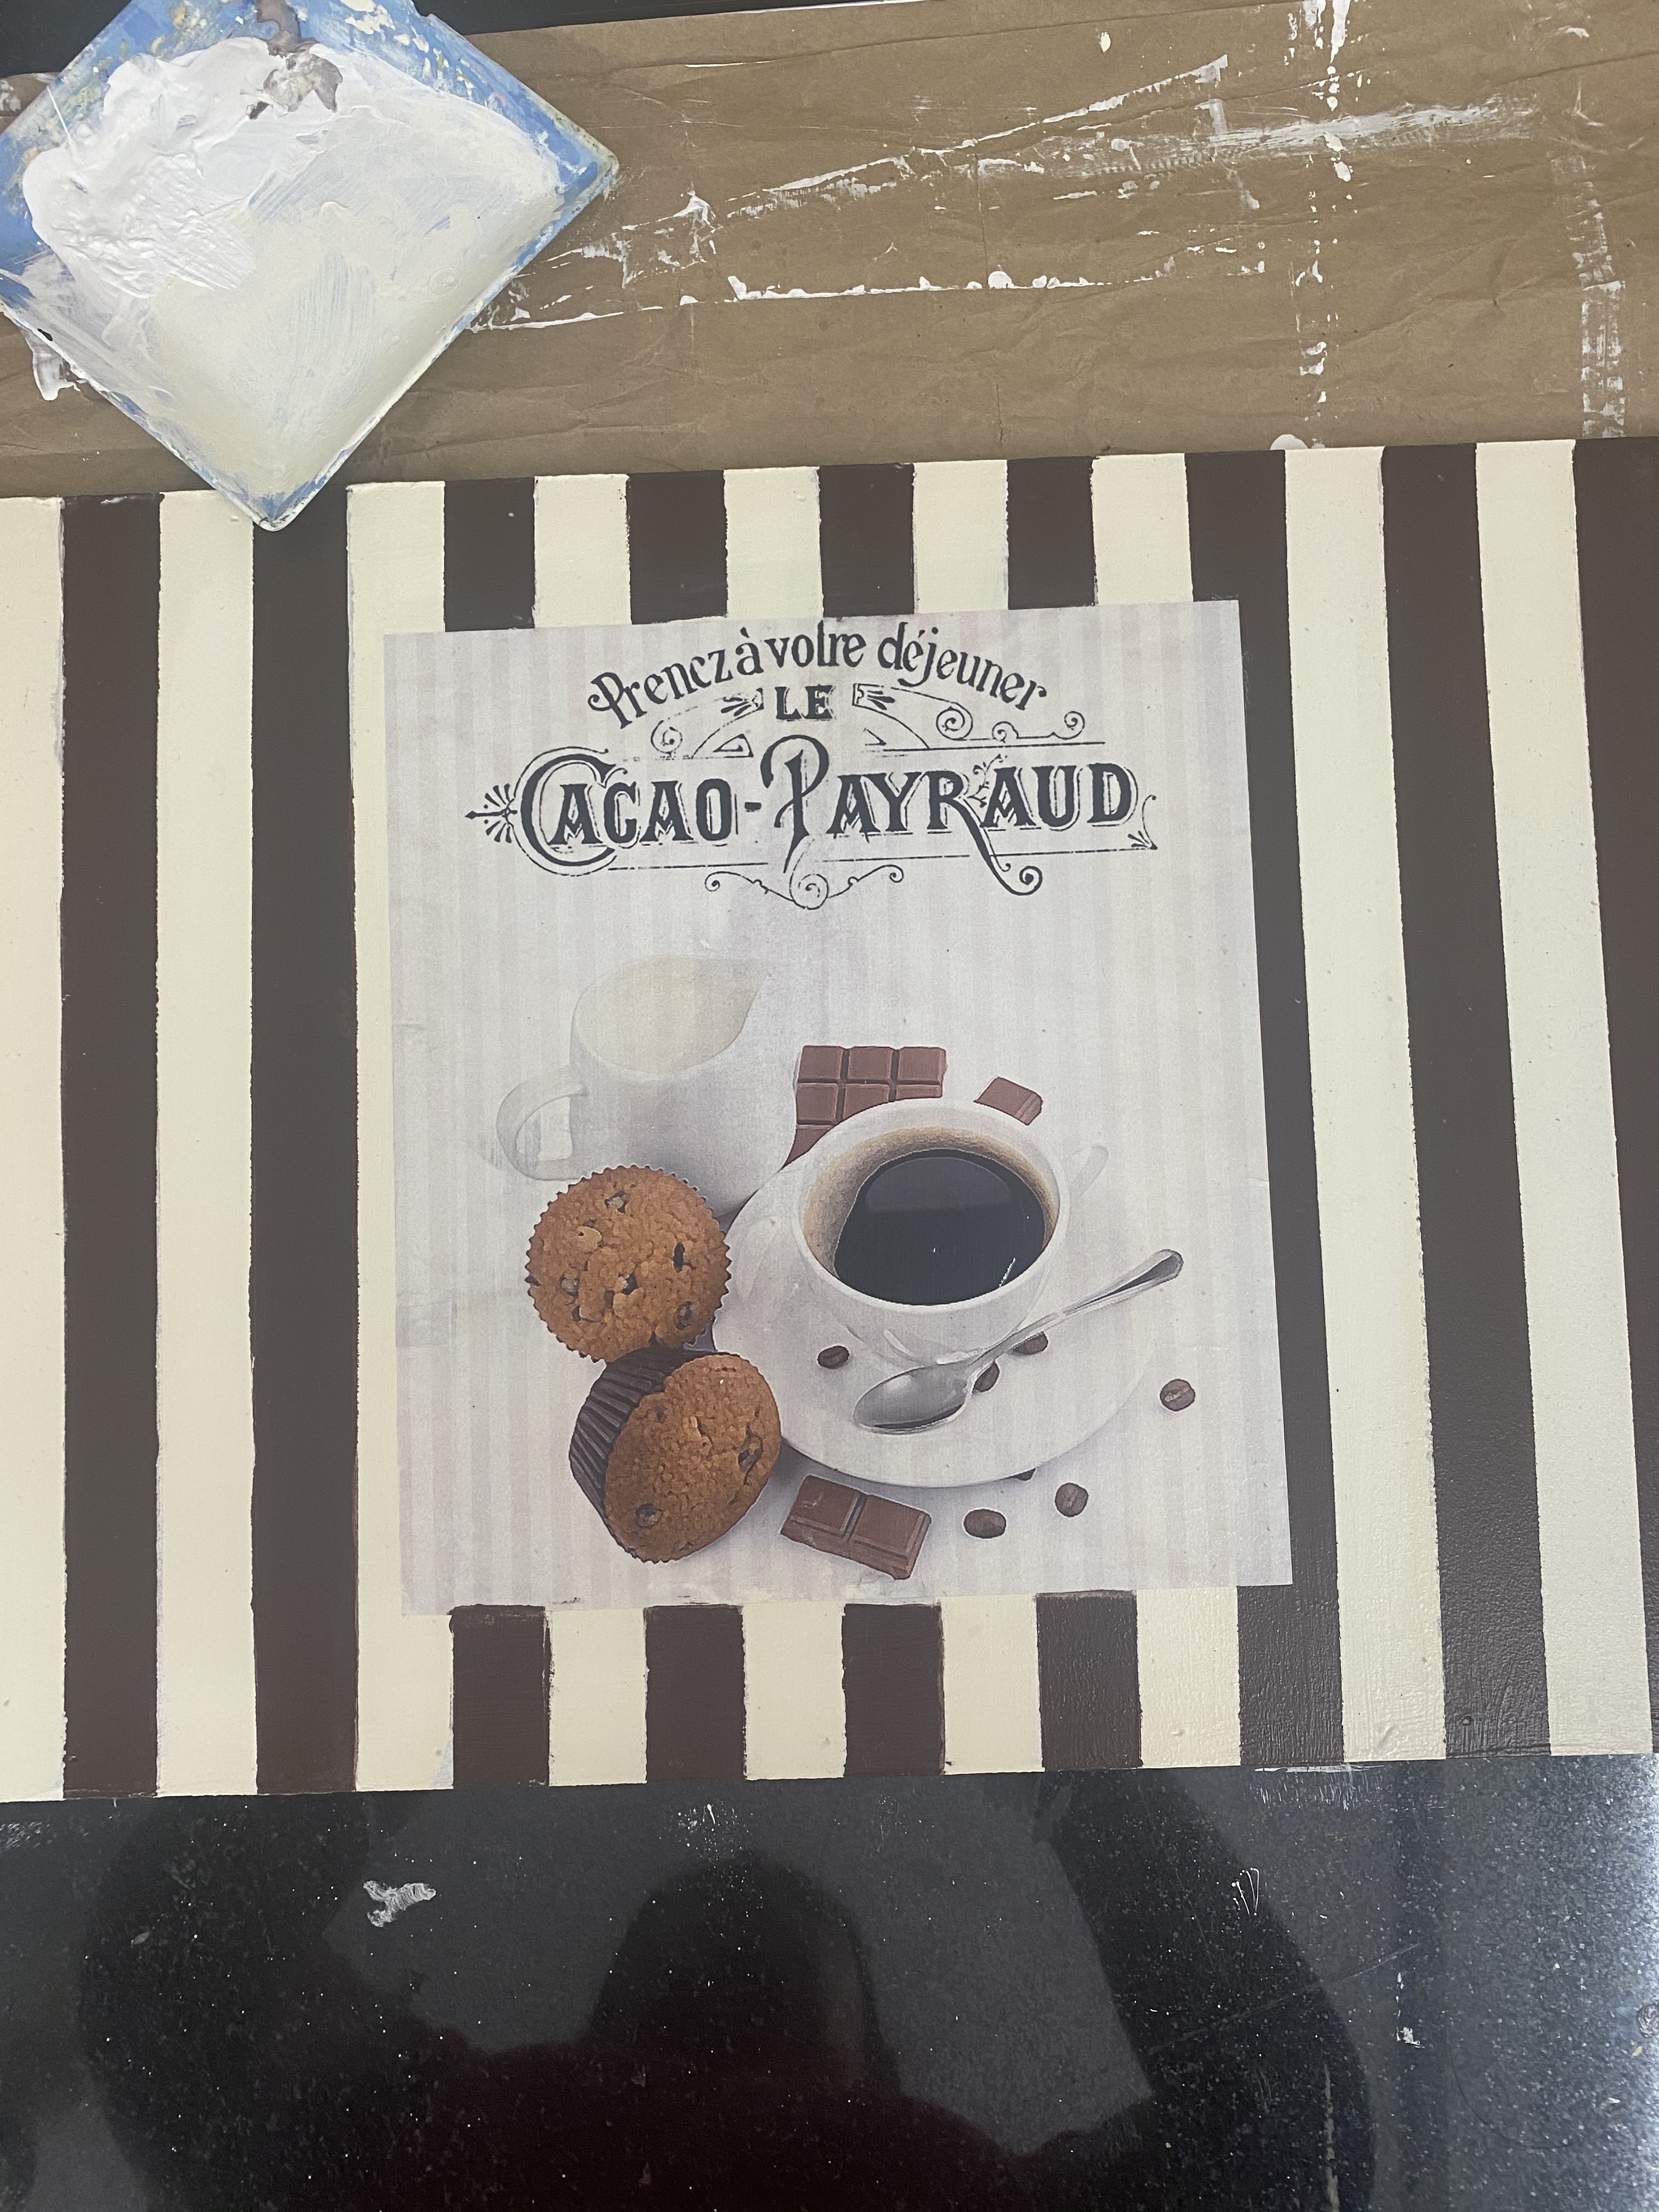
To create my project, I started with a base measuring 16 inches by 10 inches. For this plaque. I first painted the MDF base with Folk Art Chalk Paint Sheep Skin and Java in vertical stripes. I used masking Tape in vertical columns to apply chalk paints of both the shades.

 I then shortened the length of the decoupage paper to place in between the vertical stripes in the middle. I used Papericious decoupage glue to adhere the paper in the middle.
 Later, I used an angular brush with Java Chalk Paint to demarcate the area around the decoupage paper area and gave it some depth. You can see how I created the depth around the decoupaged area in the picture below. I then did some stamping all around the plaque using Black Archival Ink.
 I also used Antique Wax at the bottom and on the top of the stripes to give them some vintage look.  
Once everything was dry, I gave a coat of  Papericious Varnish to seal everything before applying hooks. 
I do love some fresh brewed coffee. I don't have it every day, but when I do, I like it strong (but sugared and milked up) and I like it BIG. My love of coffee inspired this sign. Coffee lover gift! This beautiful coffee love sign would make a great gift for all those who love coffee. So, this is all from me today. I hope you enjoyed this project and its description. Do like, comment, and share. :)

                                                         Until next time, happy crafting!

Xoxo,

Mona Diwan

 Supplies Used


Upcycled Gift Hamper Tray

  Hello friends,

Hope you are doing good and ready for a wonderful weekend! This is Priti here, and I am so excited to share another beautiful inspiration with you using the Decoupage papers and Decoupage mediums from Papericious
You don't need expensive supplies to glam up your gifting. I had this mdf tray with me which I had received as a Diwali gift hamper last year. I thought that it would be so wonderful to upcycle it and use it as a home decor piece or as a gift hamper tray for my gifting needs. So I grabbed a beautiful floral Decoupage Paper from Papericious, their glue and varnish and some paints, and converted this raw mdf tray into a beautiful piece of art.

I have fallen in love with the Papericious Decoupage Glue. It is absolutely amazing and gives such a wonderful finish. I did some stenciling on all the corners and added clay embellishments on the two sides of the tray to make it even more attractive. The edges were done using an antique gold wax from my stash which matched with the colour of the leaves in this beautiful Decoupage paper.

 These Papericious Decoupage Papers are so gorgeous and you can use them in so many different ways and on any kind of base. As a sealer, I have used two coats of the Papericious Matte Varnish which gives the projects such a nice matte finish.


Supplies Used:


I am super happy with the result of this upcycled project and cant wait to gift this tray to someone special. I think I might use it to pack some wonderful goodies for my mom on the occasion of Mothers Day this Sunday. I really hope you liked the transformation of this tray and will leave me some love. Have a great weekend!

Love,
Priti

Rustic Decoupage Kitchen Hanger


 Hello everyone , Today I am on the Papericious blog to share with you a handmade decoupage wall hanging plaque - perfect country style decor for cozy home or kitchen for hanging coffee mugs or some utility items. I created it using amazing  Decoupage papers and ornate MDF base with frame , both by Papericious.

Material Used 

Decoupage is the main technique I have used to make this wall Hanger. 

First I painted the base using Folk Art Chalk Paint- Sheep Skin. I then painted the frame using Folk Art Chalk Paint - Java.I highlighted the frame using Prima Antique Gold Wax.  My Caffeine Time. Decoupage paper pack has two papers and I combined both the papers on the wooden base and pasted them using Papericious decoupage glue. Once the paper was pasted I applied one coat of decoupage glue on top of that. In the last I sealed my project using two coats of Papericious Varnish. I then glued the frame on the base using Fevicol. Lastly hooks were attached to the plaque to add some utility to it.

This wall hanging cup hanger plaque is made for your special space in your home! A little touch can make you feel special in every aspect! This kitchen hanger also makes an ideal choice for a housewarming gift as well.

Hope you liked the project.

Happy Crafting!

Love


 Supplies Used

Papericious Decoupage Paper- My Caffeine Time

Papericious decoupage glue

                                                                   Papericious Varnish.


Buddha Wall Frame

 Hello friends,

Hope you are doing great and having a beautiful day! This is Priti here, and I am so thrilled to be back in the Papericious design team. I will be sharing some beautiful decoupage projects with the Mdf bases, Decoupage papers and Decoupage mediums from Papericious. 
Today, I have this wonderful piece of art on the blog - a Buddha wall frame, which is sure to bring a lot of positive vibes.

This is such an amazing base. I totally love the design and this hand carved frame. I am sure that it will look as beautiful with any design of decoupage paper.

I first cut the Buddha printed decoupage paper after drawing an outline of the frame. I made sure that the placement was right and I got the design exactly as I wanted. The best part is that these A4 size Papericious Decoupage Papers are of perfect size for this base. I primed the base with white gesso and then used the Papericious Decoupage Glue to paste the decoupage paper on the base. As a sealer, I have used the Papericious Gloss Varnish which gives this project such a nice finish.


The outer frame is coloured with Dark brown chalk paint and then I have dry brushed gold chalk paint and some art waxes to get his beautiful vintage look. 


Supplies Used:


I really enjoyed making this wall panel and I hope I have inspired you to create one for your home too. It's an easy and super quick diy project which you can make with minimal supplies. I would love to know if you liked this home decor piece. See you soon.

Love,
Priti


Decoupage Creativity with Tina Ollett

Hello Papericious friends. A big warm welcome from sunny and warm Queensland, Australia.
For the past few weeks here we have been treated to some very spectacular warmish weather. So being inside in the airconditioning has been where I can be found playing today especially with the ever so gorgeous Decoupage Papers "Flora Season".
And this is my finished project. 

I decided upon using these Decoupage papers to keep the sizing in A4. So I used a piece of thick chipboard to back my first piece of paper. I used Gel Glue to do this then primed my Decoupage Sheet with clear Gesso. Using a dry brush with white gesso and a mix of Liquid Pearls colours (Rose Gold, Orchid, and White Opal), I painted my background page. I also made some white splatters with a watered down mix of white gesso.
I then primed both my Collage Chippis with White Gesso. They are as below... are they pretty ?
I then went on to dress the chippis with my mix of Liquid Pearl Colours as previously noted. I used just the nozzle to apply and then allowed them to partly dry. I then used a pointed tool to blend the colours a little.

I have added in some white muslin along with white lace to soften my project.

How gorgeous is the wings from the Collage Chippies. Stunning chipboard pieces. 

Above you can see the colours on the Collage Chippi pieces and the dimension added by the liquid pearls. I also added in some material flowers along with leaves from my very old stash. These were all dry brushed and coloured with Liquid Pearls as well. 

You can also see the layers of the second piece of Decoupage that I used as matting for my photo. These pieces were sanded a little to show through the white core to keep with the shabby theme of my project.

Well that is all from me today. Thank you so much for dropping by. I do hope I have inspired you in some small way to create something for yourself this week. Even if it is something small.

Until next time take care and happy crafting.

Tina x

Wanderlust Journal


Dear friends,
This is Parul here. As we have stepped into a new year, I wish you all a very very Happy New Year. May this year bring you tons of happiness.
Today I am here with yet another inspiration post. Recently, Papericious launched this beautiful Blank Journal which is like an empty canvas for you to fill with your imagination. After wondering for quite a long I decided to convert it into a travel journal which I named "Wanderlust".

And here it is:
As soon as I saw this Globe Chippis from Papericious, I fell for it. It has got two globes and both of them are absolutely gorgeous. I painted the floral one with white paint and kept aside. 
I took out the word wanderlust from Wanderlust Chippis and coloured this as well in white.
To keep the overall theme floral I chose this beautiful floral Decoupage Paper Ephemera and pasted it on the cover of the journal with the help of Decoupage Glue. This paper has got a really beautiful border which I cut and pasted on the lower half of the cover. 
Next, I pasted the Globe and Wanderlust on the cover and fill the centre of the globe with rose gold glitter. It added a bling to this embellishment.
And that's all. This journal looks so pretty in person. And here is a close-up for you to have a look on :)

Hope you like it. Please let me know in comments. 

Love,
Parul

Supplies Used: