Papericious Guest Designer | Gayatri Viswanathan

11:00 am Hussena 0 Comments


Hello everyone,
This is Hussena here with you today. Welcome to our February Guest Designer post. We have the awesome Gayatri Viswanathan as our guest today! Gayatri is a talented designer who excels at various forms of paper crafting, be it Paper Quilling, Punch Craft, Card Making, Scrapbooks, and more. It's an absolute honour to have her here with us and I can't wait for you to check out the fantastic projects she has whipped up using our latest collection: I Love You. Please join me in giving a warm welcome to her!

Here's a little bit about Gayatri:
Hello crafty folks,
I am Gayatri, mother of two wonderful boys. I have been an art and craft lover from my younger days. I used to enjoy and love my craft classes in my school days. After a long time, five years back I stepped into crafting world through quilling. I slowly tried my hand in scrapbooks and decoupage. I love making my flower embellishments and try making different fold cards and interactive cards.  
Sometimes your joy is the source of your smile, but sometimes your smile can be the source of your joy. Spread the smile bug and and infect everyone......
I am super excited to be Guest Designing for Papericious. I am grateful to Team Papericious for giving me this opportunity.

You can find Gayatri on social media here:


 Today I am showcasing the recently launched paper pack ‘I Love You’. Such a gorgeous combination of teal and pink. I have made two interactive cards and a tag with the scraps I had.

Spinner Card
Recently Jennifer McGuire had shared a spinner card tutorial and I had to give it a try. I took a white card base and layered with one of the sheets and few cut apart from the pack. On the inside I created a spinner heart and layered with coordinating sheets.

Check out the Video below to see the Spinner in action:


Shaker Card
The second card is a shaker card. I made two heart windows and created the shaker part on the front panel. I added few handmade flowers and die cuts to decorate the front panel. The paper pack has cute little cut apart and I had to create something with them. So I made a simple pop up elements on the inside. And added the sentiment from the sheet.

Check out the video below to get a better idea:


Tag
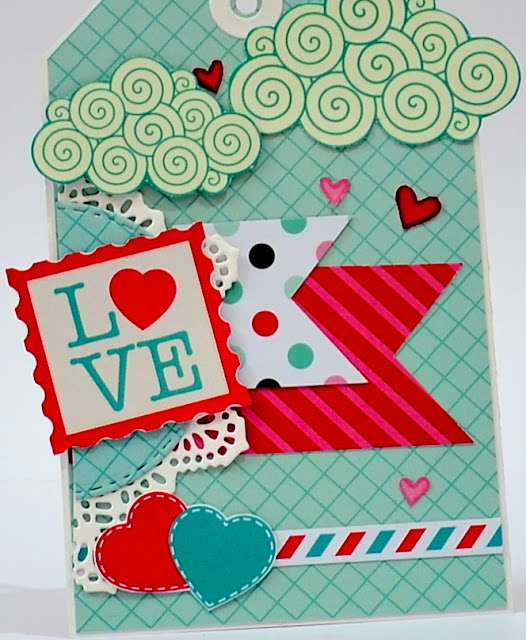
I had scrap papers lying around and I thought that what better way to make use of them than making a tag? I cut a base measuring 3.5” x 5.5” and trimmed the scraps and added a doily scrap too! I also added few fussy cut elements from the sheets.

Supplies Used:


Hope you liked my creations. Your feedback means a lot to me.
Till next time – 
Happy crafting!
- - -
If you liked Gayatri's projects, please do not hesitate to leave a comment! She would love to hear what you think of her projects. 

Stay tuned for Gayatri's next post using our Hooked Patterned Paper Pack in the coming week. We can't wait to share her beautiful creations with you!

0 comments:

Hooked in Love Mini Scrapbook

12:33 pm Nikkita 0 Comments


Hello everyone!
This is Nikkita and I am back with another inspirational post using the gorgeous HOOKED paper collection from Papericious.

I have made a Mini Scrapbook/ Photo Book specially handcrafted with love. 
Love needs no reason, no season, day or occasion to express, so take a look at this mini album, a perfect gift for someone special made with folds and flaps to keep those moments alive and have them kept here safely forever.

For the album cover, I have fussy cut some floral and word sentiments from the collection and added some blings and metal embellishments to enhance the beauty of the paper collection.
This paper-pack is so gorgeous and the quality of the papers are really good and smooth finished.


SUPPLIES USED:
HOOKED PAPER PACK

Hope you are inspired to create some beauties using the gorgeous paper collection from Papericious.
Do leave some love.

Happy Crafting
LOVE,
Nikkita

0 comments:

Mini Album Card using I Love You

11:00 am Neha Goyal 0 Comments


Hello Crafty Friends!

How are you all doing? I am back with a inspirational post today featuring I Love You Papers from Papericious. The prints of these papers are gorgeous. You will fall in love with the colors and prints of these papers.

Let's move on to today's project. This mini album is perfect to give to your loved ones and make them feel special.


SUPPLIES USED:

Hope you liked my project! Do shower some love!

 Hugs, 
Neha

0 comments:

Shaker Explosion Box By Swati

11:00 am swati nahata 0 Comments


Namaste, all
Swati from Swati's Crafting World. I hope y'all had a relaxed Sunday with some fun time 
with your family & friends. I've a pretty pictorial post to share with you. 
I hope y'all like it. 

In my today's post I'll be sharing detailed post on how to make a Shaker Explosion Box. I've used recently launched Papericious Paper pack - "I LOVE YOU" Talking about the papers, I feel the textures, & the designs they carry are extremely gorgeous. I've preserved all the bits & pieces of this collection that remained so that I create something for myself later.


 ABOUT THE SHAKER EXPLOSION BOX :

A box for any occasion. A box that doesn't literally explode, it just fall open. A way to show a lot of Love & Appreciation for the person it is created for, so it is a card & much more. These beautiful boxes are a wonderful & a perfect as a present.


STEP BY STEP TUTORIAL :

The size of the box is 5 by 5 inches & it has three layers & a small box inside of size 2 by 2.5 inches.

Step 1 : The Base ( 5 by 5 inches ) 
1. Take a piece of 15 by 15 inches.
2. Mark at 5, 10 inches from all the sides.
3. Fold the sides.
4. Cut the line in each corner, & fold them.
5.  Paste Pattern Papers.


Step 2 : The Base ( 4 by 4 inches ) 
1. Take a piece of 12 by 12 inches.
2. Mark at 4, 8 inches from all the sides.
3. Fold the sides.
4. Cut the unwanted 4 corners of size 4 by 4 inches
5.  Paste Pattern Papers.


Step 3 : The Base ( 3.5 by 3.5 inches ) 
1. Take a piece of 10.5 by 10.5 inches.
2. Mark at 3.5, 7 inches from all the sides.
3. Fold the sides.
4. Cut the unwanted 4 corners of size 3.5 by 3.5 inches
5.  Paste Pattern Papers.

Step 4 : The Small Box (2 by 2.5 inches ) 
1. Take a piece of 9 by 3 inches.
2. Mark at 2,4,6, 8 inches from 9 inches side.
3. Mark at 2.5 inches from 3 inches side.
4. Fold the sides.
5. Cut the unwanted pieces as shown in the picture.
6.  Paste Pattern Papers.


Step 5 : The Lid (5 by 5 inches ) 
1. Take a piece of 10 by 10 inches.
2. Mark at 2.5 inches from all the side.
3. Make a square of 3 by 3 inches on the centre & cut it
4. Fold the sides.
5. Cut one line in each corner
6. Put adhesive on the corners.
7. Stick the sides together.
8. Turn the lid & on the back side add OHB or Acetate Sheet & add Chipboard on the corners to create Shaker Element
9. Put some sequins, glitters on the Acetate sheet, add Glue & pack the back side from the pattern papers.
10.  Paste Pattern Papers.


Step 6 : The Lid (2 by 2 inches ) 
1. Take a piece of 3 by 3 inches.
2. Mark at 0.5 inches from all the side.
3. Cut one line in each corner
4. Put adhesive on the corners.
5. Stick the sides together.
6.  Paste Pattern Papers.


Step 7 : Assembling
1. Take the 5 by 5 inches base.
2. Put adhesive on the center & paste by 4 inches base on the top.
3. Put adhesive on the center & paste by 3 inches base on the top.
4.Put adhesive on the center & paste by 2 by 2.5 inches box on the top.
5. The box is ready.
6. Decorate the box. I've used some fussy cuts from the "I LOVE YOU" Paper Pack.

ONTO THE DETAILED PICTURES OF THE BOX :


SUPPLIES USED :


That's all for today. Thanks for dropping by. I hope y'all will try your hands & don't forget to tag me. Your likes, comments, & shares motivates me to prepare more craft ideas & tutorials for you.

Until next time Take Care & Keep Crafting!
LOVE,

0 comments:

Wiper Card using Hooked Paper Pack

11:00 am Tanvi 1 Comments


Hello there & thank you so much for joining me today.
This is Tanvi & I share a fun  card tutorial. This one is called a WIPER CARD, with a hidden interactive element. While it may sound complicated, its really easy peasy & I am surprised I have never tried this in my many years of card making.
A Wiper Card is a pop-up card with a swinging tab that pops out when the ends are pulled. This tab can be used to hold a sentiment, a balloon, a flower, a quote anything. What did I use? Well.......Wait for the surprise 😍
Here are some close ups of the front -
To make this card I have used Black Cardstock  - 2 pieces measuring 4 1/4" x 8 1/2".
Score at 1 1/2" and 3". Create a valley fold on one score line and a mountain fold on the second, as shown below.  Repeat for the second piece of cardstock. These when glued will form the card base.
Next use 1 piece of cardstock -  1 1/2 x 3" for the "wiper". Mark at 1 1/2" on the long side.
  • Score from the top right corner to the 1 1/2" mark by placing the right hand corner in the 1" groove and line the left hand corner up with the 1" mark on the left hand side of the scoring board.
  • Add double sided tape on the scored triangle on the bottom of the strip ONLY.  If you place it over the entire bottom strip, the wiper won't work.
  • Take one of the card base pieces and lay it down with the score lines to the right. This will be your card front. Adhere the strip, between the two score lines as shown below. 
  • Now comes the fun element! Yes, instead of an embellishment I have glued a gift card to the tab! Isn't that awesome & sure to bring a smile to the recipient.
  • To assemble the card, add adhesive to the edges of both 4 1/4" sides of the cardstock piece. Place the second 4 1/4" x 8 1/2" piece of cardstock over the card front. This time make sure the score lines are on the left. This is how it looks after gluing both the piecesPull both the sides together & out pops the gift card - 
  • Here is a small video of the card - 

  • I loved playing with this fun fold and I am sure you will too if you decided to give it a go. Cheers!
  • Supplies used


1 comments: