Showing posts with label gift boxes. Show all posts

Panda Love Gift Box ft. Papericious 'Dream Big'


Hello Friends!
Greetings for the day!
This is Parita Galani, here today to share with you tutorial post using Papericious New Release - Dream Big Paper Pack. I always try to keep my tutorial post with bare minimum materials, so its super easy to make.

I have created cutest boxes only using Papericious - Dream Big Paper Pack and its matching CCE. The box can be used for multiple purposes and if used for gifting, the box itself can be saved as souvenir.
So let's have a look at my project: 
Panda Love Gift Box

Step by Step Tutorial:
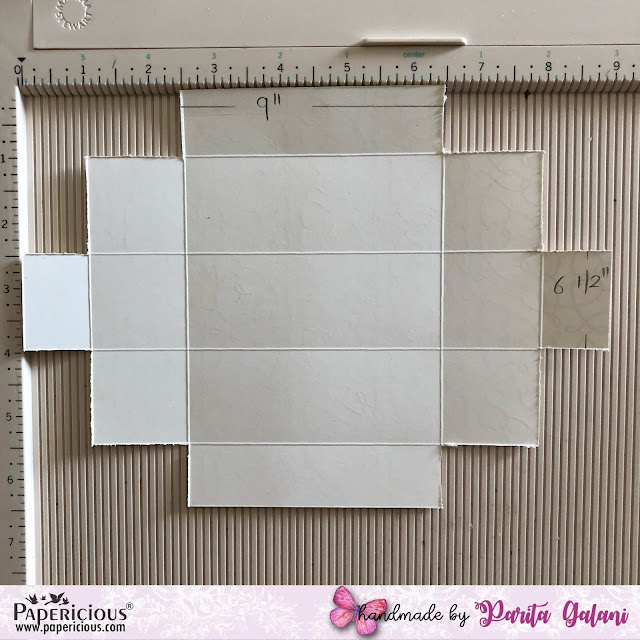
Step 1 - Take a design paper sized 10.5" by 7". Now score it at 2.5", 5", 7.5" and 10" horizontally. Turn the paper around and score it at 2.5",5" and 6.5" as shown below.
Step 2 - Properly score and fold all the measured lines. Now as shown in below diagram, completely cut the little shaded part shown at the end of the paper and snip three lines as shown below.
Step 3 - Now I have used two way tape, you can also use any normal adhesive, but use a strong one.
As shown below tape/glue is to be applied.
Step 4 - First we will stick the vertical end to form a tube like structure. It will look as shown below.
Step 5 - Now we will make base by sticking the flaps which we have already taped earlier, the one flap which is not glued will come on the top. So start overlapping flaps properly and remember unglued one should be on top. I have taken cute embellishments from Dream Big Paper Pack and its matching Cut and Create Sheets. Now from the top end hold both the side and slowly try bringing them in the middle, so automatically it will take the shape as shown below.
Step 6 - Use a Jute Rope/Wooden Clip/Ribbon of your choice to finally seal the box. Isn't it looking adorable?

Supplies Used:

I hope you guys liked this cute and functional tutorial and will craft some for yourself.
Stay safe & healthy!
Best regards,
Parita K Galani


Gift Favours ft. Papericious 'The Flickers'


Hello friends!
I am Parita Galani from Mystic Hue. Hope you all are doing great with your quarantine time. Lets use this time to fullest by crafting new creative things. Today I am going to teach you three different gifting items. We will go by step by step tutorial to create this items using Papericious: The Flickers - Designer Foiled Paper Pack.
So let's have a look:


Tutorial : Mini Slider Treat Box
How cute is beautiful box to gift all your pretty little things. Below are the steps to make it:

Step 1: Wrap of the box - Take a piece of paper measuring 6 5/'8" by 4 1/16". Align it to scoreboard as shown in picture or you you can directly score it with scoring tool as well, score at 1/2", 2", 3 9/16" and 5 1/16".

Step 2: Base of the box - Now take another piece of paper measuring  9' by 6 1/2". Score it  at 1" and 2 1/2" on all sides.

Step 3: Now cut the sides from all sides as shown in the image below.

Step 4: After cutting, fold all the score line properly. I have shown different color marker to show you how to assemble the box. Firstly apply glue on the back side where pink star is shown and stick it to the blue dotted line. Than apply glue on the whole side where green star is shown and stick it on the inside. 

Step 5: Now take Wrap of the box paper, fold it in a way to make square, apply the glue on the 1/2" side and stick were the ends meet.

Step 6: Lastly I have taken embellishments from Die Cut Embellishment Sheets & Cut and Create Embellishment Sheets. Your gift is now all ready to be filled it.

Tutorial 2: Gift Card Envelope
How we present our gifts matter a lot. For all those who loves to gift simple things in style, a cute little envelope to gift Gift cards.
Step 1: I have used Envelope Punch Board to make this cute little envelope. Take a 5 1/2" by 5 1/2" paper and score it at 2", then turn it to 90 degrees and score at 2.5", then again rotate at 90 degrees. Score at 2", and lastly rotate and score at 2.5". Cut off the area shaded.

Step 2: Cut the shaded area. Firstly fold in two small sides on the inside, than apply glue on the side we cut off the shaded area and stick. 

Step 3 - Use choice of your embellishments on the front side and also at the back closure. It's all in the details.

 Tutorial 3: 3D Card
Step 1: Take a piece of Patterned Paper measuring 7.5" by 6". Score it at 3.5" and  4 1/16". Take two pieces of Patterned Paper sized 3.5" and one strip of 1/2". Stick all of them on the on plain side of the Patterned Paper we have taken.

Step 2: Take another piece of paper measuring 5.5" by 3 1/4". Score it at  1/2", 1", 4.5", and 5". Cut the shaded area and fold the score part on inside and our 3D pocket to hold the chocolate is ready. Glue it on the three sides and stick it to the right side of the card.

Step 3: Now we decorate the card with beautiful Die Cut Embellishments. One side of the card will hold a chocolate and a place to include any message you'd like, and you can stick a photograph on the other side.

Supplies Used:


I hope you all enjoyed this tutorial. 
Be safe!
Keep Crafting!

Best regards,
Parita K Galani

Narrow Sliding Gift Box ft. Blooms N Berries | Video Tutorial


Hello friends,
Tulika here from C 4 Craft and I am back with my new tutorial post on how to create narrow sliding gift box with Papericious paper pack "Blooms N Berries".
This box is so perfect to gift a pen or bracelet or something like that.
Have a look!


I had fun to fussy cut and add Papericious Cut & Create Embellishments - 'Blooms & Berriesand 'Me Before You' and found it so handy and easy to decorate in short time. I am delighted to share with you the Step by Step Process of making this DIY Narrow Sliding Gift Box with a Video Tutorial HERE.

Supplies Used:

Papericious Cut & Create Embellishment Sheets - Me Before You


Hope you liked this inspiration. I would love to see how you create your gift boxes as well. Keep crafting!
Love and hugs,

OCTOBER CHALLENGE | Colours Of India!


A big warm welcome Papericious friends!
Hello, this is Swati Nahata from Swati's Crafting World. I hope y'all had an amazing Holiday with some fun time with your family & friends. I am here to announce the challenge this month. I am very excited to host this challenge. My aim is to inspire you to join the CHALLENGE & do something a little creative for yourselves. This month the challenge of  "Colours Of India!"

LET US RUN THROUGH THE RULES

OCTOBER CHALLENGE -  "Colours Of India."
Create ANY project (flat project, 2D projects like Cards, Tags, Bookmarks, etc) that uses atleast 4 colours. Neutral Colours will not be counted in the tally.

1. You can create any project - Altered Items, 3D projects, Home Decor, Cards, Layouts, Mini          Albums, Scrapbooks, etc

2. Remember that you need to use Papericious Products as your main focus to qualifying for the win.

3. The last date of submission of your projects is 10th November, 2019 at 11:55pm IST.

4. Please go through the general guidelines HERE before you link up your projects. Any project not following the rules will be disqualified and it will not be eligible for the prize.

5. If you are entering the challenge via social media platforms like Instagram or Facebook, please remember to write in your post that you are participating in the Papericious Monthly Challenge and give a direct link to the challenge blog post in your post description. Do mention the Papericious products used in your post as well. Then, come back and link your entry using the InLinkz tool provided at the end of the post. 

PRIZES

The Design Team will be selecting a Merit based Winner at the end of the challenge who will stand a chance to win a gift voucher worth INR 1,000 from the Papericious Store. 

We will also be picking three entries as our Top 3, who will be awarded a badge to 
flaunt on their blog.

ONTO MY CREATION

A greeting card? No! Try this colourful & Beautiful Tower Explosion Box.This gift will explode once opened, & reveal all the love you put into it. It's not only a box, but also a gift to your lover, parents or yourself. When closed it looks like a box & when opens, all the sides fall back to reveal a large multi-layered card & after that when you pull it up one by one, it'll open like a tower. I made the box with an amazing Papericious Papers - OFTEN. One of the most colourful & beautiful Paper pack hitherto. 

DETAILED PICTURES

SUPPLIES USED:


I hope you enjoyed my little piece of challenge inspiration. 
Hope you guys will join me this month. I would love to see your gorgeous creations using Papericious products. I look forward to your participation.
Well, that is from me today. Thanks for stopping by.
Happy Crafting!
 XOXO