Showing posts with label Envelopes. Show all posts

Festive Favours ft. Foiled Essential Patterned Papers


 Hello friends!
This is Parita Galani, here today sharing with you few festive crafts with Papericious' recently released gorgeous Foiled Essential Papers. I am absolutely in love with papers, with its variety of colors with different foiled patterns, they are perfect for absolutely any project.

As Diwali is round the corner I have made some variety of mini projects which is perfect for this beautiful festive season.
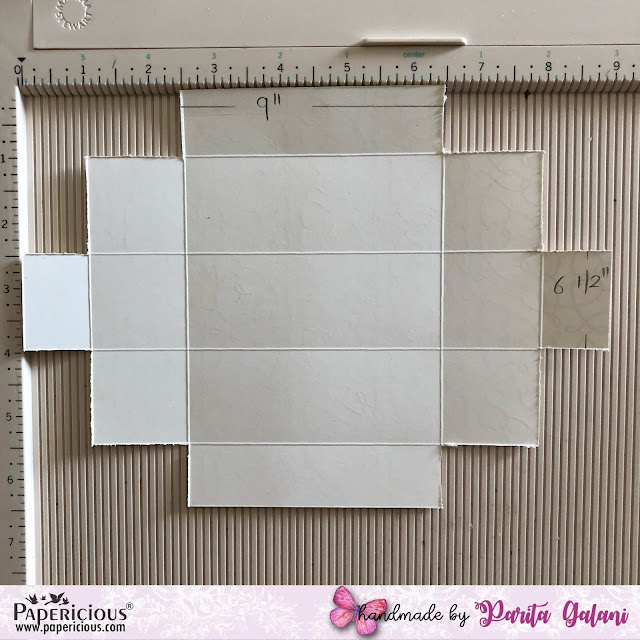
Project 1
I have created below an entire project using just 2 sheets of 12" by 12" of Papericious Fun Fiesta 12" X 12" Foiled Paper Pack. It includes Mini Treat Box, Scalloped Envelope, 2 Gift Cards/Coin Gifting Envelopes and 2 Gift Tags. I so love the combination of hot pink with lime green along with foiled patterns. It's so very festive!


Project 2
 I have created Money Envelopes using the Ethnica 12" X 12" Foiled Paper Pack, which are perfect for gifting in upcoming festive as well as wedding season. The bright shades of red, orange, and blue are just so fantastic!
Lets have a look at my project:


Supplies Used:

I hope you guys liked my projects and will create such festive projects of your own using this beautiful collection.
Keep crafting!

Best regards,
Parita K Galani

Shagun Envelope ft. Peek A Boo - Guest Post by Nupur Priya


Hello everyone!
This is Hussena here, and welcome back to the Papericious blog. I am here to share the next post by our guest designer, Nupur Priya, using the Papericious Peek A Boo Paper Collection. If you missed seeing her earlier posts, you can click HERE and HERE to see her projects.

Today, she is sharing a delightful Shagun/Money Envelope featuring the Peek A Boo Paper Collection.

Here's what Nupur has to say about this project:
Hello Everyone! 
I am Nupur Priya from Nupur Creatives and I am back with another inspiration for Papericious. For today's project, I have used the Peek A Boo Paper Pack and coordinating Die Cut Embellishment Sheets to create a Shagun Envelope for a new born baby. 

The pattern papers are quiet heavyweight, so I used one of the sheets and a die to create the money envelope. Next, I die cut a heart from the same pattern paper, inked its edges, and applied glitter. Then, I arranged and glued down few more die cuts, images, and sentiments from the Embellishment Sheets to decorate the envelope. I also added few rhinestones for the finishing touch.


I hope I was able to inspire you today with my creation. Don't forget to tag Papericious (@papericious) if you create something using the new Paper Packs. 

Thank you for stopping by!

Hugs,
Nupur
-------------

If you liked Nupur's project, please do not hesitate to leave a comment! She would love to hear what you think of her project. 

You can find Nupur on social media here:

Stay tuned for her next post using our Mama in the Making Paper Pack in the coming week. We can't wait to share her wonderful creations with you!

Gift Favours ft. Papericious 'The Flickers'


Hello friends!
I am Parita Galani from Mystic Hue. Hope you all are doing great with your quarantine time. Lets use this time to fullest by crafting new creative things. Today I am going to teach you three different gifting items. We will go by step by step tutorial to create this items using Papericious: The Flickers - Designer Foiled Paper Pack.
So let's have a look:


Tutorial : Mini Slider Treat Box
How cute is beautiful box to gift all your pretty little things. Below are the steps to make it:

Step 1: Wrap of the box - Take a piece of paper measuring 6 5/'8" by 4 1/16". Align it to scoreboard as shown in picture or you you can directly score it with scoring tool as well, score at 1/2", 2", 3 9/16" and 5 1/16".

Step 2: Base of the box - Now take another piece of paper measuring  9' by 6 1/2". Score it  at 1" and 2 1/2" on all sides.

Step 3: Now cut the sides from all sides as shown in the image below.

Step 4: After cutting, fold all the score line properly. I have shown different color marker to show you how to assemble the box. Firstly apply glue on the back side where pink star is shown and stick it to the blue dotted line. Than apply glue on the whole side where green star is shown and stick it on the inside. 

Step 5: Now take Wrap of the box paper, fold it in a way to make square, apply the glue on the 1/2" side and stick were the ends meet.

Step 6: Lastly I have taken embellishments from Die Cut Embellishment Sheets & Cut and Create Embellishment Sheets. Your gift is now all ready to be filled it.

Tutorial 2: Gift Card Envelope
How we present our gifts matter a lot. For all those who loves to gift simple things in style, a cute little envelope to gift Gift cards.
Step 1: I have used Envelope Punch Board to make this cute little envelope. Take a 5 1/2" by 5 1/2" paper and score it at 2", then turn it to 90 degrees and score at 2.5", then again rotate at 90 degrees. Score at 2", and lastly rotate and score at 2.5". Cut off the area shaded.

Step 2: Cut the shaded area. Firstly fold in two small sides on the inside, than apply glue on the side we cut off the shaded area and stick. 

Step 3 - Use choice of your embellishments on the front side and also at the back closure. It's all in the details.

 Tutorial 3: 3D Card
Step 1: Take a piece of Patterned Paper measuring 7.5" by 6". Score it at 3.5" and  4 1/16". Take two pieces of Patterned Paper sized 3.5" and one strip of 1/2". Stick all of them on the on plain side of the Patterned Paper we have taken.

Step 2: Take another piece of paper measuring 5.5" by 3 1/4". Score it at  1/2", 1", 4.5", and 5". Cut the shaded area and fold the score part on inside and our 3D pocket to hold the chocolate is ready. Glue it on the three sides and stick it to the right side of the card.

Step 3: Now we decorate the card with beautiful Die Cut Embellishments. One side of the card will hold a chocolate and a place to include any message you'd like, and you can stick a photograph on the other side.

Supplies Used:


I hope you all enjoyed this tutorial. 
Be safe!
Keep Crafting!

Best regards,
Parita K Galani

Easy Envelope Tutorial


Hello everyone!
This is Shakti Arora from Shakti Art Creations, and I am here with a Tutorial post for you all with the beautiful Blooms & Berries Paper Pack by Papericious.  For this, I have taken ready to use cash envelopes by Papericious. They are very easy and quick to make. 
I also used the Blooms & Berries: Cut & Create Embellishment Sheets with some Gold Die Cuts. I have done a Video Tutorial for you on these as well. 
Let's quickly have a view over these:


I hope you guys like these easy to make envelopes. 
Check out the video to learn these gorgeous Cash Envelopes: