Showing posts with label chippis. Show all posts

Altered Box ft. Cut and Create Embellishment Sheets - SMILE


Altered Box (SMILE)  

Hello friends!
This is Nandini. Here I am back again with an altered art project. My luv for Mixed Media and colours have got the wings with the lovely products of Papericious. Some days before I just got a box  which is to be thrown away, but instead of dustbin it has got place at my craft table and I have renovate it with Mixed Media. 

Here is the procedure:
Take the box and paint it with the Chalk Paint “Bracket Green“.  Make some textures using Modelling Paste and stencil. Spray using brush some Lamp Black Chalk Paint on it. Let it to be dry. For the focal point, I have taken the Victorian Gate from the Papericious 3D Shaker Collection. For the colouring of the window, do the first coat with Gesso and second coat with Natural White Chalk Paint. Put some Crystal Clear Glitter on the wet paint so that it will be fixed with the colour only. Put some Sequins in it and cover it with an OHP sheet. To decorate it with flowers, take Cut & Create Embellishment Sheet "Blush". This collection has beautiful images of flowers, leaves, butterflies, hearts and keys. Do fussy cutting of all the images and make a beautiful composition near the gate. It gives a beautiful vision of a garden window which can make anyone smile. Take the sentiment "Smile" from the "Moments" Collection and colour it with Gesso and White Chalk Paint. To enhance its beauty, put some Crystal Clear on the sentiment. Let it be dry and settled.

Some more pictures: 


Supplies Used:


8. Blush - Cut and Create Embellishment Sheet

Hope you all have enjoyed this post. Thank you for stopping with us!
Do not forget to leave some some love and comments for me.
Luv & Hugs,
Nandini Ramchandani

Accordion Tag Box by Tanvi

Hello lovely people! 
This is Tanvi from Paper FantaseesToday, I have an Accordion Tag Box to share showcasing the HOOKED Paper PackThe box measures, 4x4" & has 18 pockets which can hold about 36 pictures.
This paper pack has some gorgeous floral designs that are best used alone without any embellishments! I selected one such page for the box. To add some dimension I colored a coordinating Pattern Chippi & used it in one corner on either side. 
Used some mulberry roses from my stash for the tags & metal charms for the corners.
 

Supplies Used:

That's all for today. Thanks for dropping by.
Until next time take care & Happy crafting!

Mixed Media Journal Cover

Hello Crafty souls!
I am back with a mid week inspiration showcasing the Journal Books.
These are available in 2 variants - 5x6" & 8x8" with 10 flaps inside. Priced at ₹320 & ₹480 these are truly value for money. 
The thick chipboard pages make it desirable for use with all sorts of papercrafts - create a scrap book layout , layer it with pattern papers & can be use as a mini album or a baby book. 
I played around with my supplies to make a mixed media journal cover. These books are spiral bound & open flat, making it easy to work on every single page.
I started by covering with a layer of Black Gesso (the page did not warp or soak at all!)
Used Modelling paste with to create patterns with stencils for textures. I also used the scrap chipboards from the Chippis packaging & trim them to desirable sizes on the layout. All the elements were glued with Gel Medium & covered with Black Gesso. Once dry I used metallique wax pastes.
Some more close ups - 
Thanks for stopping by & happy crafting!
Love,
Tanvi.

Journal Books


Waterfall Calendar - Tutorial


Hello everyone, this is Tanvi with my tutorial post for this month, showcasing the beautiful Fleur Fun paper pack.
 It is time to say good bye to 2018 & welcome another year. I love making my own calendars & sending them across to near & dear ones. Am sharing one such make for 2019 – a mini calendar cum note holder that you can carry on the go.
Before moving to the tutorial let me share a few pictures of the finished project -


I have used a mini envelope slider die on the cover & will use them to insert mini tags with names & the year.


.
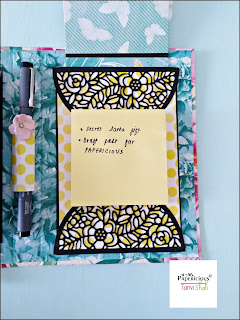
This booklet measures 5x7” & holds a calendar on one side & on the other is a pocket insert and a sticky note pad. On the spine (inside) I have a pen holder too! No more digging in my bag for a pen now.


For the calendar pages I have made a waterfall insert.


TUTORIAL –

You will need chipboard, card stock & pattern papers trimmed to the following sizes –
Chipboard – 5x7” – 2 pieces & ¾ x7” – 1 piece
Pattern papers – 8x12” & 6 ¾ x 10 ¾” for the covers.


Attach the chipboard pieces to the cardstock. Make sure to maintain a 1/8" gap between the spine piece and the cover pieces of chipboard.  


Trim the cardstock corners at an angle and attach double-sided adhesive & Wrap the chipboard, also glue the pattern paper to the inside. This is how it will look. Gently fold the covers while scoring in the 1/8" gutter between the spine and the covers.    


Next we make the waterfall section. 
You will need –
Card stock - 11 x 4 ¼  “. Score along 11” side at 5 ½ & pattern paper – 5 3/8 x 4 1/8” – 2 pieces
 
Card stock – 4x4” - 6 pieces & pattern paper -  3  6/8 x 3 6/8" - 6 pieces
Card stock – 9 ½ x 3 7/8” score on the long side at 3 ¼ , 3 ½ , 3 ¾ , 4, 4 ¼ , 4 ½  & 4 ¾ “. Burnish all the folds. This will form the base of the waterfall mechanism. Lay it down with all the score lines to the right. Line up the first 4x4 piece along the second score line from the right. Continue gluing all the pieces with tacky tape.
For the sliding mechanism you will need a piece of cardstock - 1 x 7 ½ “ score at 1 ¾ & 5 ¾“      Wrap it around the other side of the waterfall & glue it about ½ “ from the edge. Next put tacky tape on the loose ends of this strip, line the waterfall to the fold of the 11x4 ¼ “ card stock. The waterfall insert is now ready. Print & Cut the calendar pages to size & glue.
 

Next we will need a piece of card stock 4x6” & pattern paper – 3 7/8x 5 7/8” for the pocket & 3 ½ x11” for the insert.


Here are some close ups of the project - 


Here is a flip through of the calendar - 

Hope this inspires you to make one for yourself. You can play around with the inserts & themes similarly to create your own unique organizers, planners or reminders. 

Happy & crafty 2019 friends, will be back in the New Year with some more crafty inspiration 😊
Until then, do visit & comment on all our posts to win some awesome goodies!

Supplies used -