Showing posts with label Papericious Me Before You. Show all posts

Papericious August Challenge | Inspired by Moodboard


Hello Everyone!
Hope y'all are doing well & your family is staying safe & healthy!
This is Swati from Swati's Crafting World back on the blog to host the Papericious Monthly Challenge for the month of August with Tulika. We're so happy to be back & have an unique theme for this month - "Inspired by Moodboard". Isn't the theme exciting?

WHAT IS A MOODBOARD?
Moodboards are a great way to start any projects. It's a type of visual presentation or a collage consisting of images, sentiments, & objects in a composition. It can be based upon a set of topic or can be any material chosen at random. It can also be used to convey a general idea or feeling about about a particular topic.

Inspired by the below mentioned moodboard, Tulika and I have created our projects.
So let's have a look at the challenge rules & the inspiration projects.
AUGUST CHALLENGE -  "Inspired by Moodboard"
You need to use atleast 2 elements from the Moodboard given to you & mention how you have
interpreted it on your project.
1. You can create any project - Altered Items, 3D projects, Home Decor, Cards, Layouts, Mini Albums, Scrapbooks, etc
2. Remember that you need to use Papericious Products as your main focus to qualifying for the win.
3. The last date of submission of your projects is 10th September, 2020 at 11:55pm IST.
4. Please go through the general guidelines HERE before you link up your projects. Any project not following the rules will be disqualified and it will not be eligible for the prize.
5. If you are entering the challenge via social media platforms like Instagram or Facebook, please remember to write in your post that you are participating in the Papericious Monthly Challenge 
and give a direct link to the challenge blog post in your post description. Do mention the Papericious products used in your post as well. Then, come back and link your entry using the 
InLinkz tool provided at the end of the post. 


PRIZES

The Design Team will be selecting a Merit based Winner at the end of the challenge who will stand a chance to win a gift voucher worth INR 1,000 from the Papericious Store. We will also be picking three entries as our Top 3, who will be awarded a badge to flaunt on their blog.


NOW LETS MOVE ON TO MY CREATION :

I've created this simple & beautiful "BE MINE" Layout inspired by the moodboard. I've used almost all the colors from the moodboard. I had so much fun making it. This layout is perfect solution for capturing the memories of a specific holiday, occasion, holiday, or celebrations & can house two pictures and/or tags. I've used "ME BEFORE YOU" Paper pack from Papericious, & it was just perfect for what I wanted to make. I've used pattern paper from this collection as base & decorated it with some Vellum Sheets. I've then spray painted the sheet with Papericious Chalk Paint. Next, fussy cut embellishments, Papericious Grey Chippie, Colored Cardstock have been layered in cluster to give it an unique look. Decorated the layout with mulberry flowers, water droplets, paper sentiments, bow, etc.


HERE ARE SOME PICTURES & A SMALL VIDEO OF MY PROJECT WITH CLOSE UPS :


VIDEO :


SUPPLIES USED:


PEARL PINK - Papericious Chalk Paint
Now let's have a look at what Tulika has created :

Hello!
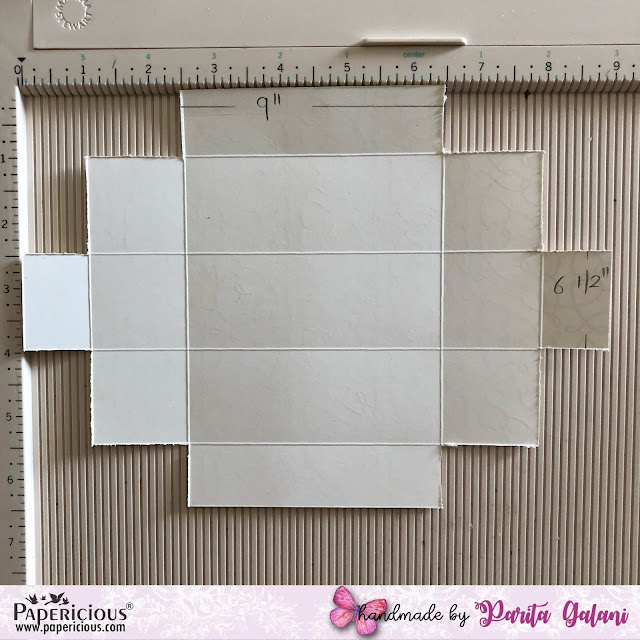
Tulika this side. This time we have got a Moodboard for Papericious August Challenge and I loved this shabby chic theme! Though it's not my style but I took the opportunity to experiment with this and super happy with the outcome! I made this Envelope Card to go with the moodboard theme. Have a look - 
Hope you liked my inspiration.
I am looking forward for your love and support.
Hugs,
Tulika from C 4 Craft.

PRODUCTS USED :

Papericious "Me Before You" Paper Pack 

Thank You so much for dropping by. Hope you like the way we created our projects and we really hope that we've inspired you to create something for this challenge. 

Please do participate as we're looking forward to see your gorgeous creations.

Your likes, comments, & shares motivate us to prepare more craft ideas for y'all.

Happy Crafting!
Love & Hugs

Papericious July Challenge - Things with Wings


Hello everyone!
Shilpa here along with Tulika andwe are hosting the Papericious July Challenge. 
We have very beautiful and simple theme for this month: "Things with Wings". 
In our craft world, we all love to add birds, butterflies, dragonflies, airplanes in our projects. And that is what we would love to see in your Challenge entries for July.

Papericious July Challenge Theme - Things With Wings

Let us have a look at the challenge rules:
1. You can create ANY project - Altered Items, 3D projects, Home Decor, Layouts, Mini Albums, Scrapbooks, etc.
2. Remember that you need to use Papericious Products as your main focus to qualifying for the win.
3. The last date of submission of your projects is 9th August, 2020 at 11:55pm IST.
4. Please go through the general guidelines HERE before you link up your projects. Any project not following the rules will be disqualified and it will not be eligible for the prize.
5. If you are entering the challenge via social media platforms like Instagram or Facebook, please remember to write in your post that you are participating in the Papericious Monthly Challenge and give a direct link to the challenge blog post in your post description. Mention the Papericious products used in your post as well. Then, come back and link your entry using the InLinkz tool provided at the end of the post.

PRIZES:
The Design Team will be selecting a Merit based Winner at the end of the challenge who will stand a chance to win a gift voucher worth INR 1,000 from the Papericious Store. 
We will also be picking three entries as our Top 3, who will be awarded a badge to flaunt on their blog.

Inspiration for the Challenge:
Tulika has created this amazing Monochromatic Mixed Media Layout.

Rich green colour is everywhere now and that she has put in the project to present the green fresh nature look!
She has tried her hands on monochromatic layout for the first time.


Tulika has shared Video tutorial for this... go check out here,


Supplies Used:


 And this is my Card for inspiration:
  
 I have used Papericious "Me Before You" Collection to create this card. On the White Cardstock, I layered two sets of pattern papers in large and small sizes. In between them I adhered lace. On the top of the card, I adhered various embellishments from Me Before You: Cut and Create Sheets. Celebrate is a chipboard piece colored with chalk paints. I also added Sequins as final touch.

Papericious Products Used here:


Thanks so much for stopping by.
Can't wait to see what you create!

Trifold Folio Card Ft. Me Before You by Swati


GOOD MORNING!
Hello Guys, I hope y'all are doing great. Swati from Swati's Crafting World bouncing back with another pictorial post. I've a fun tutorial to share with you today featuring "ME BEFORE YOU" Paper collections by Papericious. Please visit www.papericious.com to buy this & other amazing collections of Papers, Cardstocks, MDF Trays, Shakers, etc.

TRIFOLD FOLIO CARD FT. ME BEFORE YOU

Share your thoughts for your loved ones on their Birthday/Anniversary with this lovingly handmade folio card. An interactive fold album with waterfall mechanism on one side & pockets on the other. Made with lots of elements, yet compact. I love pockets, so added a lot of them to this Tri-Fold Folio. Tags & Pockets go together well! It's spacious & can house 10+ Pictures and/or Tags.
Follow along with these simple pictorials on how to make a trifold folio card with just a couple of score lines & folds.

P.S - All the measurements are in inches
STEP 1: 1 piece of 14.7/8 x 6, score along the 14.7/8 side at 5, 5.1/2, 10.1/2, 10.7/8, & fold it.
STEP 2: Position the album, & add magnets to the base.
STEP 3: I've layered the top of the page with purple & pink card & pattern paper. I love the way the black, purple, pink card make the patterned paper pops!

STEP 4: For the waterfall mechanism - take 3 pcs of black card of size - 4.1/2 x 5, score along the side 5 at 4.1/2.
STEP 5: Now onto the pocket part - I love pockets, so have added three pockets in this folio of size -
* 4.1/2 x 5.1/2, score at 1/2 & 4 along 4.1/2 side & at 5 from 5.1/2 side.
* 4.1/2 x 4.1/2, score at 1/2 & 4 along 4.1/2 side & at 4 from 4.1/2 side.
* 4.1/2 x 3.1/2, score at 1/2 & 4 along 4.1/2 side & at 3 from 3.1/2 side.
STEP 6: Fold the score lines, & position the 1st pocket, add patterned papers & paste the 2nd pocket, & then add the 3rd one. 
STEP 6: Have added tags to the pockets, & fussy cut few elements to decorate the folio. 

ON-TO THE PICTURES & VIDEO:


SUPPLIES USED TO MAKE THIS BEAUTIFUL FOLIO:


 Thank You so much for dropping by.
Hope you like it & will definitely try this. I would love to see your gorgeous creation.
Your likes, comments, creation from my tutorials, & shares motivates me to prepare more craft ideas & tutorials for you.
Happy Crafting!
Love & Hugs

Gift Favours ft. Papericious 'The Flickers'


Hello friends!
I am Parita Galani from Mystic Hue. Hope you all are doing great with your quarantine time. Lets use this time to fullest by crafting new creative things. Today I am going to teach you three different gifting items. We will go by step by step tutorial to create this items using Papericious: The Flickers - Designer Foiled Paper Pack.
So let's have a look:


Tutorial : Mini Slider Treat Box
How cute is beautiful box to gift all your pretty little things. Below are the steps to make it:

Step 1: Wrap of the box - Take a piece of paper measuring 6 5/'8" by 4 1/16". Align it to scoreboard as shown in picture or you you can directly score it with scoring tool as well, score at 1/2", 2", 3 9/16" and 5 1/16".

Step 2: Base of the box - Now take another piece of paper measuring  9' by 6 1/2". Score it  at 1" and 2 1/2" on all sides.

Step 3: Now cut the sides from all sides as shown in the image below.

Step 4: After cutting, fold all the score line properly. I have shown different color marker to show you how to assemble the box. Firstly apply glue on the back side where pink star is shown and stick it to the blue dotted line. Than apply glue on the whole side where green star is shown and stick it on the inside. 

Step 5: Now take Wrap of the box paper, fold it in a way to make square, apply the glue on the 1/2" side and stick were the ends meet.

Step 6: Lastly I have taken embellishments from Die Cut Embellishment Sheets & Cut and Create Embellishment Sheets. Your gift is now all ready to be filled it.

Tutorial 2: Gift Card Envelope
How we present our gifts matter a lot. For all those who loves to gift simple things in style, a cute little envelope to gift Gift cards.
Step 1: I have used Envelope Punch Board to make this cute little envelope. Take a 5 1/2" by 5 1/2" paper and score it at 2", then turn it to 90 degrees and score at 2.5", then again rotate at 90 degrees. Score at 2", and lastly rotate and score at 2.5". Cut off the area shaded.

Step 2: Cut the shaded area. Firstly fold in two small sides on the inside, than apply glue on the side we cut off the shaded area and stick. 

Step 3 - Use choice of your embellishments on the front side and also at the back closure. It's all in the details.

 Tutorial 3: 3D Card
Step 1: Take a piece of Patterned Paper measuring 7.5" by 6". Score it at 3.5" and  4 1/16". Take two pieces of Patterned Paper sized 3.5" and one strip of 1/2". Stick all of them on the on plain side of the Patterned Paper we have taken.

Step 2: Take another piece of paper measuring 5.5" by 3 1/4". Score it at  1/2", 1", 4.5", and 5". Cut the shaded area and fold the score part on inside and our 3D pocket to hold the chocolate is ready. Glue it on the three sides and stick it to the right side of the card.

Step 3: Now we decorate the card with beautiful Die Cut Embellishments. One side of the card will hold a chocolate and a place to include any message you'd like, and you can stick a photograph on the other side.

Supplies Used:


I hope you all enjoyed this tutorial. 
Be safe!
Keep Crafting!

Best regards,
Parita K Galani