Showing posts with label Explosion Box. Show all posts

"BABY" Embossed Fabric Explosion Album ft. My Little Bestie


"BABY" Embossed Fabric Explosion Album


Hello My Crafty Friends! Here I am welcoming you to the 
Papericious Blog.

Hope you all are doing great. This is Sabaa Hassan and I am super excited to share my today's project with you all


The arrival of a new baby is an unforgettable moment that deserves to be celebrated in a special way. And what better way to do so than by creating a luxurious and unique handmade project that captures all the precious memories of your little one?

Keeping the same thought in mind, here I am sharing the "BABY" Embossed Fabric Explosion Album featuring My Little Bestie - Designer Pattern Printed Scrapbook Papers 12x12 inch & My Little Bestie - Motif Bundle


We have made it with fabric embossing technique on the suede fabric to add an extra touch of elegance, which created a beautiful textured effect that perfectly complements the softness of the baby theme.

To embellish the album we used Crib Embellishment , handmade flowers, die cutouts, pearls and glitters.


At Papericious, we offer a wide range of high-quality materials, so that you create stunning high quality projects. Do visit to Papericious and make sure you have Suede FabricMy Little Bestie - Designer Pattern Printed Scrapbook Papers 12x12 inch & My Little Bestie - Motif Bundle in your stash. This is something you just can't miss.


Now lets have a look of some more beautiful layouts and insights of the album below


Products used are


Thank you for stopping by. Hope you liked my creation. See you soon. 
Till then keep creating and Happy Crafting!

Lots of Love,
Sabaa Hassan


Pink or Blue Explosion Box Featuring Papercious Moma In Making

 Hello friends!
This is Parita Galani, Hope all of you are doing well! Today I am here to share an tutorial project using Papericious newly launched Moma In Making designer paper pack.
This paper pack is perfect to create all beautiful pregnancy related projects like scrapbook, cards envelopes, baby shower invitation and related gifts, possibilities are endless. I have made an explosion box with 3D elements in the center, this will form a perfect gift for baby shower and with little modification you can convert into beautiful baby shower invitation too.
Pink or Blue Explosion Box
Step by step tutorial
Step 1: I have taken 12" by 12" kraft paper and scored at 4" and 8" on both sides, and cut it on all 4 sides alternatively as shown below.
Step 2: I have taken 9 various patterned paper from Papericious Moma In Making paper pack sized 3.75" and pasted it using tacky tape also do same for the back side as it will form outer layer of the box.
Step 3- Make triangle with paper strips by simply folding and sticking it and than stick Papericious Moma In Making die cut embellishment on it as shown and than stick it step wise to create a 3D effect.
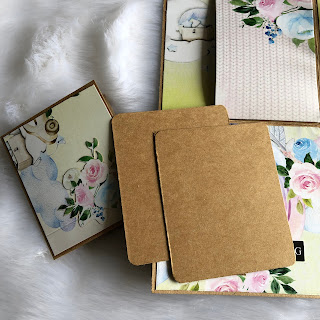
Step 4- I have made 2 pockets from 5" by 3" paper scoring 0.5" on 3 sides and stick on 2 sides as shown below. As inserts I have made one card 3" by 2.5" and 2 single inserts sized 2.5" by 3".
Step 5- I have taken 3" circle from Papericious Moma In Making patterned pack, pasted it as shown below.
Step 6- I have taken 6" by 6" kraft paper and scored it at 1" on all 4 sides make cut on 4 sides as we did for box and than pasted patterned paper sized 3.75" on top of the and 0.75" for all 4 sides.
Step 7: Now lets embellish the inside card and outer box step by step with Papericious Moma In Making laser theme chip board and Die cut embellishment, Mothers day DCE and some from element sheet from the paper pack and we are done.
 I hope you all liked my project and you will create some beautiful projects of your own and don't forget to tag us!

Stay in & Stay safe!
Best Regards,
Parita K Galani


Shaker Explosion Box By Swati


Namaste, all
Swati from Swati's Crafting World. I hope y'all had a relaxed Sunday with some fun time 
with your family & friends. I've a pretty pictorial post to share with you. 
I hope y'all like it. 

In my today's post I'll be sharing detailed post on how to make a Shaker Explosion Box. I've used recently launched Papericious Paper pack - "I LOVE YOU" Talking about the papers, I feel the textures, & the designs they carry are extremely gorgeous. I've preserved all the bits & pieces of this collection that remained so that I create something for myself later.


 ABOUT THE SHAKER EXPLOSION BOX :

A box for any occasion. A box that doesn't literally explode, it just fall open. A way to show a lot of Love & Appreciation for the person it is created for, so it is a card & much more. These beautiful boxes are a wonderful & a perfect as a present.


STEP BY STEP TUTORIAL :

The size of the box is 5 by 5 inches & it has three layers & a small box inside of size 2 by 2.5 inches.

Step 1 : The Base ( 5 by 5 inches ) 
1. Take a piece of 15 by 15 inches.
2. Mark at 5, 10 inches from all the sides.
3. Fold the sides.
4. Cut the line in each corner, & fold them.
5.  Paste Pattern Papers.


Step 2 : The Base ( 4 by 4 inches ) 
1. Take a piece of 12 by 12 inches.
2. Mark at 4, 8 inches from all the sides.
3. Fold the sides.
4. Cut the unwanted 4 corners of size 4 by 4 inches
5.  Paste Pattern Papers.


Step 3 : The Base ( 3.5 by 3.5 inches ) 
1. Take a piece of 10.5 by 10.5 inches.
2. Mark at 3.5, 7 inches from all the sides.
3. Fold the sides.
4. Cut the unwanted 4 corners of size 3.5 by 3.5 inches
5.  Paste Pattern Papers.

Step 4 : The Small Box (2 by 2.5 inches ) 
1. Take a piece of 9 by 3 inches.
2. Mark at 2,4,6, 8 inches from 9 inches side.
3. Mark at 2.5 inches from 3 inches side.
4. Fold the sides.
5. Cut the unwanted pieces as shown in the picture.
6.  Paste Pattern Papers.


Step 5 : The Lid (5 by 5 inches ) 
1. Take a piece of 10 by 10 inches.
2. Mark at 2.5 inches from all the side.
3. Make a square of 3 by 3 inches on the centre & cut it
4. Fold the sides.
5. Cut one line in each corner
6. Put adhesive on the corners.
7. Stick the sides together.
8. Turn the lid & on the back side add OHB or Acetate Sheet & add Chipboard on the corners to create Shaker Element
9. Put some sequins, glitters on the Acetate sheet, add Glue & pack the back side from the pattern papers.
10.  Paste Pattern Papers.


Step 6 : The Lid (2 by 2 inches ) 
1. Take a piece of 3 by 3 inches.
2. Mark at 0.5 inches from all the side.
3. Cut one line in each corner
4. Put adhesive on the corners.
5. Stick the sides together.
6.  Paste Pattern Papers.


Step 7 : Assembling
1. Take the 5 by 5 inches base.
2. Put adhesive on the center & paste by 4 inches base on the top.
3. Put adhesive on the center & paste by 3 inches base on the top.
4.Put adhesive on the center & paste by 2 by 2.5 inches box on the top.
5. The box is ready.
6. Decorate the box. I've used some fussy cuts from the "I LOVE YOU" Paper Pack.

ONTO THE DETAILED PICTURES OF THE BOX :


SUPPLIES USED :


That's all for today. Thanks for dropping by. I hope y'all will try your hands & don't forget to tag me. Your likes, comments, & shares motivates me to prepare more craft ideas & tutorials for you.

Until next time Take Care & Keep Crafting!
LOVE,