Showing posts with label DTdaksha. Show all posts

Diamond faceted gift box with Papericious papers - tutorial

Hello friends!
Today I am sharing quick project and tutorial using Papericious new release Guilded onyx Design papers and mini mdf shakers...
I will not take much of your time as it is a picture heavy post..so here is my project... I have created this box keeping valentine theme in mind..

And here is step by step tutorial:
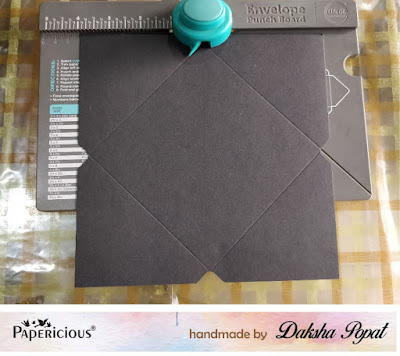
To make this gift box I have used envelope punch board..and you can vary size of box..here I have taken 8"*8" two black cardstock..and scored at 4" all four sides...i.e 1/2 of your size..means if you take 8*8" then score at 4" ..if you take 7"*7" then score at 3.5" ,6"*6" then score at 3"...like that..
Step:1- Take two cardstock 8"*8"..and scored n punched at 4" on all four sides in both


Step:2- Now score at 3/8" on all four sides..in both black CS..see in picture..then in one piece of cardstock cut n remove all that four 3/8" sides..see in picture..and in other card stock..cut small top 3/8" X3/8" square n remove..you can see details in picture


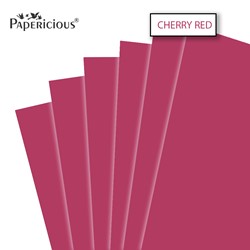
Step:3 - score and barnis all lines and add red tacky tape on 3/8" sides on one cardstock.. now stick other cardstocks triangle part in tacky tape area in ' v' shape..or in triangle shape and automatically all four triangle shapes will fit in its place and you will get a diamond faceted box.


 Step:4 - I have cut n removed top 4.5" x4.5" for top box opening..and took one 5.5"X5.5" piece of cardstock for the lid..which I have join with a hinge..means I took 3/4"*5.5" card stock n scored at 3/8" on 3/4" side and stick the lid part with this hinge part ..then used a tiny piece of magnet on both sides..inside of the box base n on box lid..for magnetic closing...used a piece of satin black ribbon for easy holding of lid part...
Step-5: now your box is ready n decorate according to your choice of paper on all sides and top part...here you can see the final result.. 

thank you..for staying with me so far🙂 for supplies you can check the supply list below..see you soon with my next post..till then bye ..
Love n hugs
Daksha

Supplies used:


 For heart diecut I have used AliExpress heart die,"Love"diecuts from DCAM dies,and sentiment from Altenew stamp.


Valentine theme shadow box with Love Actually papers.

Hello friends!
valentine day is near...the love is in the air..and the moment I saw the "Love Actually "paper pack by Papericious..I can think of this  project only..😊
We at Papericious have awesome new release this month..in pattern paper, mini shakers in MDF, MDF shadow boxes..glass beads..etc...and you can check lovely inspirations  by our talented DT's at our Papericious blog HERE. I have made a valentine theme shadow box..using love actually papers,8"x10" MDF shadow box..


 #Used  natural white Papericious chalk paint to colour my MDF box..
# used script pattern paper from  love actually papers for the base...I have used sticker sheet .. which I have layered with black cardstock and then layered with white ticket die cut with foam dots to give dimensions.... the sticker sheet from this paper pack is so beautiful that I tried to us that more in my project.. instead of other elements.
# I have arranged stickers in L shape n kept 4x6 place for photo..here I have used image of a couple.. I liked black n white look so much that I did not color the image so that it doesn't standout from the background.
#used banner diecut at the bottom part..
# that cute  mason jar with lovely sentiment..is also from the same sticker sheet..n used mulberry tulips..
#cute little angel from pattern paper..I fussy cut that and highlighted with glossy accent n clear glitter..
#finally used love sentiment n top circle stamp sentiment from my stash.
#this shadow box you can hang or use it as photoframe.
Thank you.. that's all for today..see you with my next project...till then bye n take care.love n hugs
Daksha
SUPPLIES USED:


Altered notebook diary using Papericious decoupage stuff..

Hello friends!
First wishing you all Happy 2018!
Today it's my turn to give inspirational post on Papericious new decoupage papers n chalk colors...so here I am with altered notebook... I have altered a notebook diary...which can be used by a young girl or can be used by any makeup artist/ fashion designer to write down notes. I did not want to give bulky decoration so can be used practically..so here it is..

Before alterations

Top 2" part colored in gray chalk colors matching with side n background gray Colors...by mixing Papericious natural white and lamp black chalk colors.

Did shading by mixing Papericious natural white and lamp black chalk paints..


By using black colour and different stencils gave that swirls n using pink color and icraft rose stencil gave few roses here n there on top part....which I have highlighted with white gel pen
Finally decorated using black stone lace, flowers,pearl, charm and sentiments.
To decorate ribbon bookmark..(Attached with the notebook).I have used cute tiny lock n key metal charm.
Thats all for today..hope you have liked my project
Thank you.
Love n hugs
Daksha

Supplies used:

Papericious


Monochrome double easel card tutorial

Hello! Friends,
Today I am here with my tutorial post using Papericious new release Monochrome paper pack and new 3D chipboards!
I have made double easel card ...and made it with 12"x12" cardstock so when you fold it you get 6"x12" size card with two easels to work..it's a picture heavy post..so  I am not taking more of your time n starting with my pictorial... I have done it on black cardstock..but to give clear picture ...so that you can see clearly initial few steps I have done on white card stock....so here you may follow..


# First you take a 12''x12'' cardstock
#score at 6''
# turn round your card and score at 6'' till the first score line where it meets. 6''x12'' line(shown in picture with pencil lines)


# Now cut this 6'' score line till it meets 12'' line so will have two 6''x6'' part...while cutting please cut 1/16 of paper as shown in picture ..it will help in folding our easels properly.


#Now burnish  score lines properly ( show in picture)

#Now in each 6''x6'' panel make diagonal score lines( shown in picture)

#After scoring each diagonally it will look like this (above picture)
#Now cut two 6''x6'' pieces of card stock  and stick on the half diagonal part ( see picture above)....and our two easel parts ready.Now you can decorate as you wish.Each panel size is 6''x6'' so we can decorate beautifully and the base part is 6''x12''
Here is my double easel card in black cardstock....I have done this card  keeping someone's birthday in my mind ..and I have created a story if you can see..:)


This is  my complete card with top view where you can see how beautifully  both easel parts and base part I have decorated 
straight view of my card.

single easel view- right easel


                                                        Single easel view- left easel  


                                                                        flat folded card view 


thank you for stopping by ...Hope you have liked this..love to see your comments..thank you.
Love n hugs
Daksha

Supplies used:

*Papericious Monochrome paper pack
*3D chipboard
*Papericious lace
*Papericious clear glitter
*Black distress ink
*mulberry and crochet flowers  from my stash
*Sentiment tiles
*Metal charms from my stash
*Stamp images n sentiments
*Vintage girl image