Mini Scrapbook with "Vintage Rosewood" Stack

Hello crafty peeps.
This is NIKKITA and today I am sharing a mini scrapbook I recently made using one of the old collection from PAPERICIOUS "Vintage Rosewood" Stack, I love the soft tones of purple and grey and rose printed papers in this stack.
I made a mini scrapbook to store special memories.


I hope you like my take on this beautiful paper collection.
Do leave some love.

Happy Crafting

LOVE
NIKKI

Trishutter album with the 'Vintage Rosewood' Stack

Hello Everyone!

I'm Manu and I have a old collection featured here in this post which is a collection solely for the vintage lovers!!!! I have always admired folks who play awesomely with the vintage note and had always a little spectical of how my vintage play would come out to be. When I received the 'Vintage Rosewood' paper pack as my DT kit, these papers I thought were perfect to try out something vintage and I totally loved the outcome!

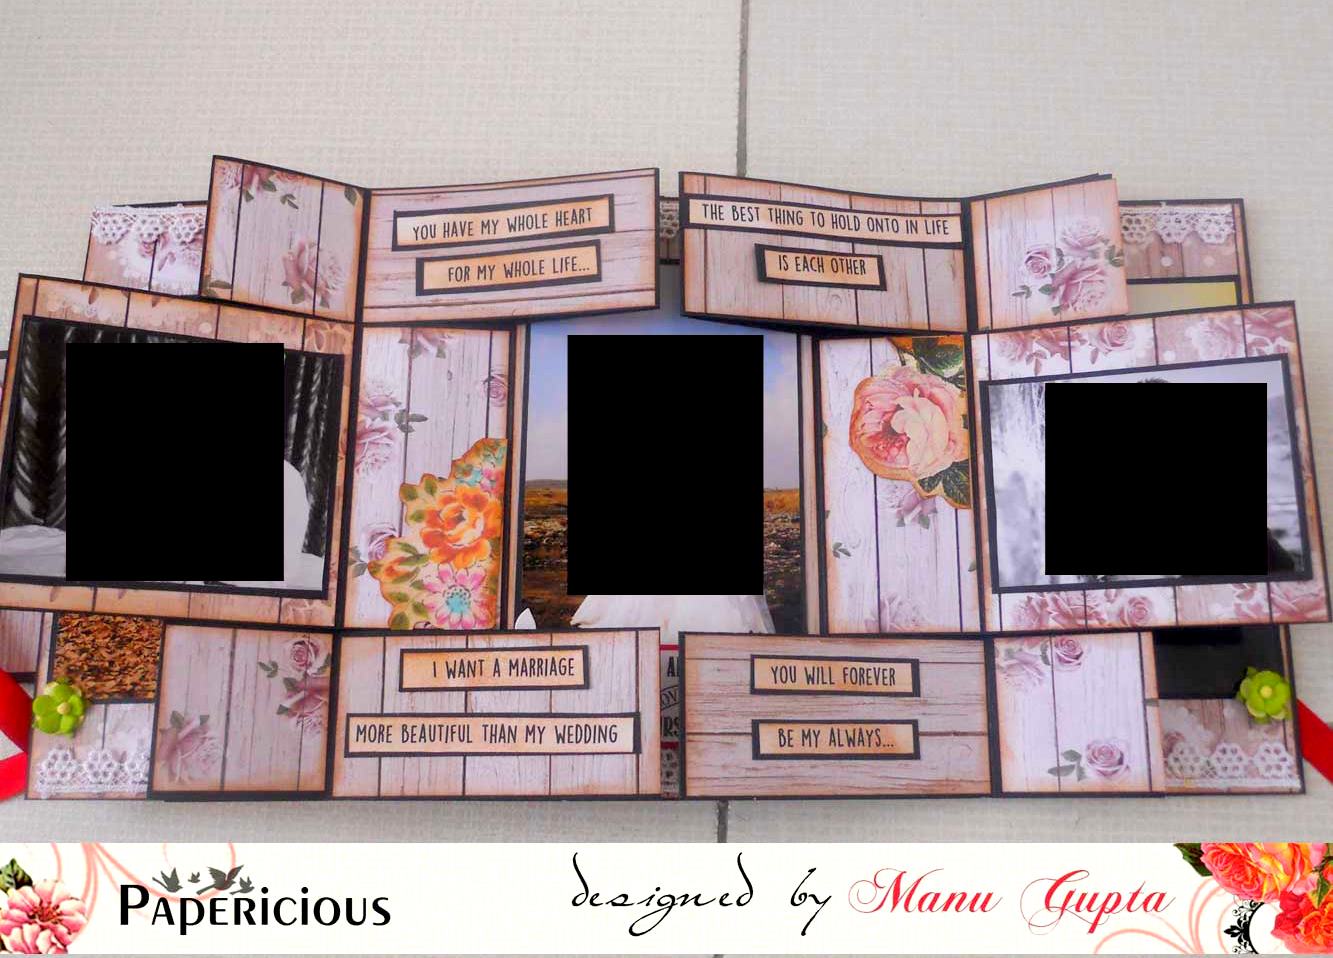
I made a Trishutter Album using this lovely vintage pack and I love trishutters for the sole fact that they look very compact, yet when they open up, it opens up into something very lovely and beautiful!
This one is an 8*8 inches card which opens up to be a 24*8 inches..  

Here's my album!

I loved the way this one had tuned out to be and totally loved the all vintage feel this one!


A closer look at the front panel.


The complete look of the inside of the card


View from various angles!


I hope you must have liked my first official take at the 'Vintage' theme and loved it too!! 
Do let me know your feedback and I would love to take on any queries that you have. 

Happy Crafting!
Manu

Dusk N Dawn, Let's Celebrate with Papericious! ^__^

Hello! Once again it's me Halak and today is about the GORGEOUS Dusk N Dawn paper stack by Papericious.

As you can see, I have made some pretty paper bows and rosettes.

The tutorial is focussed on the paper bows, simply because they are made minus the hassle and the stress of measuring, looping and gluing (well almost!).

Yup, absolutely no need to stress over a glue gun and burn your fingers or go crazy trying to figure out math and measurements!

A cool little bonus tip involving the rosettes is featuring towards the end.

Here we go :

Paper Bows, the Halak way, in 6 easy steps.... (did I mention it's a picture tutorial? Yup... ^__^)

1. First things first, what all will you need?
Paper Bows look pretty because of their shape and so you should never opt for thin paper which can bend them or lead to losing their shape.
Papericious papers are of great quality and quite sturdy. They beautifully hold up shapes and are quite suitable for other 3D projects too!

So, you need 1.5 cm paper strips, a stapler, a small square of paper with tacky tape stuck on it and some glue. (I used the generic Fevicol, a basic pva glue available in India, but you can go crazy and use whichever brand glue suits your fancy!)

Here are my paper strips and tiny tacky tape coated square. (Adhesive backing is not yet peeled off.)

Oh, which paper sheets am I working with from Dawn N Dusk, you ask? These.

2. Okay, so after this here's what we'll do. Take an end of the  strip and make a tiny loop and staple it to secure. Once it's done, trim it and repeat process. Have a look at this pic.

To make a medium sized paper bow, you need 15 such loops... 6 each for two layers and 3 for the final layer.

I made three layered bows but hey,  once again, you can always make more loops and create a bigger bow or instead of 1.5 cm go for 2 cm or 2.5 cm and create a thicker loop.

Tip : When you are done making the 12 loops and securing them with a staple pin, make the last 3 and secure those with pva glue.
Why? Cos, well the last three are in the final layer and I don't want staple pins to be seen!

Here are the 15 loops. (Note that 3 are glued whereas the rest are stapled.)

3. Now, trim the base of the loop a bit.
Why do we do this? Simply because it makes layering them super easy for the bow.
You wanna see a pic? Here you go.

4. After this it's easy. You remember that square? Yes, you remove the backing off that tacky tape and start layering the loops on top of it.

Tip : Remember how we secured loops with staple pins? This method not only saves time but also that makes it easy to position the loops on tacky tape without excessive clinging of adhesive to the paper loop!

So, now our bow looks like this...

5. Now you gotta build the second layer, but you don't need a separate adhesive square. Just cut a piece of tacky tape and add it on the first layer to build the next layer.

6. Last step! Yup, now all you gotta do is add a tiny piece of tacky tape or just squeeze some glue into that tiny space and fit the final 3 loops in there. That's it!

What did I do with the bows I made? ^__^ Packed up a gift for a friend... many more to go, Christmas is coming!!

Ta-dah! What's inside? A book. Which book? Shhh... it's a surprise!

I know I promised a cool tip for paper rosettes too and here it is....

Most people use glue gun to seal their paper rosettes but if you don't have one or are scared of burning away your fingers like me, check this out.

(Also, if you don't have a scoring board, fret not, secure your paper with a tissue tape to the cutting mat, take your metal ruler with a butter knife and score away....)

Yeah... not only did I score the lines with a butter knife, I also punched a pretty edge using a paper punch.

Tip : The greater the scoring distance, the more is the thickness of the rosette.
So let's say you want to make one for a card, then the ideal scoring distance would be to score at an interval of 0.5 or 1cm whereas if you are opting for a wall decor rosette piece which is huge, a scoring distance interval of 1" (one inch) would be perfect!

After this, use the trick that we used while making bows... take a square, stick tacky tape onto it and remove backing. Then, form a rosette and then instead of sealing it with hot glue, just position it on top of that tacky tape square and press it down firmly. Done!

Quick and easy decorations using Papericious papers from Dawn N Dusk!

I also did a couple from the Papericious paper stack Let's Celebrate which is just so perfect for Christmas gifts and decorations! (Oh yeah, decorate the Christmas Tree with these beauties!!)

This festive season, give the store bought stuff a miss and make some handmade happiness!

Till next time dear friends! *Hugs*


Posted via Blogaway

Gifting ideas for Christmas!

Hello, everyone!
This is Hussena and I'm here to share some cool Christmas gifting ideas using our NEW paper pack which was released last month called - Let's Celebrate. I have some Pillow Boxes, Paper Rosettes and a Gift bag to share today, all using this stack. So, let's begin with the inspiration. :)


 I have created two pillow boxes using the papers from the Let's Celebrate. These papers work so perfectly for both, Christmas and Diwali. I had lot of fun making the paper rosettes as embellishments for my pillow boxes and I have shared a few examples above.

After I created these two pillow boxes, I went ahead and created a gift bag using one of the papers from the stack as my central panel. I have also made a flower using this paper. You can check it out in the close up below. I just used Distress ink- Fired Brick and Abandoned Coral and sculpted a 3D flower!


The gift tag is also layered using this paper. This type of bag would work perfectly for any occasion. :)

Hope you enjoyed the projects I had to share today and are inspired to create some of our own using our new paper stack.
If you have any queries, please leave them in the comments below. 

Would love to hear your views on my projects, so do drop me a line.
Have a nice day everyone!

Diwali emotions – A T-light Gift Box and Card


Diwali is a season of love, celebrations, lights and gifting. Today I present to you a product which emboldens all these three essence of Diwali emotions – A T-light Gift Box and Card

Made from Paper, ornated with Papericious -Lets's Celebrate, new collection of pattern paper, the top of the box captures the sparkling feeling of the festival. Use of modeling paste, heat embossing and glitter makes the card stand out. But what truly makes it noticed is the “Celebrate” adhesive button, made by Papericious as part of their collection, and the arty metallic borders and die cuts used on the card.

Inside the card is a box, which can hold 6 T-light candles on one side and a space to keep nice die cut tags of the other. The tags can carry your personal message for the receiver and / or reflection of your nicest moments together. The glitter and metallic borders across the craftily created window inside the card also heightens the spirit of festivities. The window is covered with thick plastic sheet so that one can see the T-lights inside.


 So this Diwali, be different. Instead to routine stuff like sweets, chocolates, give a piece of your creation to your loved ones. Give this “T-Light Gift Box & Card” and see them sighing with awe on your efforts and creativity

Happy Diwali!!!!

Door Hangers with Papericious Adhesive Buttons!


Hello! ^__^

I'm Halak and today I bring to you something that is super fun to make using the AMAZING new release at Papericious, the Adhesive Buttons!

I made.... Door Hangers!

It's my very first time and I was a tad nervous but boy.. I sure am glad to see the way they turned out!

Let's call the orange and black door hanger on the left, DH (Door Hanger) #1 and the one on the right, DH #2.

Here's how I made them :

DH #1

1. I took a sheet of paper from the lovely - Orange Fall paper stack by Papericious and covered my wood base.

2. After that, I decided I wanted to go with the black Adhesive Buttons, so I picked the Be You button pack to work with.

3. Once I decided where to place them, I put them aside and began stenciling to create the background I thought of with a couple of stencils.

Tip : For a texturized look, always opt for more than one stencil.

4. Then, I placed the buttons back on, this time after removing the protective backing and stuck them firmly to the project along with some butterflies and black sequins!

5. I also dug up some black and white stickers from my stash [the word Hope and the tiny design on the black circle are stickers] and added them to DH #1. (Have I told you I absolutely LOVE collecting stickers?)

That's it! Super easy! Check this cool close up pic out!

Now onto DH #2

This is how I did it :

1. The background for this is a lovely sheet from my favorite paper stack... yup, The Vintage Attire by Papericious.

I wanted to make this one for my sibling and she LOVES all things PARIS!
When I think of Paris, don't know why... Vintage Chic is what comes to my mind so that is what I decided to go with.
The Adhesive Buttons are from the Paris button pack.

2. When I looked closely at the buttons, I absolutely loved how the Eiffel Tower images on the buttons had pretty flowers so I inked up some flower stamps in red and added them randomly to the project.

Did you know, Papericious papers are archival safe, acid and lignin free and are FANTASTIC for stamping on and even color blending! ^__^

3. Once the flowers were stamped, I stamped a nice sentiment cos well... let's face it, all siblings are pretty awesome! (No matter how much we fight with them most of the times! LOL)

4. Again, just like how I did it for DH #1, similarly, I took a couple of stencils with my Papericious Blending Tool (Circle) and began stenciling to my heart's content.

5. I cut up some leaves from My Golden Garden embellishment sheet and stuck them to the project followed by the buttons. I also scattered a couple of tiny black leaves in the background.

6. Lastly, punched out a few green butterflies, glued them to the project and gave them a matching rhinestone center.

And it's done! Here's another close up.

I had so much fun working with these buttons.... and my sibling was absolutely stoked with the fact that I made one for her in her favorite theme.

She was seen showing it off around the house. Here's her door....

Till next time dear friends! ^__^ Have a lovely day! *HUGS*


Posted via Blogaway
Gift boxes

Hello Crafty peeps
Papericious is back with  new festive collection of pattern papers "LET'S CELEBRATE" perfect for making gift boxes and bags specially keeping in mind the upcoming festivals , these come in shades of red and green.
I have made few gift boxes perfect for gifting chocolates and sweets .


Papericious papers are acid free and are available in various sizes you can select as per your convenience.
I loved making these cute gift boxes you can make paper bags as well.

Do leave some love

Happy Crafting 
Love