Papericious 3D Shaker Heart with Indie Chic

11:00 am Artforte 1 Comments

Hello Dear Friends,
Shalini Pahwa here,
It's time now - to sing out; Tho' the story never ends
Let's celebrate; Remember a year in the life of friends

The above lyrics from a song from the Broadway Musical “Rent” captures the human emotions of Autumn. There is something about the Autumn season that is magically romantic. Trees bursting into hues of red-gold -orange, the weather getting cooler, the nights drawing in, birds chirping everywhere and a sense of energy in the air. Autumn is the season of love.

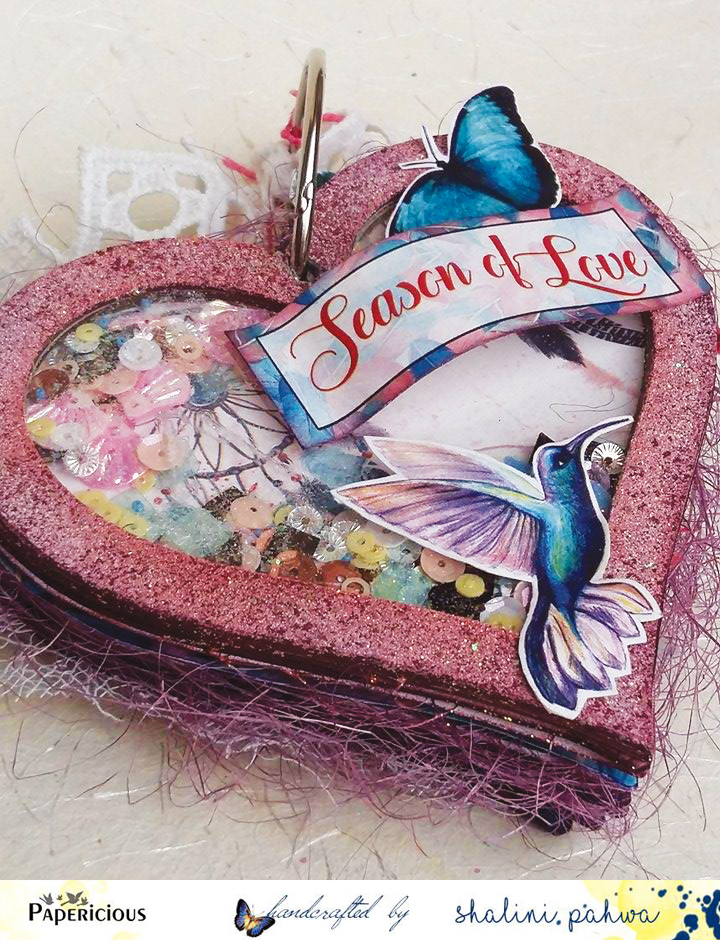
To celebrate this lovely weather and the nature’s cycle and message to “Let go and release the negativity of our lives”, I present to you a lovely mini album appropriately titled “The Season of Love” using Indie Chic Collection and 3D shaker Chippis.


Products Used:


Don't forget to participate at Papericious July Challenge-Tic-Tac-Toe
The last date for submission of your projects is 9th  August, 2017 at 11:55pm IST.

I hope you all will love my work and 
would like to hear your words.

Have A Nice Day!!!

1 comments:

Step Fold Card using Indie Chic Collection | Tutorial

12:04 pm Ujjwal 3 Comments

Hello,

This is Ujjwal and I am showcasing the mesmerizing Indie Chic Papers through this step fold card that I created. I also have a step by step photo tutorial on how to make it, so I hope you enjoy making your own.


The papers in the Indie Chic collection are so vibrant and pretty. The color palette is unique and beautiful and I had the most fun creating this project.


Tutorial for Step Fold Card


Step 1: Use the coordinated 12" X 12" cardstock available in the collection and cut two pieces of size 12"X6"


Step 2: Score one piece of 12"X6" at 6" on the longer side, such that when you fold it, it becomes a 6"X6" card base.


Step 3: Cut the other piece of 12'X6" at 9.5" and score the 6"X9.5"cardstock at 1.5", 3", 6", 9"


Step 4: Reinforce the folds and adhere the two pieces together as shown in the picture. It will now become a long piece folded piece measuring 6" X 21"


Step 5: Pick 2 pieces of pattern papers from the Indie Chic Collection and cut matting papers for the card keeping a 1/8th margin on all subsequent layers. Exact measurements are mentioned in the image.


Step 6: Using a distressing tool or the edge of your scissors, lightly distress the edges of the pattern papers.


Step 7: Fussy cut the journaling sheet and the element sheet to create your unique, coordinating embellishments.


Step 8: Add the beautiful Crystal Clear Glitter to make the embellishments shine.


And then just put all the elements together to finish the card. I also used some doilies, Papericious Jute cord and some silver thread to add accents.


Love, Ujjwal
Supplies Used

Glitter - Crystal Clear - by Rajni Chawla


Papericious Indie Chic Paper Pack


Ink Blending Tools - Rectangular


Jute Cord - Rose Pink


3 comments:

Indie Chic card

11:00 am Monia - Monika Jakubowska 2 Comments

Hello, Monika here.
Today I would like to show you a card made with Indie Chic papers.


Indie Chis is a collection full of colours, so I made a card with an unusual colour combo.


At the bottom of my floral cluster I adhered piece of Moroccan latice chipboard painted turquoise and  I made some light turquoise flowers with Sigma cardstock, added chipboards painted white: Leaves chipboards and Leaf flourish chipboards; lace leaves and some turquiose cord. To make flowers sparkling I used fabulous Frosting Powder.


Papericious products used:
Indie Chic Premium Edition
Moroccan latice chipboard
Sigma cardstock
Leaves collage chipboard
Frosting powder
Leaf flourish collage chipboard

I hope you like my inspiration :)
Have a great day!

2 comments:

Father & Son Layout Using Azealian Papers

11:00 am Erum Tasneem 7 Comments

Father and Son layout made using Azealian papers by Papericious - Handmade by Erum Tasneem - @pr0digy0
Hello everyone!
Erum here with you today.
I have another LO to share with you using the Azealian papers.
I thought I'd focus on the themed chipboard called Gentleman this time therefore used my brother and his son's photo for my LO.
Father and Son layout made using Azealian papers by Papericious - Handmade by Erum Tasneem - @pr0digy0
I started with watercolour paper as my base. Added a very diluted black and yellow distress stain as my watercolour. After it was dry, I added black splatters.
I placed all my main elements to know where I should add more watercolour and splatters. Even after adding watercolour, my background was lacking something so I stamped some horizontal stripes, stars and dotted border using Altenew's Basic Borders stamp set.
Father and Son layout made using Azealian papers by Papericious - Handmade by Erum Tasneem - @pr0digy0
I stamped more sentiments on to the background that went with the look and theme.
These stamps are from Kaisercraft. The numerical background stamp is by Hero Arts.
After I was done building my background, I started to add my layers on to foam tape.
Also, the glossy hexagons you see in the above photo are the negatives that I used from the Honeycomb Collage chipboard element.
Father and Son layout made using Azealian papers by Papericious - Handmade by Erum Tasneem - @pr0digy0
I inked all my chippies using distress stains. For the Gears chippies, I added silver heat embossing on some parts to give it a gritty look.
Father and Son layout made using Azealian papers by Papericious - Handmade by Erum Tasneem - @pr0digy0
I used the same technique on Honeycomb Collage chippies as well.
You can see I left one negative piece intact and added glossy accent on it, just to add a bit of interest.
Father and Son layout made using Azealian papers by Papericious - Handmade by Erum Tasneem - @pr0digy0
More glossy goodness from the themed chippies set called Gentleman.
Father and Son layout made using Azealian papers by Papericious - Handmade by Erum Tasneem - @pr0digy0
I hope you liked my layout. I only used three types of chippies and four designs of papers to build my LO.
I am having tons of fun making these!
That is all for today. If you have any questions please feel free to ask in the comments.
-Erum
Supplies used:


7 comments: