Gift Favours ft. Papericious 'The Flickers'
Hello friends!
I am Parita Galani from Mystic Hue. Hope you all are doing great with your quarantine time. Lets use this time to fullest by crafting new creative things. Today I am going to teach you three different gifting items. We will go by step by step tutorial to create this items using Papericious: The Flickers - Designer Foiled Paper Pack.
So let's have a look:


Tutorial : Mini Slider Treat Box
How cute is beautiful box to gift all your pretty little things. Below are the steps to make it:
Step 1: Wrap of the box - Take a piece of paper measuring 6 5/'8" by 4 1/16". Align it to scoreboard as shown in picture or you you can directly score it with scoring tool as well, score at 1/2", 2", 3 9/16" and 5 1/16".

Step 2: Base of the box - Now take another piece of paper measuring 9' by 6 1/2". Score it at 1" and 2 1/2" on all sides.

Step 3: Now cut the sides from all sides as shown in the image below.
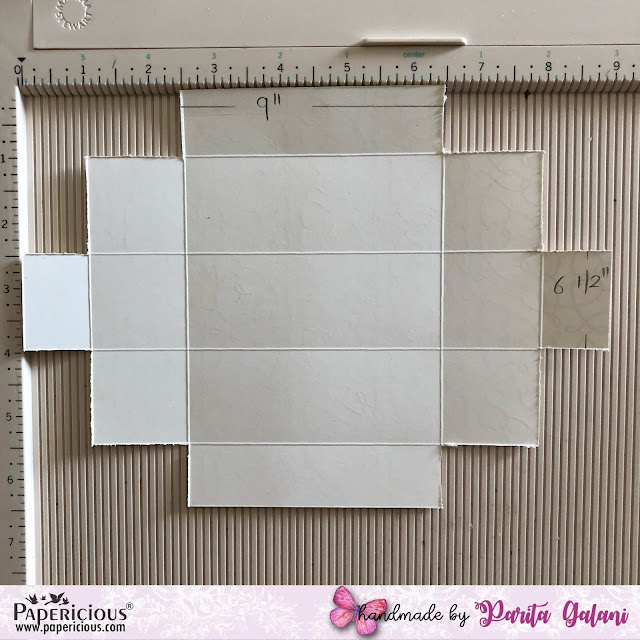
Step 4: After cutting, fold all the score line properly. I have shown different color marker to show you how to assemble the box. Firstly apply glue on the back side where pink star is shown and stick it to the blue dotted line. Than apply glue on the whole side where green star is shown and stick it on the inside.

Step 5: Now take Wrap of the box paper, fold it in a way to make square, apply the glue on the 1/2" side and stick were the ends meet.

Step 6: Lastly I have taken embellishments from Die Cut Embellishment Sheets & Cut and Create Embellishment Sheets. Your gift is now all ready to be filled it.
Tutorial 2: Gift Card Envelope
How we present our gifts matter a lot. For all those who loves to gift simple things in style, a cute little envelope to gift Gift cards.
Step 1: I have used Envelope Punch Board to make this cute little envelope. Take a 5 1/2" by 5 1/2" paper and score it at 2", then turn it to 90 degrees and score at 2.5", then again rotate at 90 degrees. Score at 2", and lastly rotate and score at 2.5". Cut off the area shaded.

Step 2: Cut the shaded area. Firstly fold in two small sides on the inside, than apply glue on the side we cut off the shaded area and stick.

Step 3 - Use choice of your embellishments on the front side and also at the back closure. It's all in the details.

Tutorial 3: 3D Card
Step 1: Take a piece of Patterned Paper measuring 7.5" by 6". Score it at 3.5" and 4 1/16". Take two pieces of Patterned Paper sized 3.5" and one strip of 1/2". Stick all of them on the on plain side of the Patterned Paper we have taken.

Step 2: Take another piece of paper measuring 5.5" by 3 1/4". Score it at 1/2", 1", 4.5", and 5". Cut the shaded area and fold the score part on inside and our 3D pocket to hold the chocolate is ready. Glue it on the three sides and stick it to the right side of the card.

Step 3: Now we decorate the card with beautiful Die Cut Embellishments. One side of the card will hold a chocolate and a place to include any message you'd like, and you can stick a photograph on the other side.

Supplies Used:


I hope you all enjoyed this tutorial.
Be safe!
Keep Crafting!
Best regards,
Parita K Galani