Hi! I'm Halak and today I'm going to be talking about one of the accessories that come with the PapericiousPlanners, the stickers!
With the ColorSplash planner kit, you get 5 sticker sheets.
Out of the 5 sheets, 4 sheets are co-ordinating set of icons, tags etc. that beautifully match the planner colors.
The 5th sheet is a sheet consisting of fun words in different fonts that enable the planner user to add a special touch to happy occasions.
You can view the co-ordinating sheets above and here's a picture of the 5th sticker sheet :
Okay, so the next question... what do I do with these stickers? Do I need anything more before I sit to start jotting down stuff in my planner?
To be honest, apart from the stickers in the PapericiousPlannerKit, you don't really need to purchase additional stickers.
All I did was dug up some colorful stickers, washi tape, some colorful plastic tags and ribbon from my stash.
I did purchase the pen though, just bought one that has 7 colorful refills in it.
Check it out :
So with all the materials I needed to jazz up my planner, I sat down to do some planning.
Here's the first page :
Oh yeah, lol... read up the deets of my life, you know you want to!
But on a serious note, notice the small birthday present sticker when I wrote down about birthdays, and similarly, the checklist sticker when I was talking about stuff I want to learn or be better at!
(Also put down a shopping cart sticker for the part where I put down what I wanted to purchase.)
Here is an Icon sticker break-up for better understanding :
I will also be showing you how I planned this ongoing week in my planner where you can see how stickers are used but before that, let's check out some top tips.
TopTipsforPlanners :
1. Don't go crazy purchasing stickers, an additional pack or two is okay, but really, the Papericious Planner kit has all the stickers you will need.
2. Try not to over-embellish your planner pages, the aim is to decorate it lightly so that checking out the things-to-do does not seem plain and boring.
3. If you purchase stickers, do not opt for thick chunky ones. Remember, when it comes to planners, less is more, so the flatter the stickers, the better.
4. Papericious stickers are of excellent quality, have good adhesive, bond well with paper and are easily removable from the backing sheet, however the local stickers I purchased did not have good adhesive.
So, if you purchase stickers locally which are of no-so-good quality, use a little glue on them before you stick them down. That way they will stay put.
Here's my current week, you can see how I used stickers here and get an idea. I like to plan on sunday for the entire week and keep ticking off items as I finish them but really, it's upto you on how you use your planner as long as it helps you keep a track of things!
I hope this post was informative and helped you gain a little insight and information with respect to the stickers and their usage in planners!
Hello everyone,
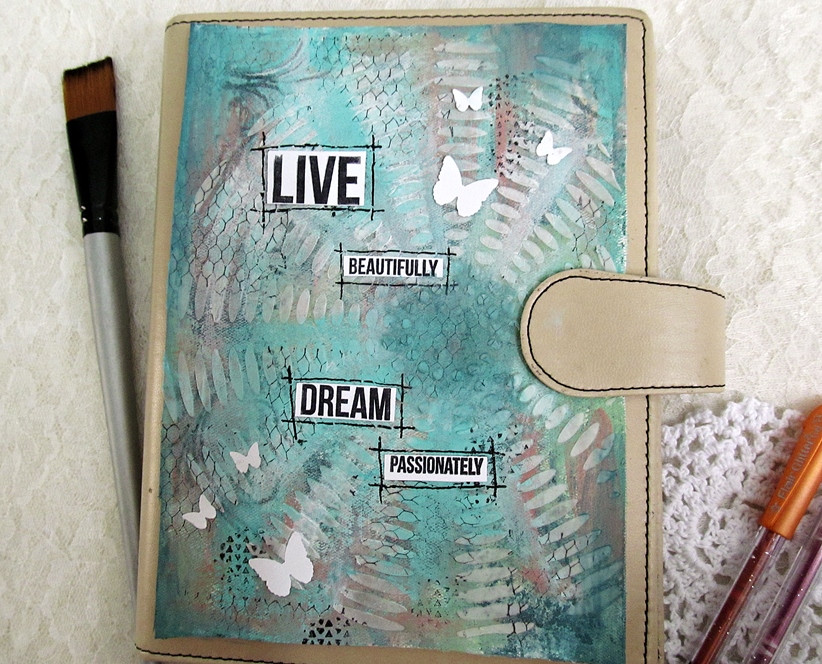
its kavitha here today to show the cover customization for retro chic planner .You must have got an insight of the planner contents from Hussena's post,its in my favorite color teal n subtle vintage touch..So i decided to replicate the feel of the planner in my cover and wanted to keep it simple and user friendly as this is something that i am going to use it everyday.Now its not my cup of tea to keep it simple,but i tried my best not to add any embellishments and created layers only with colors and modelling paste.
I have used canvas cloth to work on,added layers of Deco art fluid acrylics in shades of teal,sage green n coral.After i got the desired shades i used a decoart large stencil and modelling paste.Added some highlights using white paint and did some random stamping.
The words are from kasiercraft stamp,which made real sense to my current mindset,true words to live by.Everything starts with a dream,hope you too can make some of your dreams come true this year with our beautiful planner:).
You would have gone through the post of Manu regarding this
lovely product launched by Papericious – The 2016 Planner-Colour Splash. Manu in her unique,
clear and unambiguous description has highlighted the numerous uses of this
Planner. Great work Manu. Today I give you one more compelling reason to not
only own this delightful product but also show your own creativity to make the
Planner reflect yourself and make your desk stand out with your imaginations.
Today I give this Planner an Arty Twist.
I have created the cover of the Planner into a reflection of
your inspirations, your dreams and your journey as you go through the days and
weeks of 2016.
The fairy wings, impressions of butterfly,butterflies embellishments , impressions of leaves amidst an array of vibrant colours, would
inspire you to go through the journey of 2016 fulfilling your dreams and
achievements.
This cover is created using modeling paste, flutterfly and moving leaf stencil, fairy wings and butterfly embellishments and flying butterflies
made of jute. Using shimmers spray, mica powders, lindy's spray, glass glitter, flakes, I have tried to reflect my
impressions of the year to come – lively, vivacious, exciting and dreamy. I am
sure you would also create this planner using the Papercious 2016 planner,
reflecting your creative impressions and motivate you to go through 2016 –
alive and partying!!!!
Happy journey into your
2016 Dreams with Papercious Planner.
This is Hussena here and today I am sharing with you all the first look and all the details of the newly launched Retro Chic Planner.
A few days ago a good friend and fellow blogger Arjita did a short video of the unboxing of this planner where she has shown what you can expect when you purchase this planner kit. Her video is very crisp and clear about the contents of the planner and she shares some tips too on how she plans to use it. I would definitely urge you to check out her video HERE
Having said this let's begin by seeing what this planner looks like and what accessories you get with it.This is a picture heavy post so please be patient with it :)
This is how the planner looks like, it's a light beige in color and quite big in size .The outer cover is really soft and it handles quite well.
You get 4 pack of accessories with this planner and it includes 2 Stickers sheets, one Hole-Guard sheet and oneJournal sheets pack.
When you open the planner there is a side pocket on the right hand side to keep all your accessories like die cuts, tags, bookmarks and even these stickers sheets. The left hand side is the side with the journal cover or the first page insert.
Next is the monthly planner page which gives a overview of the entire month.This entire planner is meant for 6 months only and the best part is you can start using the planner from any month of the year as there are no dates given. You can customise the month and dates according to your personal preference.
There is a "Things to accomplish" page where you can jot down your monthly or yearly goals too.
These are the weekly pages, each month has 4 weekly pages done in the beautiful vintage style.
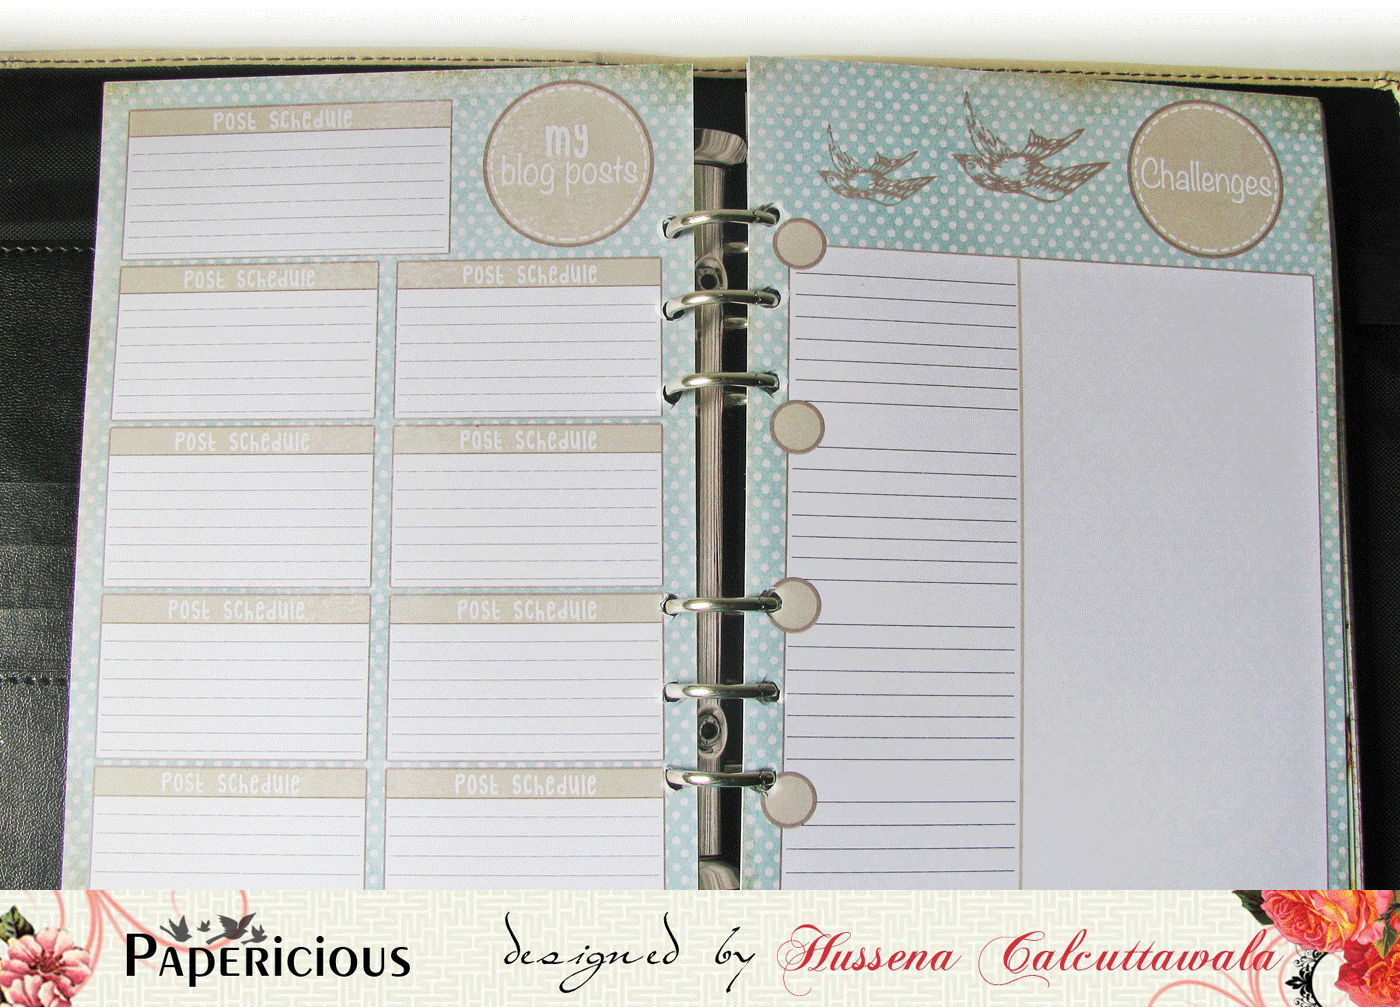
This is the monthly blog schedule page and also a page to note down all the challenges that are taking place in the blogland. This page is a boon to all the bloggers as it will really help you to keep track of all your scheduled posts as well as help you remember the current challenges in which you might want to participate.
This is a monthly notes page where you can write down notes of how your month was and what you have accomplished in that particular month ...On the other hand, it can also be used to jot down your favorite memory or even your favorite recipe too. The sky is the limit :)
This is the last page of the journal and on the left hand side there is a pen holder to help keep a pen with you at all times.
Now, here's a look at how I have started to use this planner. I am still in the basic stage of using it and will be including a lot of details in my second post in the meantime here's how I have started decorating the insides of it.
I have put some die-cuts and sticker sheets on the left hand side pocket and created my own cover page on the left hand side by using the pattern paper from the recently released If Only collection.
Here I have marked a few of the important dates for the month of February.
The important days for the first and second week of february which I have highlighted using some stamping and doodling.
The page for blog schedule and challenges :
As you can see, I have just started using this planner and I have still to fully use it, but I promise in my second post I will share with you more ideas on how to decorate the insides of your pages using the stickers in this planner kit.
Hope you all enjoyed the overview of this planner and have got a general idea on how this planner looks when you purchase it.
My team mate Manu has done an awesome post and video on the how the Color Splash Planner looks like and how she has been using it. Hope you have checked it out. Also stay tuned as my other teamies has a lot more information to share on how to use these planner !
Manu here, and my post today is all about the January 2016 release from Papericious which is none other than the much awaited PLANNERS!!! What more, the planner has 2 styles!!! One is a very colorful Color splash and the other is a heaven for Vintage lovers, called Retro Chic !
Planners is the new found interest everywhere and what better way to plan and keep track of all the important things than the planner! It really helps to keep all things at one place and I know this for sure since I had been using a planner (a printable from the internet, which I'll also show in the video) since november 2015 and it really helped me in keeping a track of my To-do's and I also used to jot down a few memories, anything that happened which would be worth visiting over again. With multi tasking, I was kind of forgetting things to do and using the planner was kind of a boon to me!! I owe a lot to this.
I'am going to show you the planner in action, there are 2 video's. I had taken the first video which is a complete picture of how the color splash planner looks like and what all accessories comes with it. This was taken before I started working on the planner when I received it around mid Jan.
The other video captures how I have used my planner to keep track of the stuff I want to remember and my day to day professional and my routine! (I had started designing the same as soon as I shot the first video, it's exciting to set up the planner and I had seen numerous posts off the internet on how to plan !! So, I had in mind the way I wanted to set it all up! ). I have also made some additions to the planner as per my plan of setting up the planner, you can see those in the video and the pictures below too!
Checkout the first view of the planner here :
Here's the video of the planner in action !!!
( Sorry about my voice, I'm down with a little cold and cough !! )
I also have pictures of each page in the planner to see how and what goes where!!
There are a lot of pics, so sit back and enjoy!!!
This is the color splash planner, I love the pastel pink shade it has and I did purchase some writing accessories to go along. Some coloured pens and a few neon tape rolls, that I thought would blend perfectly with the planners!
I have kept all the planner accessories on the left behind the pocket for easy access. I also make 2 bookmarks with the journal cards that comes with the planner.
Here's a pic with the complete planner accessories !! I love this planner for its very colorful and vibrant!!
Now, here are some additions that I made for my planner! Since the planner did not had additional pages so I added a few pages, this one is the Vellum sheet that I added as per the planner measurement, and embossed some nice quotes!! These quotes are from the technique tuesday stamps!
I also added this sheet on the right from another papericious paper stack (color conceptions) and the journal card is from a simple stories pack!
Now this is the back of the extra A5 papericious sheet that I added and I had decided to use this blank page for the introduction. Since there was no page which indicated that 'this planner belongs to' I added these 2 sheets to utilize the area!
I stamped a few quotes along with my handwritten quotes and some washi tape to make it look brighter and in sync with the color splash theme of the planner! the stamps are from one of the Heidi Swapp stamp sets!
The Bee awesome is a printable that I had from long ago and this went very well with my planner!
I wanted to keep a few goals and resolutions I had for this new year 2016(we all make those resolutions, right), but I wanted to keep remembering it everytime I worked on the planner and there's no better way to jot them down and keep seeing them!!! The planner does have a year goals page (which is consistent for all months, but then I used the first one for the year goals and the rest, I'll be using for the monthly goals.
I also added a small panel here from another journal collection to jot down things I love doing!!
That's the year 2016 goals page that comes along with the planner! Still not complete, coz there are always more ways to plan and learn.
This is the monthly insert and I have used a couple of stamps, some washi tape to make it look more brighter and eye catching!! the best thing about these planners are that they come undated, so you can start wherever and whenever you wish to!
This is the weekly page!! I started off using the planner for FEB and have clear defined work to do this week. The slots for next week are partially filled, but I do have a pic for the same too!
Since there was ample of space to write down for each day. I divided my space in 2 halfs, to keep my personal and professional work apart and not mix them! (I know I mixed it all up here, but that's what I'm gonna remember in the future to keep them seperate) I also plan to use the right hand side of each day for keeping track of the shopping list that I have! so this basically serves the purpose of 'No shopping/Notes column' with the color splash planner (I know there's one in the Retro Chic planner)
Here's a closer look at the weekly page!
The whole Idea of using the planner is to be organized and keep track of the things to do, but that does not mean that you need to do it the mundane way!! Do it the BRIGHT and the COLOURFUL way!!!
This is my next week and you can see that I have it partially filled, but it's soon gonna get it's share!!
The Blogpost page is the one where I keep track of the blog posts that I need to do for my own blog and for the design teams that I'm a member of!! So I have the dates on which my posts is scheduled along with a little hint of what the post will be all about!
This is the complete COLOR SPLASH planner kit and I must say that this one is very colorful with bright and cheery colors!
I do hope you all will be inspired to use planners henceforth for planning out stuff and keeping track of the things!! I know it can be a tiring thought to think about the stuff to do and then jot it down also, but give it a try, this seems a little difficult at first, but just about 10 mins of daily planning can help you do a lot of things at proper times and save you from untimed hassles!!!
Be sure to get back to this space, we will have more inspiration from our DT members soon with their take on the planners and it's all about planners this month. With lots of inspiration and reading I'm sure you will love it all!!
Papericious is a vision started as a result of lack of craft supplies in India. This MADE IN INDIA production was started to provide craft supplies at affordable prices and best quality to all the international craft market. Starting from Scrapbook Papers, we have made beautiful Chipboards, Laces, Fabric Flowers, Art Mediums, Die Cuts, Stickers, Planner Kits etc. This journey is just 3 years old but has many many miles to go. Stay tuned with us, we have a lot surprises to pamper your crafting needs