Friday, 28 December 2018

Decoupaged Desk Organizer


Hello people!
Chirali here with the Decoupage Project with the new Decoupage Paper Collection of Papericious. They are very very beautiful and you will find the exact corresponding Chalk Paints to the papers too in the store. Isn't it amazing?
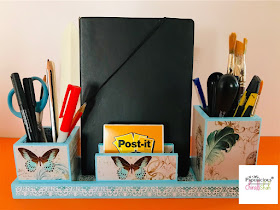
I have decoupaged on the Papericious Desk Organiser using Fly Away Decoupage Papers and French Blue Chalk Paint.
Here it is:

It looks lovely when filled with stationary. One can use it to store makeup supplies or craft supplies or anything.  
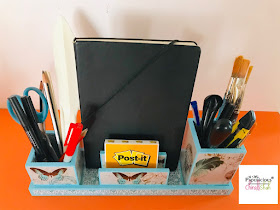
Side look:
Due to decoupage, longevity of the product becomes very high. It can be cleaned easily too.
I hope you liked the post.
Thanks for stopping by.
Hugs,
Chirali :)

Supplies used:


Thursday, 27 December 2018

Envelope Tutorial using Decoupage Papers by Nikkita


 Hello everyone, 
This is Nikkita and it's time to bid goodbye to 2018 and welcome 2019 with celebrations and fun. Today, I am back with a quick tutorial on  Envelope with a belly band. It's a picture-heavy post!
ENVELOPE with a Belly-Band

TUTORIAL
You will need Cardstock, Pattern Papers/Decoupage Papers and Embellishments.
STEP 1- Take a piece of cardstock measuring 8 x 7.75 inches, score on the 8 inch side at 1/2" and 7 1/2". 
Turn 90 degrees, i.e on 7.75 inch side, and score at 1" and 4 1/2".

STEP 2- For the belly-band, take a strip of 2 X 8 inches, and score on the longer side at 3 1/2 ", 3.75",  7.2", 7.5".

STEP 3 - Remove the top corners and last corner sides from the envelope as shown in the picture below, then add tacky tape or glue and stick them together to create the envelope base.
For the belly- band, apply tape or glue to the 1/2 inch area and create a band. 

STEP 4 - Finish the envelope by decorating it using Decoupage Papers or Pattern Papers as you like.
I loved working with Decoupage Papers as they are very easy to use and you can use it in many ways from making Decoupage projects to scrapbooking.
ENVELOPE BASE
BELLY- BAND
FRONT

BACK

CLEAN ENVELOPES WITH BELLY -BAND


SUPPLIES USED
:
OFTEN 12" X 12" Paper Pack


BLACK CARDSTOCK

 Hope this quick tutorial inspires you to make not one but many envelopes for yourself /gifting.
Do leave some love.
HAPPY CRAFTING
LOVE,
NIKKITA

Wednesday, 26 December 2018

Clean and Simple Coasters with Papericious Decoupage Papers


Hello Girls!
Parul here! Hope you are having good time with all the festivity going around.  Personally, I love this season all thanks its to pleasant weather, warm desserts and cheerful atmosphere everywhere.
Alright, let's talk work now! I am all card making person and have never done Decoupage. And when I received these absolutely gorgeous Decoupage Papers in my DT kit I had no idea of what will I make with them.
And then I thought there is always a first time for everything. So gave it a try. And what better than coasters to start with :)
I was hoarding these coasters since like forever. Finally I put them to some use. 
I planned to make a set of 6 coasters 2 in teal + 2 in grey + 2 combination of both. 
I took one Decoupage Paper each from Fly Away and The Queen set and cut out squares from them.
I applied a coat of decoupage glue on on the coaster and then adhered the paper on it. To seal it further I applied 3 coats of Matte Finish Glue on top of paper. For two combination coasters, I cut out a smaller square and adhered it diagonally.
Kept them for drying and pressed with a thick book to get them straight. 
And thats all!  My set of 6 coasters was ready :)

Here is a top view of these coasters.

Hope you liked these. Please tell me in comments.

Love,
Parul
Supplies Used :

Monday, 24 December 2018

Christmas Cards using Decoupage Papers


Hello everyone,
Priya this side from Palchin Creation
Wishing you all Merry Christmas and Best Wishes for a Happy New Year!
Today I'm sharing a step by step tutorial of Christmas cards which I made using Papericious newly launched Decoupage Papers!

Here it is, enjoy!


Some close-ups:


Here is the step by step tutorial:

I hope you all like it
Thanks for stopping by :)
Love,
Priya

Supplies Used :


Saturday, 22 December 2018

A Colourful Card using Fleur Fun


Hi there everyone!
Erum here today with a very bright, colourful, floral, card to share.

I have used papers from Fleur Fun Paper Pack. I picked out the yellow polka dots paper from the 6x6 pack. I tore it off instead of cutting it to give it a more distressed feel. 

Next, I worked on the background. First I heat embossed with clear embossing powder and then added watercolour to it using pink, orange, yellow, and a bit of green. Then I wiped it off with a slightly damp tissue so that the clear embossing is visible.
Next, I adhered the polka dotted piece onto the background with foam tape then tucked in some mesh. After this, I assembled the floral elements and then added a lot of paint splatters to give it a more grungy look.

I used the Natural White Chalk Paint to paint over the Pattern Chippis. As soon as that was dry, I coloured it pink to balance my flowers. I tucked these under the polka dotted panel as well. To this, I added a few splatters of Natural WHite CHalk Paint mixed with yellow paint.
To finish off, I stamped a sentiment and cut it in a fishtail banner and then adhered a couple of butterflies.
There is a lot of texture on this card and I love how it turned out, floral yet grungy.

I hope you liked my cheerful, colourful, card!
See you soon!


Papericious Journal Cover Page


Hello people!

Chirali here with the very instant journal cover page, and yes, this beautiful high quality Journal is the product from Papericious. It has such a thick sheets inside that you won't get creases after journaling with colours etc, which you would usually find in normal ones

So here is mine:

I created layers from Fleur Fun Papers, added a sentiment and one of the Abstract Chipboard (painted with Soft Rock Chalk Paint and added Twinkling Spark) and at last, added fussy cut flowers and butterflies from the pack.
The inside look!
Some close-ups: 


I hope you liked the cover of the Journal.
Thanks for stopping by.

Hugs,
Chirali :)

Supplies Used: